This view allows adding Identity Providers to the STAGE system. Instead of STAGE validating a user’s identity, STAGE uses one or more external Identity Provider services that provide user authentication for STAGE. In this scenario, STAGE does not store passwords or provide a 2-factor authentication mechanism for these users as this part is externalized by the Identity Provider for them.
STAGE shares information with the Identity Provider. However, there are a number of different Identity Providers that are supported and the way you need to configure the Identity Provider will be different and the way users are stored in a given Identity Provider will also be different from one to the next. In all cases, STAGE uses SAML v2.0 to communicate with the Identity Provider. This is an advanced configuration task that requires an in-depth knowledge of your Identity Provider’s configuration and operation.
At minimum, STAGE always maintains the Admin account which cannot be deleted, so that access to the STAGE configuration remains available at all times. This ensures that should the connection to an identity provider become disrupted, access to configure STAGE configuration remains available, by the STAGE system administrator.
PREREQUISITE: These configuration procedures can only be carried out by an experienced administrator of your Identity Provider service.
Overview
Failed to load the diagram preview image.
Authentication Required
Page ID: 800457045
User Management - Identity Provider
The DETAILS section on the right can be expanded/collapsed by clicking on the left
Using the Identity Providers view
Adding an Identity Provider
To add an Identity Provider, you must set the connection details from the Identity Provider, and then provide STAGE’s connection details to the Identity Provider. The procedure below makes reference to Keycloak as an example of an Identity Provider. The Identity Provider you use will be similar, but not the same.
-
Click
-
Select the
SAML 2.0interface. -
In the Identity Provider Details section in the Setup tab, enter a Name and an Alias for the identity provider. See section #Identity-Provider-Configuration.
-
Import the SAML 2 connection details using one of the following methods:
-
From a URL:
-
Select the Import from URL option to import the Identity Provider’s connection information from a URL supplied by the Identity Provider.
-
Enter the URL to the Identity Provider’s XML metadata in Metadata URL. This URL comes from the Identity Provider’s configuration. For example, with Keycloak, this is found under Realm settings, Endpoints. Refer to your identity provider’s documentation.
-
Click

-
-
From an XML file:
-
From your Identity Provider’s configuration, save the connection metadata as an XML file to your PC. This XML file comes from the Identity Provider’s configuration. For example, with Keycloak, this is found under Realm settings, Endpoints. Refer to your identity provider’s documentation.
-
Select the Import from XML option to import the Identity Provider’s connection information from an XML file supplied by the Identity Provider.
-
Click

-
Select the XML file on your computer that has the Identity Provider’s connection metadata.
-
Click

-
-
By manually entering the connection details:
-
Select the Manual Setup option where you have to configure the Identity Provider’s connection details.
-
Click

-
In the Connection tab, enter the relevant connection information about the Identity Provider in all fields. See section #Connection-Tab.
-
Click
-
-
-
In the Setup tab, click

-
In the Setup tab, the Status should become Enabled.
-
Export STAGE’s Identity Provider SAML 2.0 metadata XML file to your PC: Click Export to File in the Setup tab.
-
The Identity Provider needs STAGE’s SAML Metadata to make the connection between STAGE and the Identity Provider complete. In your Identity Provider’s configuration, import a client:
-
In the Identity Provider’s client list, import a new client.
-
Browse for STAGE’s SAML 2.0 metadata XML file (resource file).
-
Click Save.
-
STAGE is added as a client in your Identity Provider under the name you defined in step #3 above.
-
In your Identity Provider’s configuration for the STAGE connection, add mappers for certain STAGE client properties. For example, in your Identity Provider, you need to add mapping for email, givenName,surname, and username.
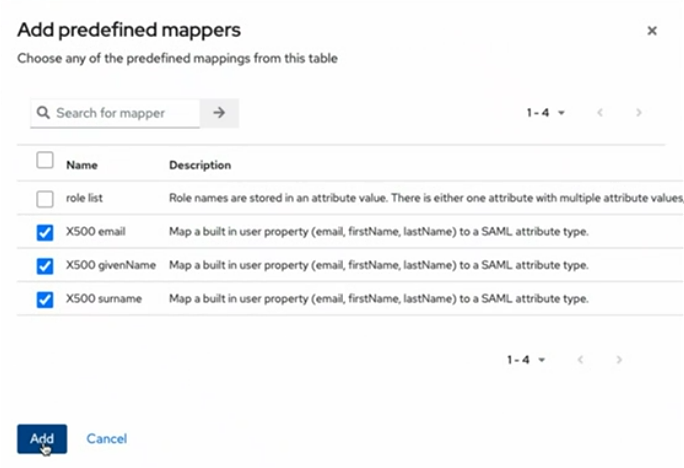
Example mappers created in Keycloak
-
In Keycloak for example, the mapper type to use for username is User Attribute For NameID.
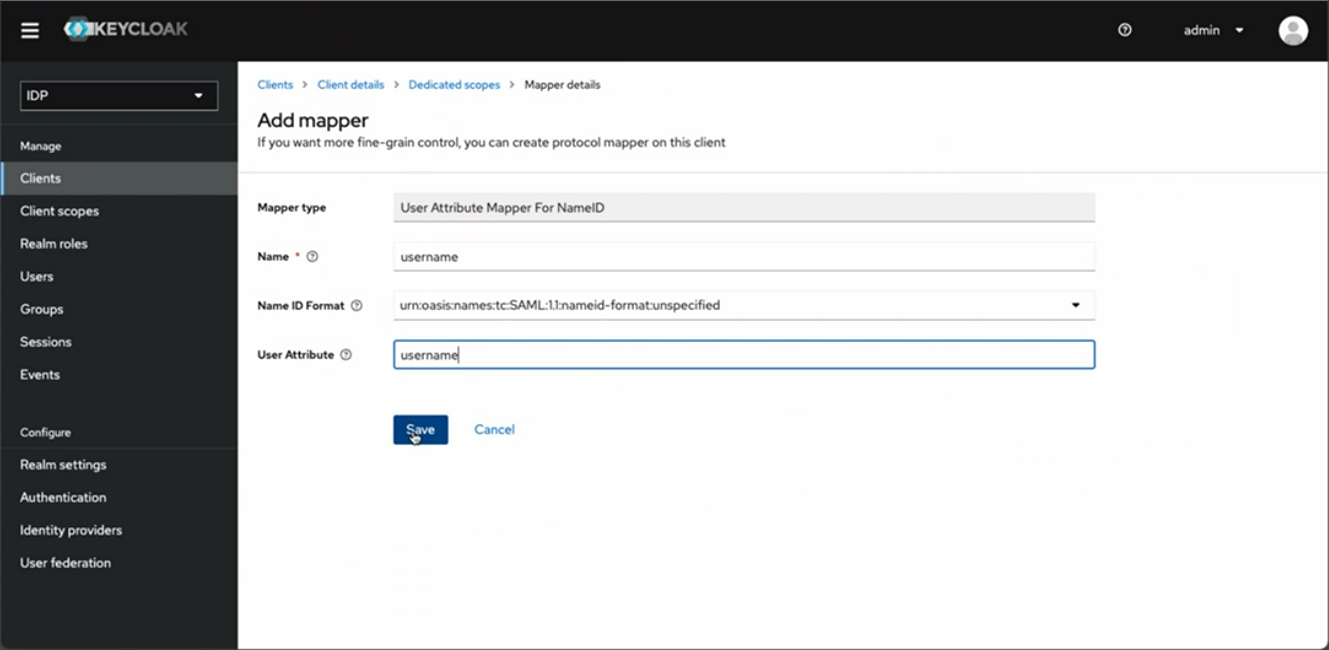
Example mapper for username
-
In the STAGE Identity Provider Management, Property / Group Mapping tab, add the equivalent SAML Attributes as they are defined in your Identity Provider under the SAML Attribute column. In this example, the Identity Provider uses the following attributes: email, givenName, and surname.
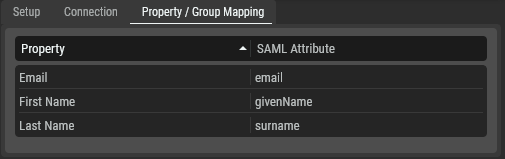
Mapping the Identity Provider’s SAML attributes
-
Click Save.
-
In the Setup tab, click Enable. The Status should become Enabled. In Users (see chapter Users), the users from the Identity Provider have been added to the user list and are identified as Identity Provider in the Origin column.
-
Assign these users to Groups or give them Permissions to access STAGE. See chapter Users.
-
Logout of STAGE and then log back in. This new Identity Provider has been added to the login screen under the name you defined in step #3 above, under Or sign in with.
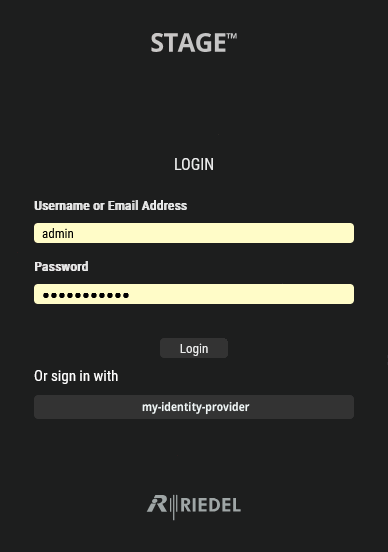
Typical login screen showing access to the external Identity Provider my-identity-provider
-
Click the Identity Provider. You are taken to the Identity Provider’s sign in page where you sign in with your credentials you have previously established with the Identity Provider. See chapter Start & Login.
Mapping Identity Provider Users to a User Group in STAGE
User identities from an Identity Provider can be mapped into STAGE User Groups when Users have already been assigned to one or more groups in the Identity Provider. These user groups are mapped into STAGE User Groups where they have access to STAGE according to the permissions assigned to the User Group.
PREREQUISITE: You must have created one or more User Groups in STAGE. See chapter User Groups. One or more groups in the Identity Provider must have been created. User identities in the Identity Provider should be assigned to one or more groups.
-
In the Setup tab, if the connection status is Enabled, click Disable to break the connection between STAGE and the Identity Provider. This action will cause an outage for users trying to authenticate themselves with the Identity Provider. Only perform this action during off hours.
-
In Group Mapping, click Add.
-
In Group Mapping, select a STAGE User Group in the STAGE Group column.
-
In Attribute, set the name the Identity Provider uses for a group. For example, this is often group or groups.
-
In Attribute Value, set the name of the group used in Identity Provider to map to the selected group in STAGE.
-
Click Save.
-
In the Setup tab, click Enable to re-establish the connection between STAGE and the Identity Provider.

Configured Identity Providers
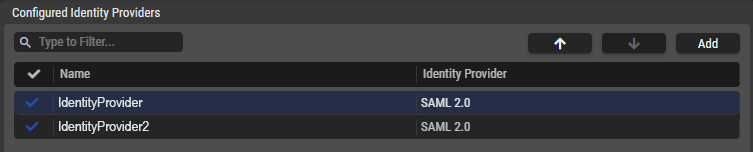
The table lists all the Identity Providers set up in the STAGE setup.
By clicking on an Identity Provider, Details are displayed on the right-hand side.
|
|
Set a filter to display only identity providers whose search text is found in the name. |
|---|---|
|
|
Click to change the order of the selected identity provider in the list and in the user login screen. Each Identity Provider appears as a separate button in the user login page. The order of the Identity Providers shown here will be reflected in the order the buttons are shown in the login screen. |
|
|
Click to add a new identity provider. See section #Adding-an-Identity-Provider. |
|
|
Indicates whether the current identity provider is enabled ( |
|
Name |
Shows the name of the identity provider. |
|
Identity Provider |
Shows the Protocol used by STAGE to connect to the identity provider. |

Identity Provider Configuration
The Details section on the right-hand side displays full information about the selected identity provider.
-
Any changes in this section need to be confirmed by clicking the
-
Click the
-
The
Setup Tab
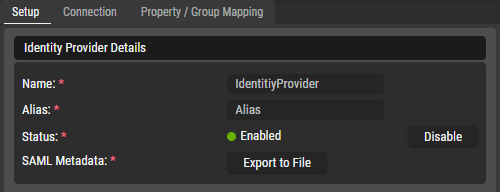
This section is specific to using SAML 2.0 as identity provider.
Identity Provider Details
|
Name |
Set the Name for this identity provider. This alphanumeric string should only use URL-safe characters as it may be used in the login redirect URL to the identity provider. |
|---|---|
|
Alias |
Set the Alias for this identity provider. This alphanumeric string should only use URL-safe characters as it may be used in the login redirect URL to the identity provider. For example, redirect URL = "https://stage-cluster.riedel.net/service/auth/realms/UE/broker/Alias/endpoint" |
|
Status |
Indicates whether the current identity provider is enabled ( Click on |
|
SAML Metadata |
Click on the |
Import
This section is visible after clicking on ![]()
|
Import (SAML 2.0) |
To connect to an Identity Provider, set the SAML 2 import the Identity Provider’s XML metadata connection details. See section #Adding-an-Identity-Provider. Import From URL: Import the Identity Provider’s XML metadata connection settings from a URL. Set the URL to import in Metadata URL. Import From XML: Import the Identity Provider’s XML metadata connection settings from a XML file. Click Browse to locate the XML file to import on your PC. Manual Setup: provide settings in the Connection tab manually. See section #Connection-Tab. |
|---|
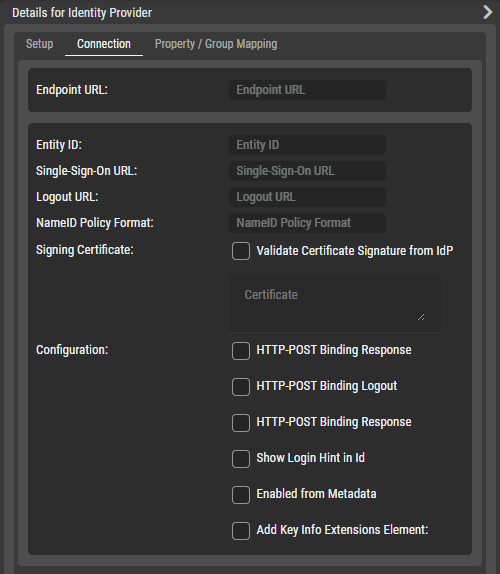
Connection Tab
When you have selected the Manual Setup option in the Setup tab, you must manually add the connection details about the Identity Provider, by entering the values for the fields in this tab. See section #Adding-an-Identity-Provider.
If you have already added an Identity Provider, this tab shows the Identity Provider’s current configuration parameters.
URL
|
Endpoint URL |
Set the endpoint URL. |
|---|
Connection Details
|
Entity ID |
Set the Entity ID. |
|---|---|
|
Single-Sign-On URL |
Set the Single-Sign-On URL. |
|
Logout URL |
Set the logout URL. |
|
NameID Policy Format |
Set the NameID policy format. |
|
Signing Certificate |
Set to enable / disable how the signing certificate is to be validated. Enabled: Validate certificate signature form IdP. Disabled: Use the signing certificate you enter in the text box shown below. |
|
Set the signing certificate to use when Signing Certificate is disabled. |
|
|
Configuration |
The following parameters can be enabled/ disabled. HTTP-POST Binding Response: Set to enable the use of an HTTP-POST binding response in the HTTP redirect. HTTP-POST Binding Logout: Set to enable HTTP-POST binding logout. Show Login Hint in ID: Set to add a login hint to the ID. Enabled from Metadata: Set to use SAML Metadata. This enables the use of an XML document which contains information that allows the interaction with SAML-enabled identity or service providers. Add Key Info Extensions Element: Set to add key info extensions element to the SAML response. |
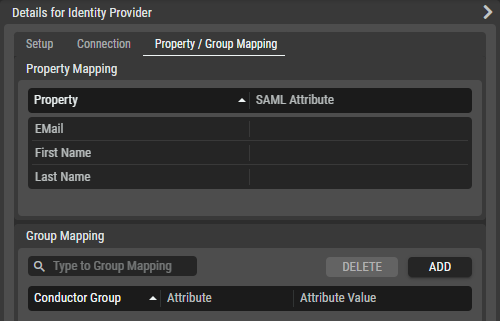
Property / Group Mapping Tab
To manage user group memberships in your SAML system, STAGE needs a way to find out how they are mapped as attributes in a SAML system which are not fixed. As such, you have to map attribute names used in the SAML system for STAGE parameters such as email, first name, and last name.
For every STAGE User Group (as configured in the User Groups tab), you need to provide an attribute and a value under Property Mapping.
STAGE will then check with the SAML system for every user:
-
If the attribute exists.
-
If the value of the attribute contains the value provided. When true, the user is allowed to be part of the group
|
Property Mapping |
Property |
Map the following properties to their equivalent SAML attribute: Email, First Name, and Last Name. |
|---|---|---|
|
SAML Attribute |
Set the corresponding SAML attribute for the Property. |
|
|
Group Mapping |
|
Set a filter to only show groups that contain this text in their name (case insensitive). |
|
|
Click to remove the mapping of the selected group. |
|
|
|
Click to map a user group. |
|
|
Stage Group |
Shows the STAGE User Group that the SAML group members are part of. |
|
|
Attribute |
Shows the SAML attribute for the group. |
|
|
Attribute Value |
Shows the value of the SAML attribute. |