This view allows registering hosts such as WebRTC Gateway servers, NMOS and Artist-1024 devices that have been discovered on the network to make the device’s resources available for use within STAGE.
This workflow includes:
-
Creation of main and sub-locations that represents where equipment is physically located.
-
Assignment of Discovered Hosts to their locations.
Registered hosts are used as follows:
-
Artist-1024 hosts are used with Virtual SmartPanels through WebRTC Gateways.
-
NMOS devices are used with SAME DSP-Engine processing servers.
Hosts to be registered in STAGE must be powered on, configured, network connected, and be ready to be deployed.
Overview
Failed to load the diagram preview image.
Authentication Required
Page ID: 1645117701
System Commissioning - Registration
Filters allow you to quickly narrow-down a list to find a device.
See chapter Getting familiar with the User Interface #Filtering for more information.
Quicksteps for Registration of Hosts
Host registration adds hosts to STAGE to allow them to be controlled and monitored. By assigning hosts to locations, STAGE is able to represent how the system is physically organized in the real world.
Proceed as follows.
-
Optional: Create one or more locations that represent where the equipment is physically located. See section #Edit-Add-Locations.
-
Your hosts should automatically be discovered. Select one or more hosts to be assigned to a location. See section #Discovered-Hosts.
-
Select a Location in which the selected hosts will be registered. By assigning a host to a geographic location, STAGE’s users have a view of where hosts are physically located. You can then focus your attention on the hosts situated at a specific location. See section #Locations.
-
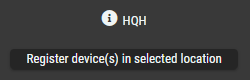
Click Register Host(s) in Selected Location.
-
Once a host is registered to a location, it is removed from Discovered Hosts to be now listed in Registered Hosts. See section #Registered-Hosts.
-
You can filter the Registered Hosts by host type. See section #Host-Types.

Edit/Add Locations
To assign a host to a location, you must first create the location. Proceed as follows. See also section #Locations.
-
Click
or -
Click

-
Click

-
Click Duplicate to duplicate the selected location.
-
Click Delete to delete the selected location.
-
Double-click on a location to edit its name.
-
Close the window:
-
Click Confirm to apply all changes
or -
Click Close to discard all changes.
-
-

Discovered Hosts
This section displays all hosts that can be found in the STAGE network through the use of the Discovery protocol.
|
|
Indicates whether the host is online ( |
|---|---|
|
Name |
Shows the host name that comes from the host. This name is configured on the host. |
|
IP Address |
Shows the IP address of the hosts. |
|
Click to register the selected Host(s) in the selected location. Hosts that have been assigned for use by other STAGE instances are also shown. Normally, you have enough hosts available to meet the needs for all productions. However, you can take the host from the other STAGE instance by accepting the following warning: 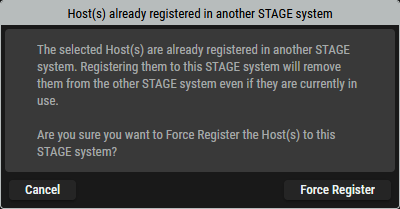
Cancel: Leave the host to run with the other STAGE instance. Force Register: Force the host from being used by the other STAGE instance, for it to be used with this STAGE instance.
|
Prerequisites:
-
Hosts being registered must have network connectivity with STAGE.
See chapter Network Architecture and the
section #Device-Discovery (in this chapter). -
Artist-1024 devices that are to be used with STAGE must have been previously configured in Director to have one or more STAGE Ports. See section #Artist-1024-Setup. Stage Ports are required by the Virtual SmartPanel for use as intercom ports, to allow inter-operability with the Artist system.
-
WebRTC Gateway devices must have been previously configured. See chapter Installation #Main-Steps-to-install-WebRTC.
-
SAME devices must have been previously configured. See chapter Installation.

Locations
This section specifies the location/sub-location to which the discovered hosts are assigned.
A location is metadata that gives an indication where the registered hosts are located. For example, a location can represent a country, a city or a building, while a sub-location can be more specific and represent a building, a floor or an equipment room. Users can use the locations in the way that suits them best.
By default, STAGE uses the Unassigned Location option, which allows users to register a host if they do not want to register it at a specific location.
|
|
Click to open a window for editing (adding, renaming, duplicating or deleting) top-level and sub-locations. See section #Edit-Locations-Dialog. |
|---|---|
|
|
Click to add a top-level location. |
|
Locations |
If a location is selected, the Registered Hosts list only shows hosts that are assigned to that location. Sub-locations can be displayed/hidden by clicking on the right |
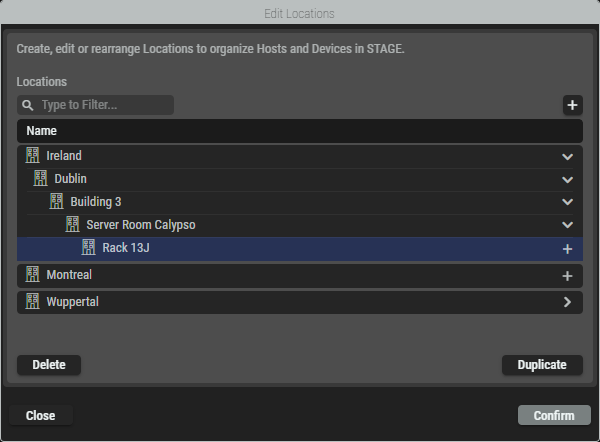
Edit Locations Dialog
This Edit Locations dialog can be opened by clicking the ![]()
|
|
Set a filter to display only content whose search text is found in the name. |
|---|---|
|
|
Click to add locations and sub-locations. |
|
Delete |
Click to delete the selected location. |
|
Duplicate |
Click to duplicate the selected location. |
|
Double-click |
Double-click on a location to edit its name. |
|
Confirm |
Click to exit this dialog and apply all changes. |
|
Close |
Click to exit this dialog and discard all changes. |

Register Host(s) in Selected Location
Proceed as follows to register hosts in a location.
-
Optional: Focus the list of Discovered Hosts to hosts found in the system by selecting the search and All/Online/Offline filters. See also section #Discovered-Hosts.
-
Optional: Focus the list of Locations to a location by selecting a location in Locations. See also section #Locations.
-
In Discovered Hosts, select one of more registered Hosts. See also section #Discovered-Hosts.
-
In Locations, select one location. See also section #Locations.
-
Click Register Host(s) in Selected Location.
-
On the left, the discovered Host will disappear in the section Discovered Hosts.
-
On the right, the registered Host will appear in the section Registered Hosts.

Registered Hosts
This section lists all hosts that are currently registered at the selected location.
|
|
Set a filter to display only content whose search text is found in the name. |
|---|---|
|
Create Unmanaged Host |
Click to add a host that STAGE is unable to configure or control, but this host’s AES67 audio stream(s) can be used by STAGE. See #Unmanaged Host. |
|
|
Indicates whether the host is online ( |
|
Name |
Shows the name of the registered host. |
|
IP Address |
Displays the IP address of the registered host. |
|
Host Type |
Shows the type of the registered host. |
|
Location |
Shows the assigned location for this host. |
|
|
Click to deregister the selected host(s) from the selected location. |

Host Types
Focus the list of Registered Hosts to a host type (for example, Artist-1024, or WebRTC Gateway) by selecting a host in Host Types.
This section lists all host types that are available in the STAGE system.
|
|
Set a filter to display only content whose search text is found in the name. |
|---|---|
|
Host Types |
If a Host Type selected, the Registered Hosts list only shows that host type. |

Deregister Host(s)
Proceed as follows to deregister hosts from a location.
-
Optional: Focus the list of Registered Hosts to hosts found in a location by selecting a location in Locations. See also section #Locations.
-
Optional: Focus the list of Registered Hosts to a host type (for example, Artist-1024, or WebRTC Gateway) by selecting a host in Host Types. See also section #Host-Types.
-
In Registered Hosts, select one of more registered Hosts. See also section #Registered-Hosts.
-
Click Deregister Host(s).
-
Click Deregister.
-
On the right, the deregistered Host will disappear in the section Registered Hosts.
-
On the left, the deregistered Host will appear in the section Discovered Hosts.
Host Discovery
This is an overview of how STAGE typically discovers network-connected host instances, to add them to the Riedel Registry. This makes the host available for use in STAGE.
Riedel hosts use common network services such as DHCP and DNS to find STAGE in an automatic fashion resulting in STAGE being able to register them.
For certain hosts, you will have to manually configure them with STAGE’s IP address so that they appear in the section Discovered Hosts.
Prerequisites
The host to be discovered must have IP connectivity with:
-
For automatic discovery: the following network servers:
-
DHCP server.
-
DNS server.
-
STAGE server.
-
-
For a manually configured connection: the STAGE server.
Automatic Device Discovery
Here are the typical sequence of events for automatic host discovery.
Failed to load the diagram preview image.
Authentication Required
Page ID: 1645117701
|
1 |
The device boots and tries to connect to a DHCP server. |
|
2 |
The device retrieves the DNS server address. |
|
3 |
The device connects to the DNS server to resolve the |
|
4 |
The DNS server replies with the Service description for the STAGE Riedel Registration service endpoint. |
|
5 |
The device connects to STAGE and is added as an entry in the Riedel Registry. Once a device or software service has been added to the Riedel Registry, it appears as a discovered host in System Commissioning. |
If the device is unable to resolve the Riedel Registration Service through the DNS server, or the DNS server is unavailable, the device may fallback to using mDNS to attempt to connect with the STAGE Riedel Registration service.
Manual Mode
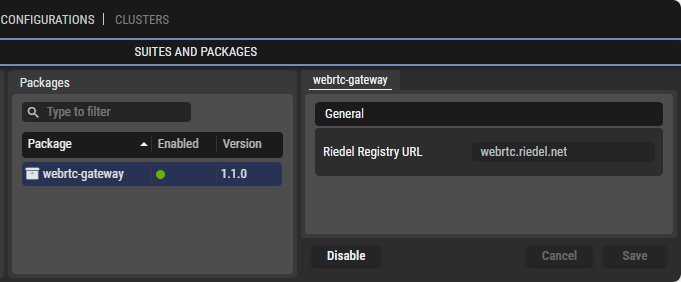
When installing a product such as the WebRTC Gateway through the Riedel Software Manager (RSM), you configure where it is to find the Riedel Registry.
Artist-1024 Setup
In order for an Artist-1024 to be recognized as a Discovered Host and Artist-1024 ports to be used in STAGE, the following configurations must first be set up in the Director.
Proceed as follows:
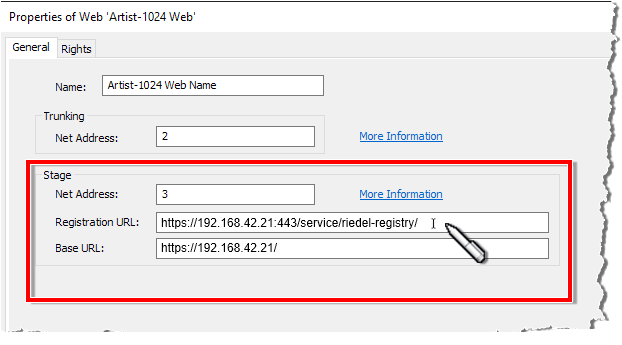
Editing the Web Properties
Open the web properties. See chapter 'Web' Properties in the Director manual.
-
Assign a Net address.
-
Enter the Registration URL of the STAGE installation.
-
Enter the Base URL of the STAGE installation.
-
Click the OK button to confirm.
Creation of the STAGE ports
Open the workspace of an AES67-UIC of an Artist-1024 by double-clicking on the corresponding AES67-UIC in the ‘Networks’ navigation bar.
Create the desired number of STAGE ports (Miscellaneous > STAGE) on the Media Interface 1 of the AES67 UIC.
See chapter ‘Adding a New Port’ in the Director manual.
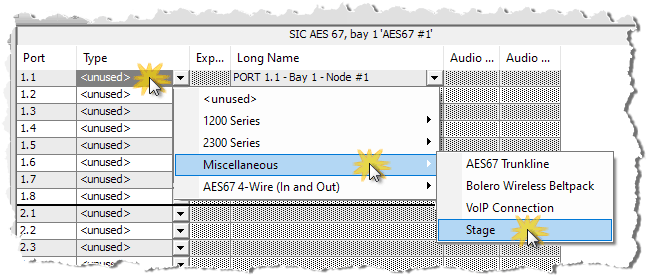
The Media Interface 2 and the redundant SMPTE 2022-7 operation will be available in a later version.
Editing names in the properties window
The names can be customized in the properties window of the STAGE port.
Open the properties window of a STAGE port by right-clicking on the desired port and selecting “Properties”.
Customize the names (Long Name, Local and 16-char Subtitle) according to your requirements.
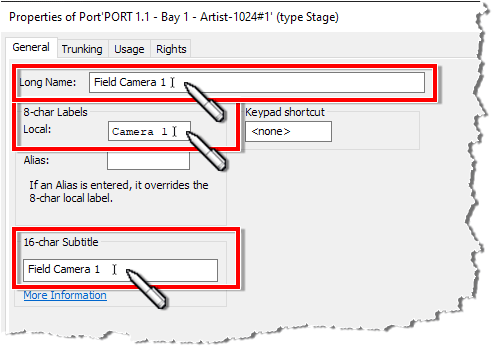
The ports are displayed in Stage as Intercom Resources with the names defined here.
This completes the configuration of the STAGE ports on the Director side.
Unmanaged Host
An unmanaged host represents in STAGE a device that STAGE is unable to configure or control. However, this host can send and receive AES67 audio stream(s). These types of devices must be added through one of the following methods:
-
Manually to add their audio stream IP addresses.
-
Using the device’s SDP file.
Once an unmanaged host has been added to STAGE:
-
It is understood that the audio stream IP addresses will not change (remain static).
-
The STAGE network ports for the Host must be configured in Configuration. It is important to set the Network Scope for each Host Ethernet connection. See chapter Configuration.
Failed to load the diagram preview image.
Authentication Required
Page ID: 1645117701
|
Create Unmanaged Host |
Click to add an unmanaged host. Create Manually: Use the device’s static stream IP addresses that have been previously configured on the device by adopting them into STAGE as named audio streams. This adds the host as an Unmanaged Host to STAGE. Create From SDP File: Use the host’s SDP file to add the host as an Unmanaged Host to STAGE. |
|---|
Manually Create an Unmanaged Host
This option assigns the device’s static stream IP addresses that have been previously configured on the device by adopting them into STAGE as named audio streams.

|
Host Name Template |
Set the name by which this unmangaged host will be known by throughout STAGE. |
|---|---|
|
Amount |
Set the number of audio stream interfaces the host supports / that you want to use. |
|
Name |
Shows the automatically generated name for each audio stream by which it will be know by throughout STAGE. |
|
Control IP Address |
Set the static unicast Control IP Address of the unmanaged host. |
Create an Unmanaged Host through its SDP File
This option uses an SDP file that has been generated for the device to make the device’s streams available in STAGE.
By Pasting an SDP File’s Contents
In the Paste SDP tab, copy the SDP file contents and paste it into STAGE.

By Uploading an SDP File
In the Upload SDP Files tab, find the device’s SDP file on your filesystem and upload the file into STAGE.
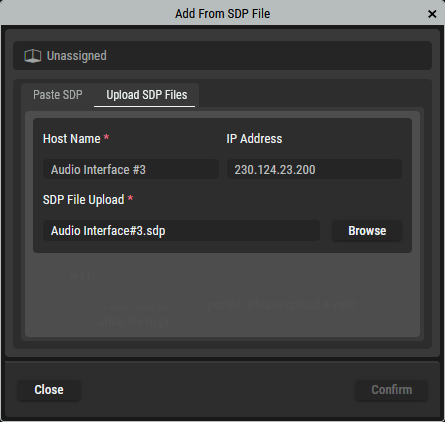
|
Host Name |
Set the name by which this unmangaged host will be known by throughout STAGE. |
|---|---|
|
IP Address |
Set the static IP address for the audio stream. |
|
Clipboard |
Paste into this field the contents of the device’s SDP file. |
|
SDP File Upload |
Click Browse to find and select the device’s SDP file on your PC’s filesystem. |
|
Close |
Click to cancel this operation. |
|
Confirm |
Click to proceed. |