When a Job is selected in the Job List, the following configuration tabs are shown:
Resource Creation Tab
This tab is the wish list of items to be used for various productions. Here, it is determined what is to be done in a production by specifying the Devices and Applications to be used.
Overview
Failed to load the diagram preview image.
Authentication Required
Page ID: 1645346978

Jobs
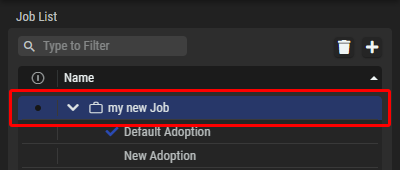
Collapsed Jobs section, where the Job “my new Job” is selected.
The name of the selected “Job” is displayed in the header of this Setup tab.

Resources
|
Roles /
|
Tabs to create Roles and assign Roles, Devices and Applications to Jobs. |
|---|---|
|
|
Set a filter to display only content whose search text is found in the name. |
|
|
Click to delete the selected user defined Role (available for Roles only). Global Roles are edit in the System Management and cannot be deleted in this view. |
|
|
Click to add a user defined Role. |
|
Name |
The name of the Role, Device or Application. (Depending on the selected tab.)
|
|
Members in Job
|
Shows the number of Members, Devices or Applications assigned to a Job. (Depending on the selected tab.) |
|
|
Click to add the set number of Members to Role or Devices/Applications to a Job. (Depending on the selected tab.) |
Member: Represents a single participant in a Production Event. A Member always has a Role, and a Job can consist of multiple Members using the same or different Roles. For example, Technical Director, Audio Engineer 1, Camera Operator 1, Camera Operator 2.
Roles: Categories of people that participate to Productions. Roles are used to create Members.
For example, Technical Directors or Audio Engineers.
A particular Role can be global to entire STAGE system or only exist in the context of a particular Job.
Device: Specifies the hardware needed for the Job. During Activation, when a Job is run, the actual available hardware will be used to send and receive audio signals.
Applications: Specifies the audio signal processing needed for the job to process, mix, and master sound. Applications emulate classic hardware in software and they run on the SAME DSP-Engine server when the Job is activated.

Job Content
|
All |
Shows all Resources assigned to the selected Job. |
|---|---|
|
[Resource Groups] |
Shows only Resources of the corresponding Type:
|
|
|
Set a filter to display only content whose search text is found in the name. |
|
|
Click to unassign the selected Resource. |
|
All / In / Out |
In Producers/Consumers tab, filter to show all, incoming or outgoing Prosumers. |
|
Name |
The name of the Role, Device or Application. (Depending on the selected tab.) Double-click the name of a user defined Role to rename it. |
|
[Column Names] |
Depending on the selected tab, various columns with corresponding content are available. In total following columns are available: Type, Role, Devices, Applications, Producers/Consumers, Role/Member, Media Group |
Right-Click Options
Depending on the selected tab, various options are available for the right mouse button.
|
Collapse All Items |
Only the parent group names will be displayed. |
|---|---|
|
Rename Selected […] |
A dialog box opens, allowing to rename the selected items simultaneously and using automatic numbering. Label: New Name of the item. Start Counting from: Set the start value, the next values will be increased by one. Add at Start/End: Set if the numbering should be added as a prefix or suffix. Add Leading Zeros: Set if a zero should be added to one digit numbers. Search/Replace: User the Search Text and Replace Text to modify the names according to your requirements. Add Text: Set additional Text to be added as prefix or suffix. |
|
Delete Selected […] |
A dialog box opens to confirm the deletion of the selected items. |

Filter (Job Content)
Filter the Job Devices. See Getting Familiar with the User Interface #Filtering.
Using the Resource Creation Tab
Adding a Resource to a Job
A Job normally requires resources from each of the tabs in Resource Creation.
-
Select a Job to configure in the Job List.
-
Select the Resource Creation tab.
-
Select a tab under Resource Creation for the resource type you want to add to the Job
(Roles tab / Devices tab / Applications tab). -
To add a resource,…
-
click a resource and drag it to the Drop Here landing spot or
-
enter the number of desired resources and click the Add Members/Devices/Applications button.
-
-
Repeat this for each of the Resource Creation tabs (Roles tab / Devices tab / Applications tab).
Failed to load the diagram preview image.
Authentication Required
Page ID: 1645346978
Resource Configuration Tab
Once Applications have been added to a Job in the Resource Creation tab, they can be configured in the Resource Configuration tab.
Overview
Failed to load the diagram preview image.
Authentication Required
Page ID: 1645346978
Jobs
Collapsed Jobs section, where the Job “my new Job” is selected.
The name of the selected “Job” is displayed in the header of this Setup tab.
Job Applications
|
|
Set a filter to display only content whose search text is found in the name. |
|---|---|
|
Hide Roles and Members |
Hides the group name to which the Application belongs. |
|
Application Name |
List of all Applications assigned to the selected Job. Click on an Application to display it on the right-hand side in the Application Configuration. |
Application Configuration
This defines the initial configuration of the Application that is to be applied to the adopted Application when the job is activated. For example, faders can be set to a preset level, channels can be muted, metering can be set to be pre-fader or post-fader, snapshots of setting can be created to be later recalled, and so on. By doing this, when a Job is run, the Application starting configuration is suited to the production’s needs and workflows.
An overview of all available SAME Applications can be found in Chapter SAME Application Configuration.
|
|
Click to maximize the application to full screen. |
|---|---|
|
|
Click to restore the application from full screen. |
Using the Resource Configuration Tab
Configuring a Resource
-
Select a Job to configure in the Job List.
-
Select the Resource Configuration tab.
-
Select an Application to configure in the Job Applications List.
-
Configure the Application.
-
Repeat this for each Application in the Job Applications List of a Job.
Failed to load the diagram preview image.
Authentication Required
Page ID: 1645346978
Signal Management Tab
The Signal Management tab provides a XY Matrix that is used to connect the I/Os of the various Job Resources (Applications and Devices). The XY Matrix allows to connect a Source (Producer) to a Destination (Consumer).
Overview
Failed to load the diagram preview image.
Authentication Required
Page ID: 1645346978
Both the source and destination sections are not flat lists, but follow a structure consisting of Device → Prosumer group → Prosumer. See an example in the graphic above: The expanded Mixer (Destination) consists of a “Channel Input” and an “Insert Return” Consumer group. And the expanded “Channel Input” and “Insert Return” group contain a list of Consumers.
Moreover, the XY Matrix provides additional capabilities such as inserting a processing application (called network plugins) between a connected Source and Destination (i.e. crosspoint).
Finally, the XY Matrix allows to map individual legs when connecting multi-legged producers and consumers. When using this with SAME, this allows to map/shuffle audio channels, for example
-
map any audio source to any destination.
-
repeat any any audio channel any number of times.
-
establish the position of an audio the channel to any destination.
Jobs
Collapsed Jobs section, where the Job “my new Job” is selected.
The name of the selected “Job” is displayed in the header of this Setup tab.
Connection Matrix
|
Prosumer Header |
|
|---|---|
|
Search
|
Set a filter to display only content whose search text is found in the corresponding Destination/Source name. |
|
Sources |
The Sources (Producers) are located in rows and their names are displayed on the left-hand side. |
|
Destinations |
The Destinations (Consumers) are located in columns and their names are displayed on the top. |
|
|
Click on this icon in the section with the Prosumer names to expand it and show its further sub-elements (e.g., prosumer groups under prosumers; devices under prosumer groups). |
|
|
Click on this icon in the section with the Prosumers names to hide the sub-elements (e.g. prosumer groups under a device; prosumers under a prosumer group). |
|
Crosspoint Section |
|
|
|
Click on these icons in the crosspoint section to expand and show more of the device’s prosumers (i.e. consumers or producers). |
|
|
Double-click to create a crosspoint, to connect a source signal to a destination. |
|
|
Shows that a crosspoint has been made: all source channels (legs) are mapped to the connected destination. |
|
|
Double-click to remove a connection. |
|
|
Double-click to create a crosspoint, when there is no one-to-one connection. For example, a source has two channels and a destination is mono. You have to choose how to finalize the crosspoint audio signal connection(s) in the following window that opens. 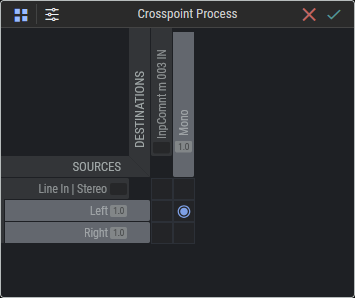
|
|
|
Shows that a crosspoint has been made: only some source channels (legs) are mapped to the connected destination. For example, a source has two channels and the destination is mono. |
Using the Signal Management Tab
Connecting a Source to a Destination
-
Select a Job to configure in the Job List.
-
Select the Signal Management tab.
-
Click

-
Double-click a crosspoint to make the connection between a Source and Destination.
To clear a connection, double-click the crosspoint again. -
Repeat this for all necessary signal connections.
Failed to load the diagram preview image.
Authentication Required
Page ID: 1645346978