Codec and format settings overview
In Settings, you can configure export and streaming parameters for each stream independently.
Each stream can use its own codec, file type, compression, audio configuration, logo overlay, burned-in timecode, and file name template. This gives you the flexibility to prepare different outputs for different teams at the same time.
For example, one stream can be prepared for high-quality archive, another for editorial review, and another for client viewing.
Why this matters in live production
Not every destination needs the same deliverable.
A director may need lightweight review files with visible show timecode and a rehearsal watermark. Post-production may need a higher-quality file for finishing.
By preparing the output correctly from the start, you avoid extra handoffs and unnecessary reprocessing. That saves time, reduces delays, and keeps the workflow under control during fast-turnaround productions.
What can be configured
Per-stream codec and format settings
Each stream can be configured independently, allowing different outputs to be prepared for different purposes within the same production.
In Settings, you can define:
-
audio type and gain
-
codec and file type
-
compression level
-
retry and buffer behaviour
-
burned-in timecode
-
file naming structure
-
logo overlay and logo position
-
This makes it possible to prepare one stream for archive, another for editorial, and another for fast client delivery.
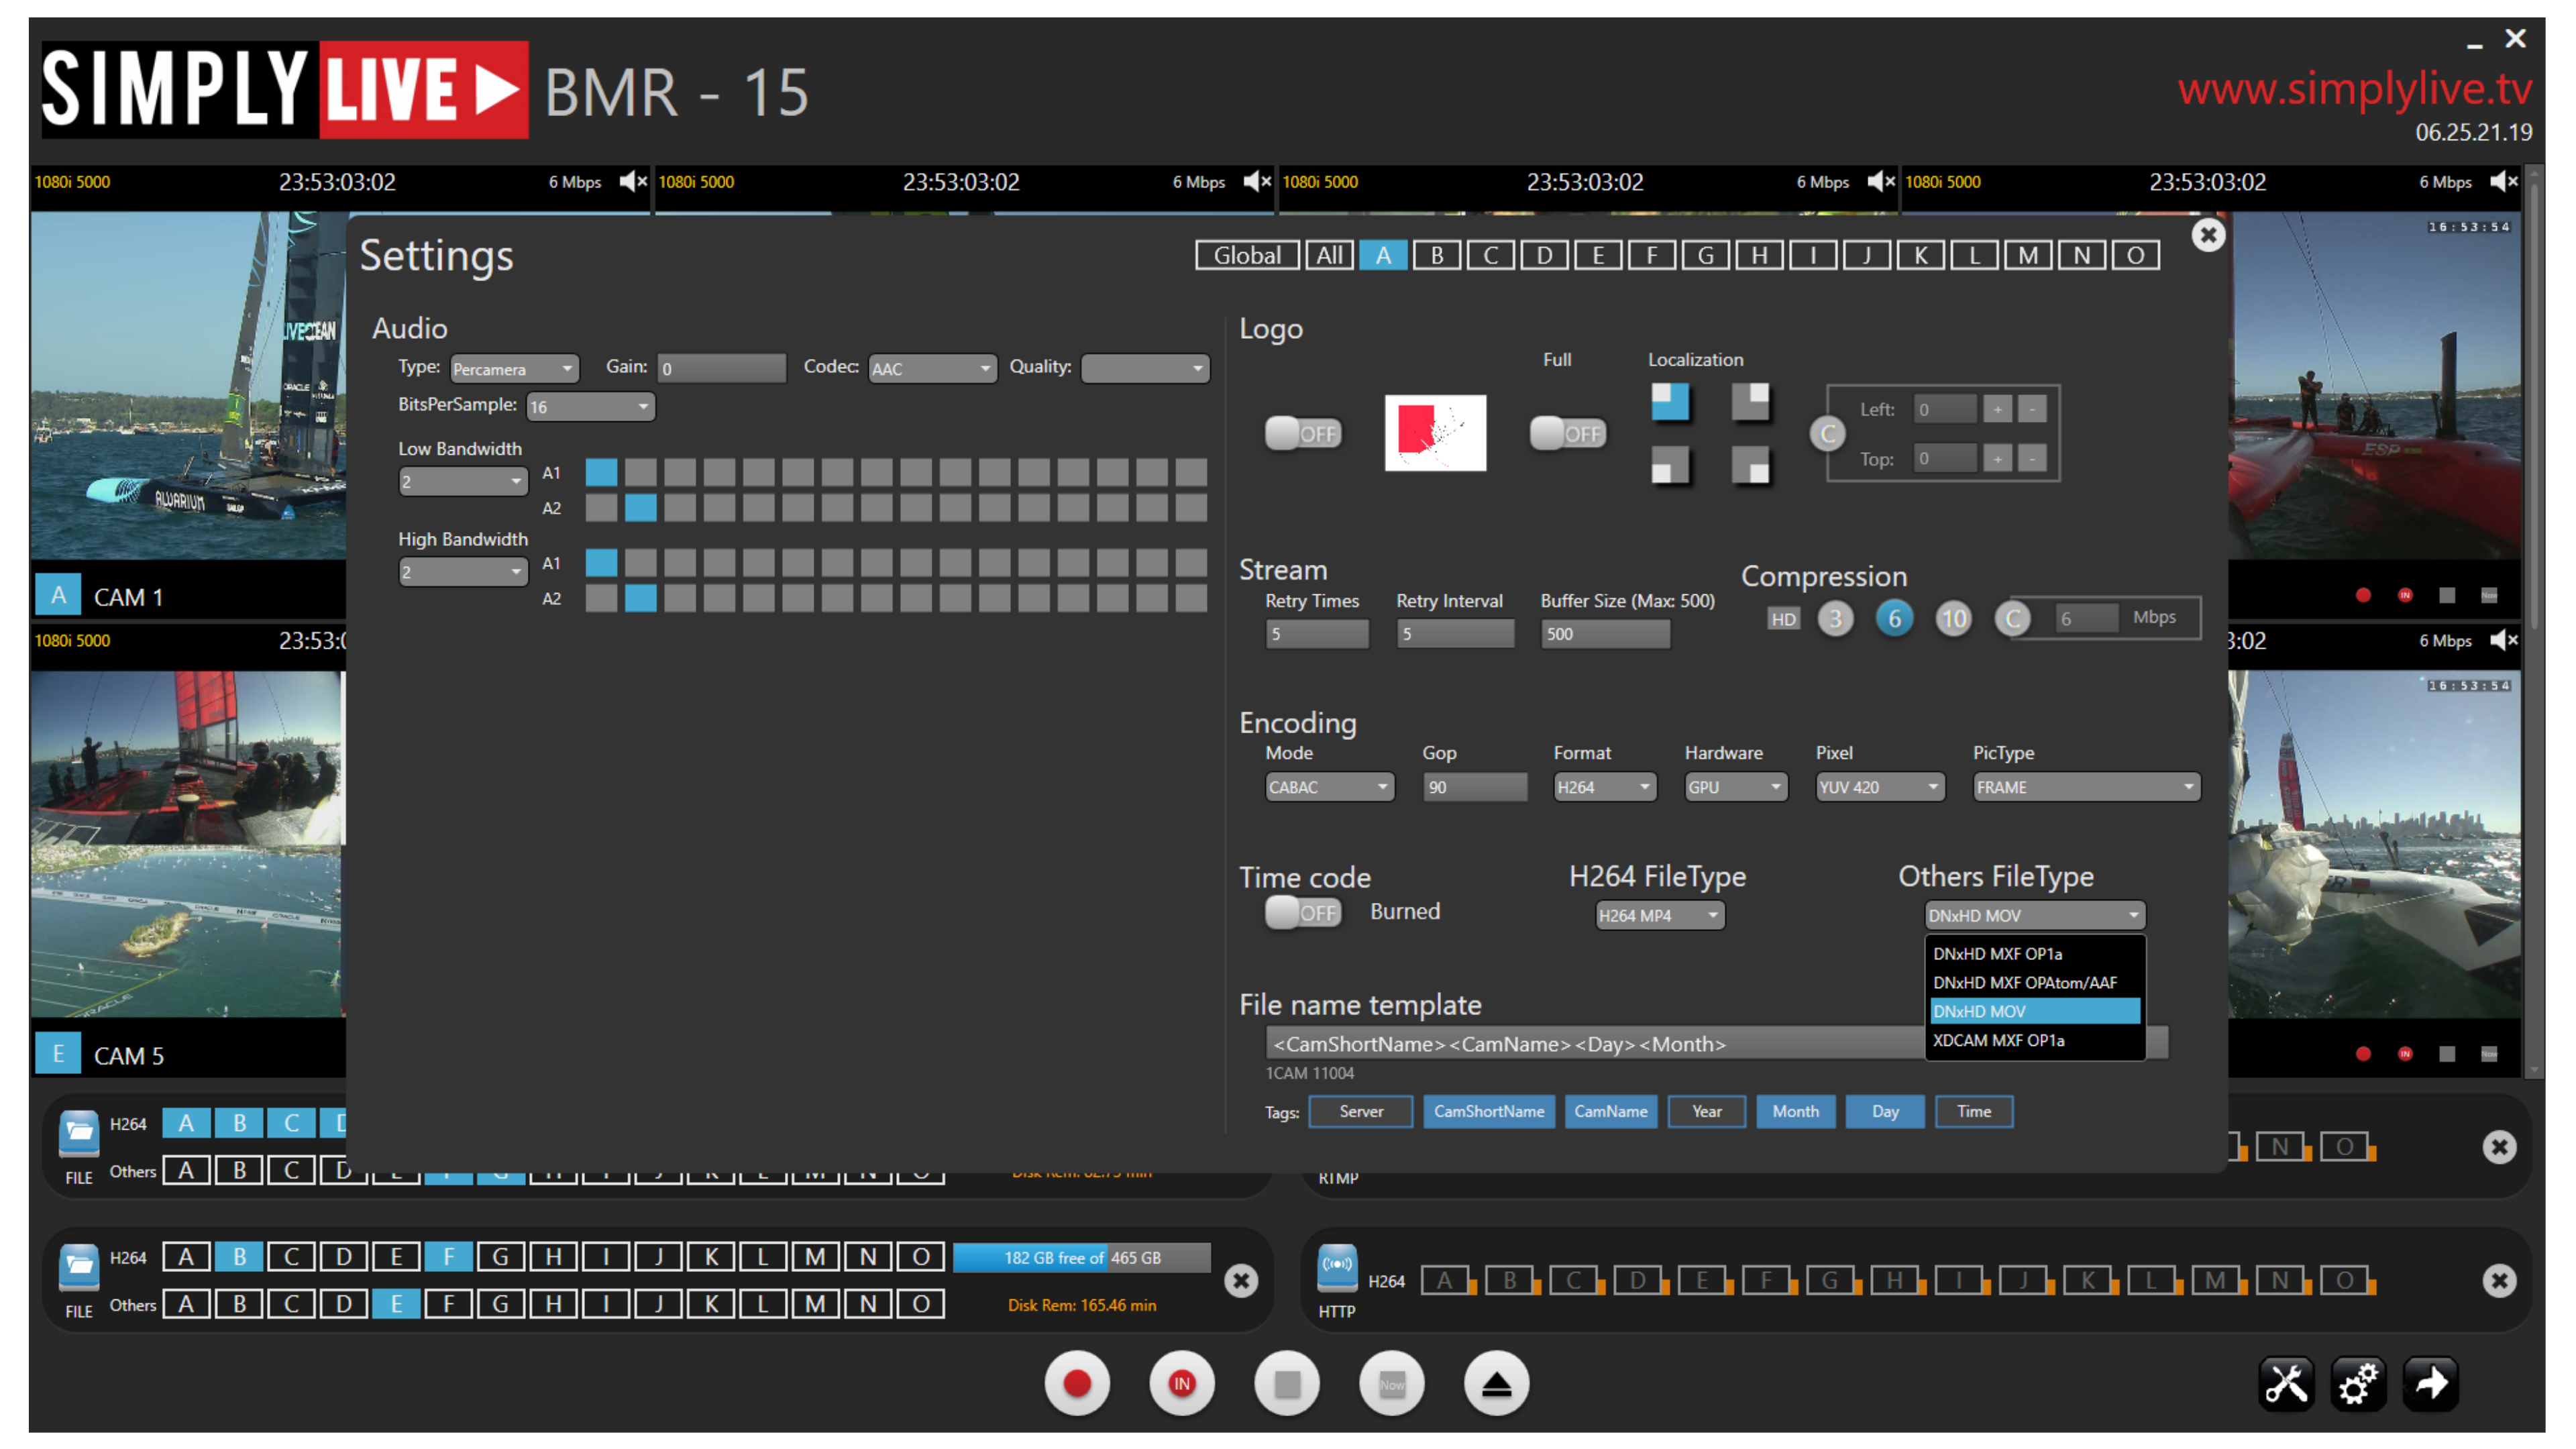
Supported file types
Depending on the selected codec and workflow, exports can be created as:
-
H264 MP4
-
DNxHD MOV
-
DNxHD MXF OP1a
-
DNxHD MXF OPAtom/AAF
-
XDCAM MXF OP1a
This gives you the flexibility to match the output format to the destination workflow.
Info
If you are already exporting streams such as Program Clean and Program Dirty in H264 HiRes and LoRes through the main stream settings, you can still add a third export version when needed by using the Export button. This is useful when post-production or production needs a quick additional file in a different codec or with a different timecode range, without changing the main stream setup. For more details, see Using the Export Button .
Compression and encoding controls
Compression and encoding behaviour can also be adjusted for each stream, including:
-
target bitrate in Mbps
-
retry times
-
retry interval
-
buffer size
-
encoding mode
-
GOP value
-
hardware selection
-
pixel format
-
picture type
These settings help match each stream to the technical and operational requirements of its destination.
Audio configuration
Audio can be configured as part of each stream setup.
This is important when different outputs require different delivery behaviour, or when the stream needs to match the technical requirements of the receiving workflow.
Logo overlay
A logo can be added directly to the output stream.
This is especially useful for rehearsal outputs, internal review copies, approval files, and protected preview versions. A common use case is adding a visible overlay such as NOT FOR BROADCAST, so everyone immediately understands that the file is intended for review only.
Overlay settings also support full-screen logo use and screen placement control, making it possible to position the logo where it is most useful or least obstructive, depending on the purpose of the output. Typical positions include top left, top right, lower left, or lower right.
Burned-in timecode
Timecode can be burned directly into the exported stream or file.
This is extremely useful in rehearsal and review workflows, where the director, producer, or creative team need to reference exact timing quickly. Visible timecode helps match running order, cue points, camera shots, performance timing, and production notes without adding an extra post-production step.
File name templates
Each stream can use its own file naming structure.
Available tags include:
-
Server
-
CamShortName
-
CamName
-
Year
-
Month
-
Day
-
Time
This allows file names to be tailored to the destination.
For example, Camera A files can include camera name, date, and time. Another stream may use only server name and time. Another may use a simplified naming structure for client delivery.
This is a powerful way to keep large productions organised when many files are being created for archive, editorial, production management, and client review.
How to use it
Set each stream individually
Open the required stream settings and define the output profile for that stream.
Because each stream is independent, separate settings can be prepared for each camera or output path.
Choose the required file format
Select the file type that best matches the destination workflow.
Use lighter formats where speed and accessibility matter most. Use higher-quality formats where finishing or archive quality is the priority.
Use case scenario- Typical big concert production
Imagine you are recording rehearsals for a major live concert.
At the end of each rehearsal, the director and creative team need files for immediate review. In most cases, the rehearsal files would first be exported to post-production, then the logo would be added, then the show timecode would be burned in, and then the files would come back to your server before being exported again for the director or producer.
That can easily add another 30 minutes.
With BMR, the rehearsal can be exported directly to the director’s or producer’s drive with a logo overlay such as NOT FOR BROADCAST, burned-in show timecode, the correct file naming structure, and the required compression and file format already applied.
The files are ready immediately, without being sent away for reprocessing.
Time is everything in live production, and this removes an entire delay from the chain.
Pro Tip
Use different profiles for different uses.
Keep Program and Clean in a higher-quality format and use lower-resolution files for archiving.
This keeps quality where it matters, while making files faster to transfer, faster to open, and easier to manage.
Pro Tip
Use All when you want to apply the same settings across every stream at once. For more precise control, switch to individual stream tabs such as A, B, C, or D and configure each stream separately. This is especially useful when different destinations need different codecs, overlays, or file naming rules.