
Manage Port Containers
Overview
Information
See also: Concepts: Port Containers for conceptual details on how Port Containers work.
To open the workspace, select Inventory > Port Containers. Use the Port Containers, Labels, and Tagging views to manage containers and their metadata. The Templates view is available when the Port Container Template feature is enabled.
Port Containers bundle related Ports that route together as a unit. Typical uses include 2SI or Quad-Link UHD signals and audio-follow-video routing.
Creating Port Containers
Prerequisites
-
hiCore for a new installation, or the existing hiBase license, and the Port Container admin role to manage Port Containers.
-
The Port Container Assignment role when changing Port membership from the Control Panel.
-
Identified set of Ports from one or more Nodes to be bundled.
Steps
-
Select + to open Create Port Container.
-
Provide the following details:
-
Primary Name - a descriptive name for the container, shown in routing and control workflows.
-
Panel Name - shortened name for Hardware Panels (auto-generated if left empty).
-
Monitoring Name and Mixer Name - optional display-name overrides for monitoring and mixer integrations.
-
Flow Direction - select Source Container or Destination Container to set which side of the Control Panel it appears on.
-
Show Parameters From Ports - show parameters from the container's Ports when the container is selected.
-
Disconnect Destination Ports On Replacing This Source - disconnect destination Ports that do not match the replacement Source Container. Available for Source Containers only.
-
-
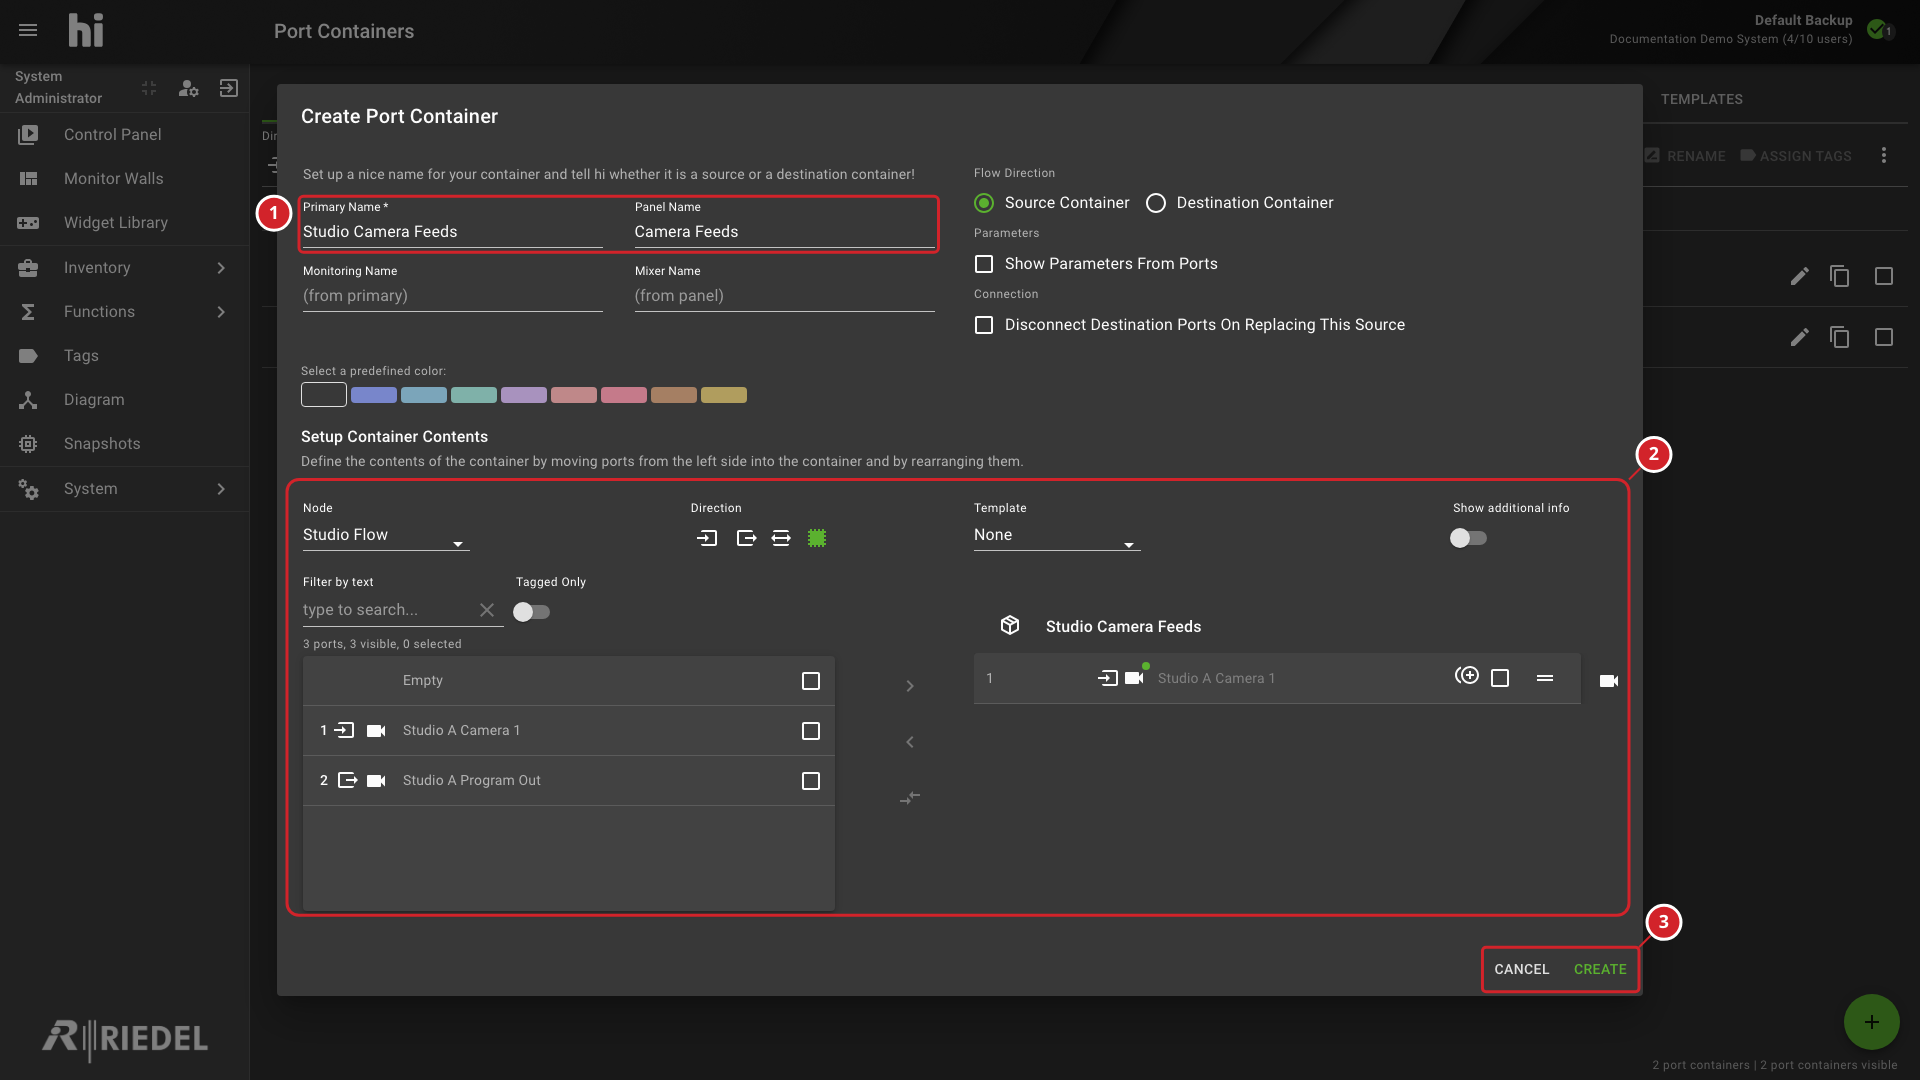
In Setup Container Contents, select a Node and use the Port lists to add available Ports to the container. Use the arrow controls to add and remove Ports.
-
Arrange the selected Ports in the container. Their order determines how the container slots map when routed.
-
Select Create to save the container.
-
Set the primary and panel names used to identify the container.
-
Use the container-contents section to select Nodes and add or remove Ports.
-
Review the dialog actions. The screenshot shows the creation form before it is submitted.
-
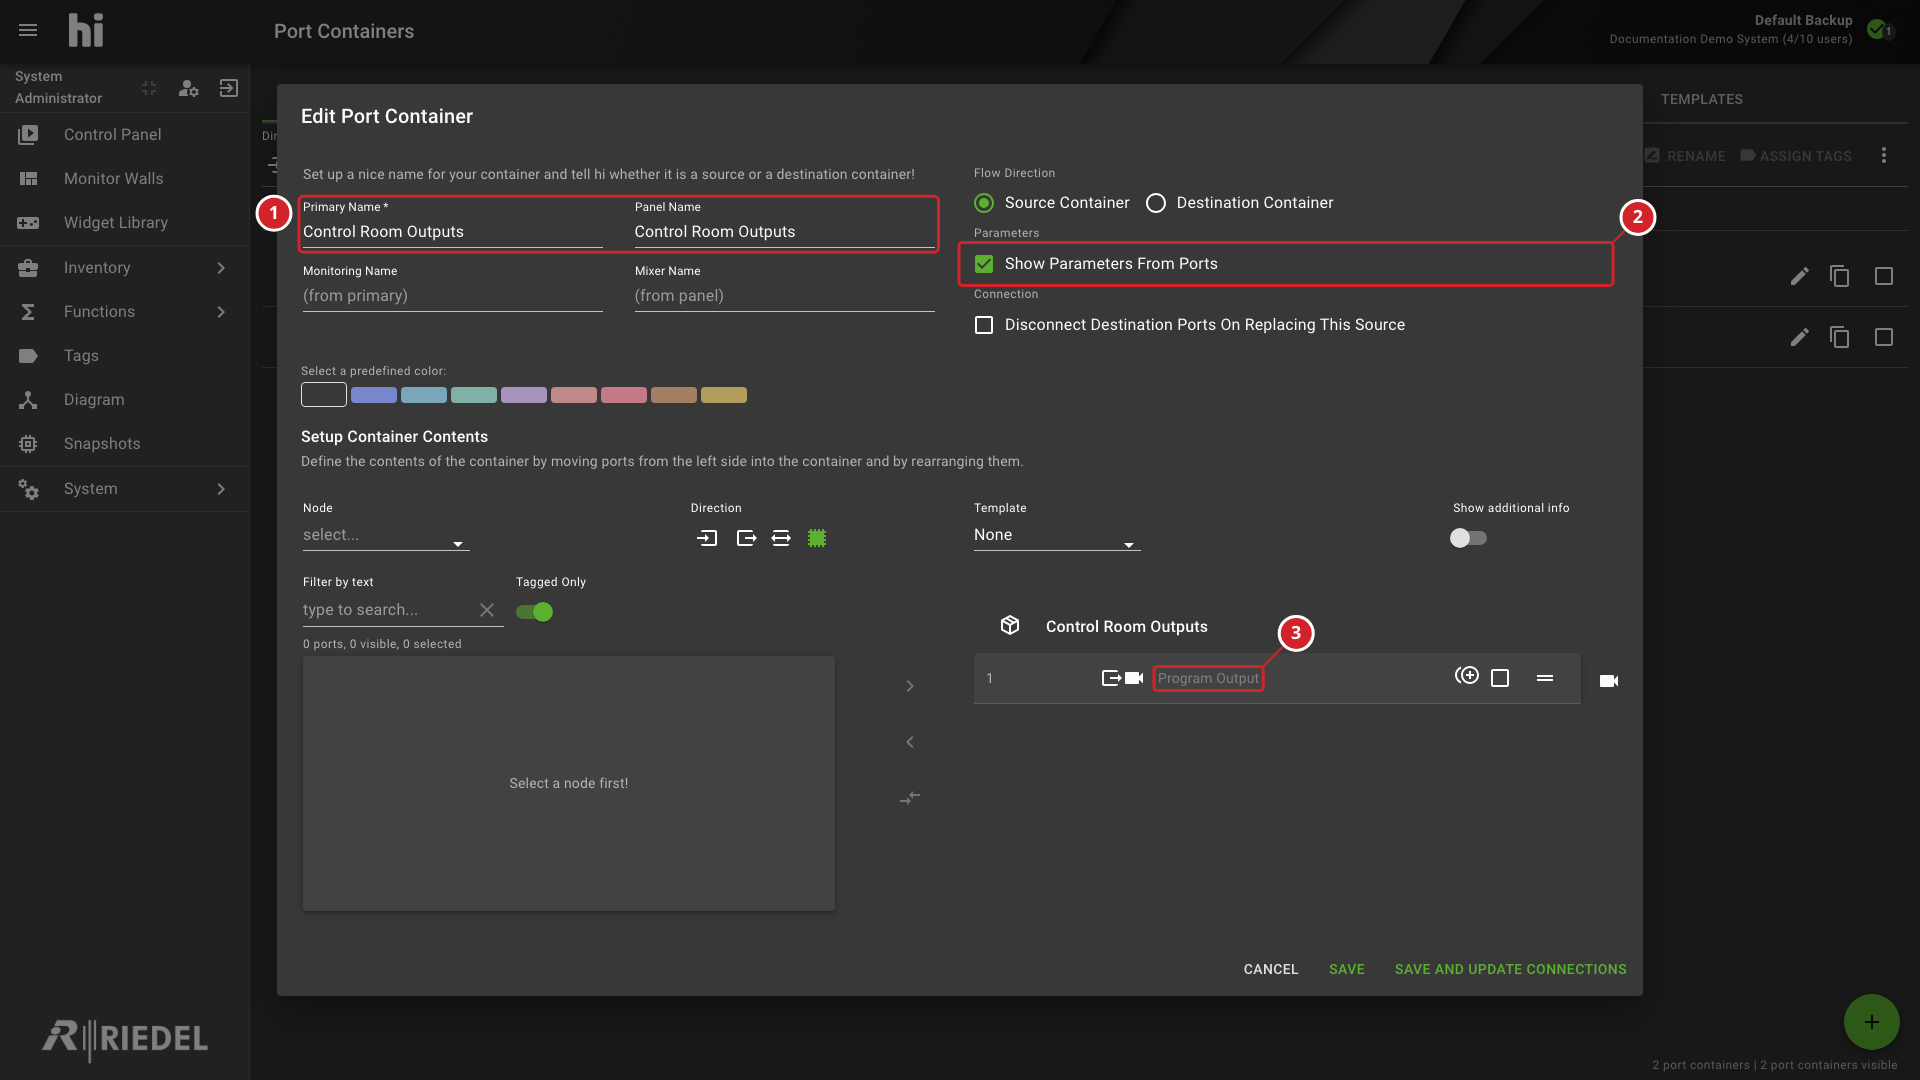
Port Container name and identity.
-
Show Parameters From Ports setting enabled.
-
Mapped Flow Port whose parameters are shown.
Result
A new Port Container is created and appears on the Control Panel as a single routable Source or Destination.
Information
You can also open a Node's Labels tab, set the Layer to Flow, select the Flow Ports, and select Create Port Container from the three-dot menu. To generate containers from a template, select Create Port Containers from Template there.
Connecting Containers
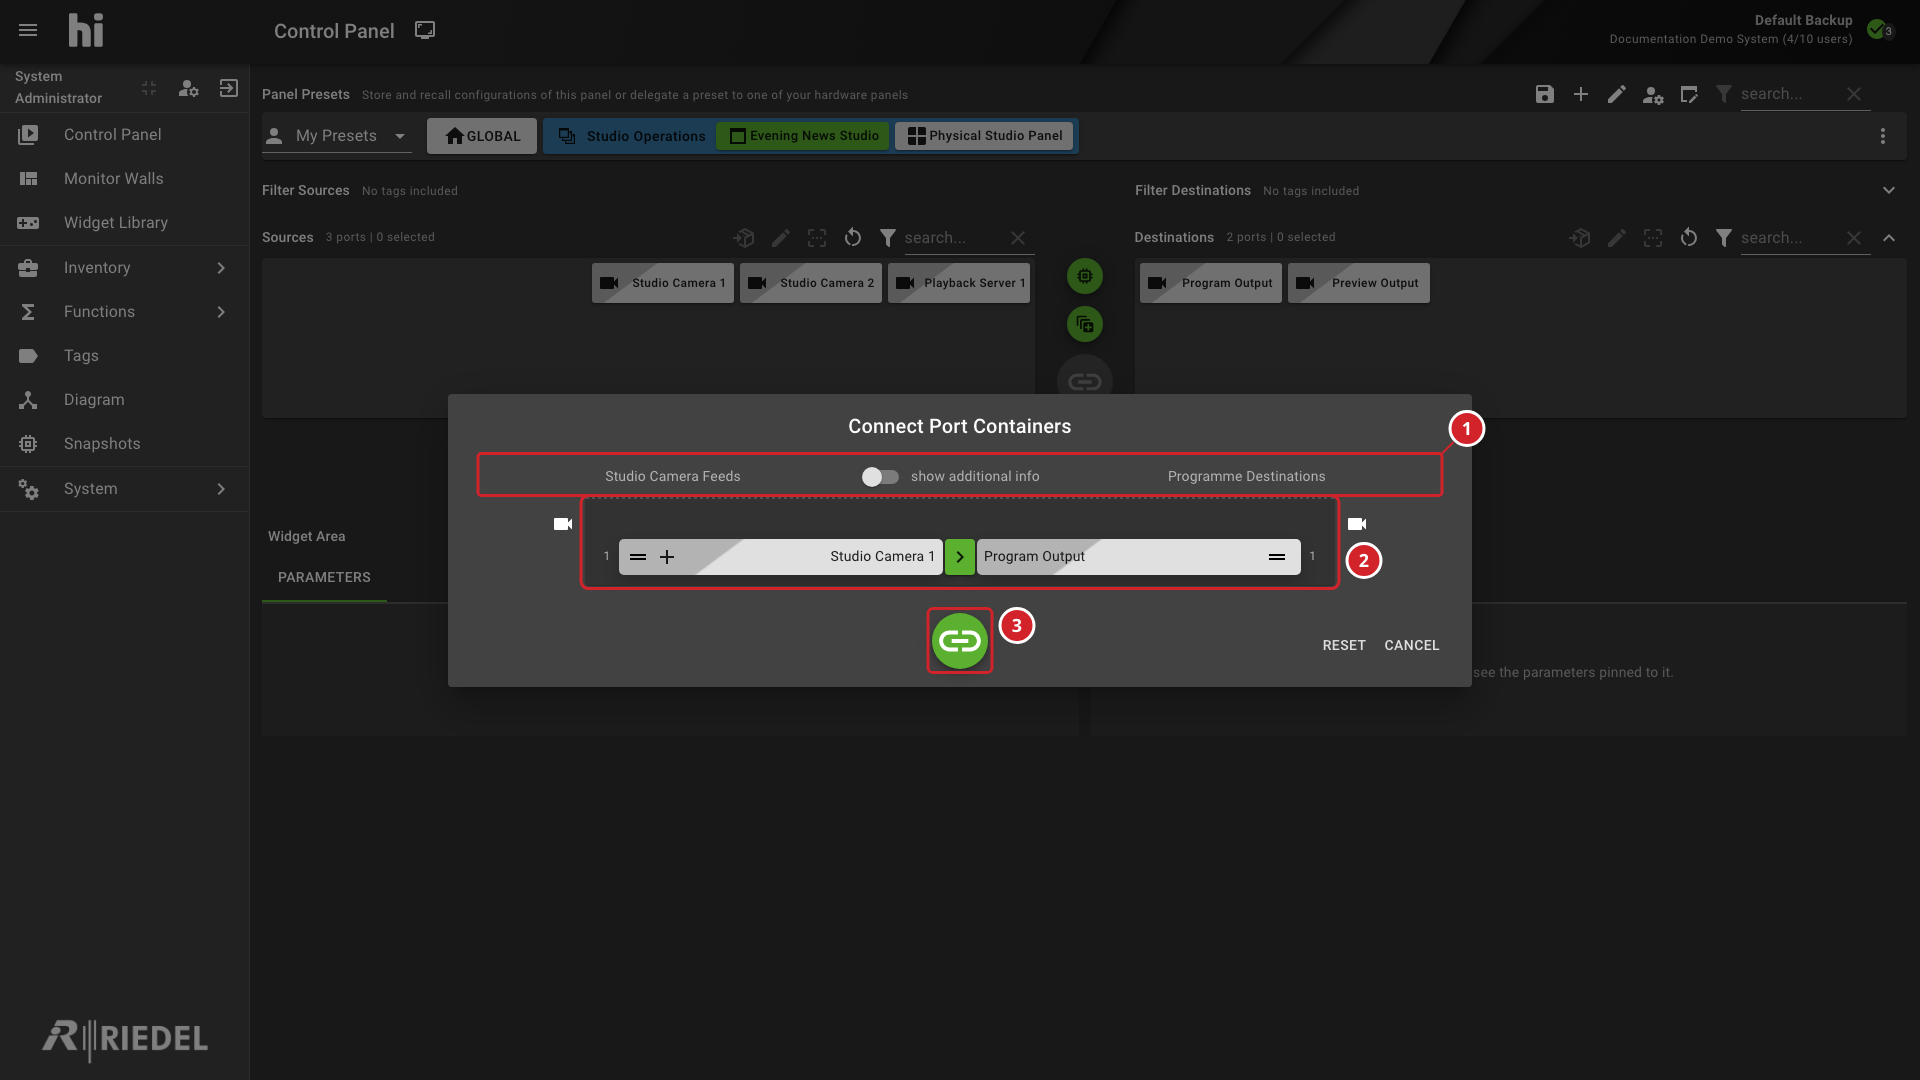
Follow Review and Connect Port Containers to route a Source Port Container to a Destination Port Container and adjust its row pairings.
-
The Source and Destination Port Containers define the route being paired.
-
Each row shows the Port pairing and its direction.
-
Take applies the reviewed connection.
Updating Port Container Connections
Caution
Save and update connections changes live routes that use the container. Review the affected Destinations and the revised Port mapping before saving; perform the change when those routes can be changed safely.
Steps
-
Select the edit icon for an existing container.
-
Modify the Port assignments (add, remove, or reorder Ports).
-
Select Save and update connections.
To replace assigned Ports while retaining their positions, select a Node and the replacement Ports in the left list, then select the assigned entries in the right list and select Switch entries. Both selections must contain the same number of Ports for each signal format. Review the resulting assignments before saving.
Result
hi updates live connections that use the container to apply the changed Port assignments.
Information
Example: A Source Port Container "CAM 1" contains "CCU 1 HD" and is connected to a Multiviewer input. After changing the container contents to "CCU 3 HD" and selecting Save and update connections, hi applies the revised assignment to the existing routes that use "CAM 1".
Editing and Deleting Containers
Caution
Deleting a Port Container removes its saved grouping. Review its references and operator workflows before confirming deletion.
-
Editing: Select the edit icon at the end of the container row. The editing interface is identical to the creation interface.
-
Deleting: Select containers using the checkboxes and select Delete. Confirm the action in the dialog.
Port Container Templates
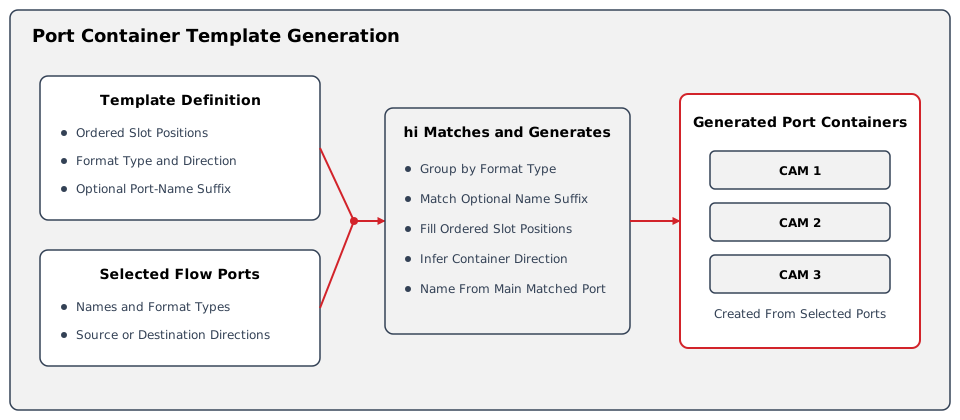
When the installed license includes the Port Container Template option, open Templates in the Port Containers workspace to create, edit, clone, or delete templates. A template defines ordered slots, format and direction, and optional slot details. The editor also includes Connect Matching Templates Only.
Steps
-
Open a Node, select its Labels tab, and set the Layer to Flow.
-
Select the Flow Ports to use for generation.
-
Select Create Port Containers from Template.
-
In Select a Port Container Template, select a template and select Create.
Result
Review the generated containers in the Port Containers workspace before routing them.
Verify the Result
Confirm that the Port Container appears on the intended Control Panel side. Perform a controlled connection and verify the complete Port-to-Port mapping before production use.
Next Steps
-
Use Control Panel to route the Port Container.
-
Use Manage Snapshots to store a known Port Container configuration.