
Manage Rules
Overview
The Rules Page can be used to trigger actions by different conditions, for example Crosspoints, GPI, Tally change or metadata change.
Information
See also: Concepts: Rule Engine for the conceptual foundation of triggers, actions, and Rule logic.
Select Functions > Rules from the navigation panel to see configured Rules, sorted in Rule Groups.
Prerequisites
The user must have the Rule admin role. The Rules page must also be available under the installed License Scope.
Activating / Deactivating Rules
Rules can be inactive. Select the switch icon to toggle. Entire Rule Groups can also be disabled.
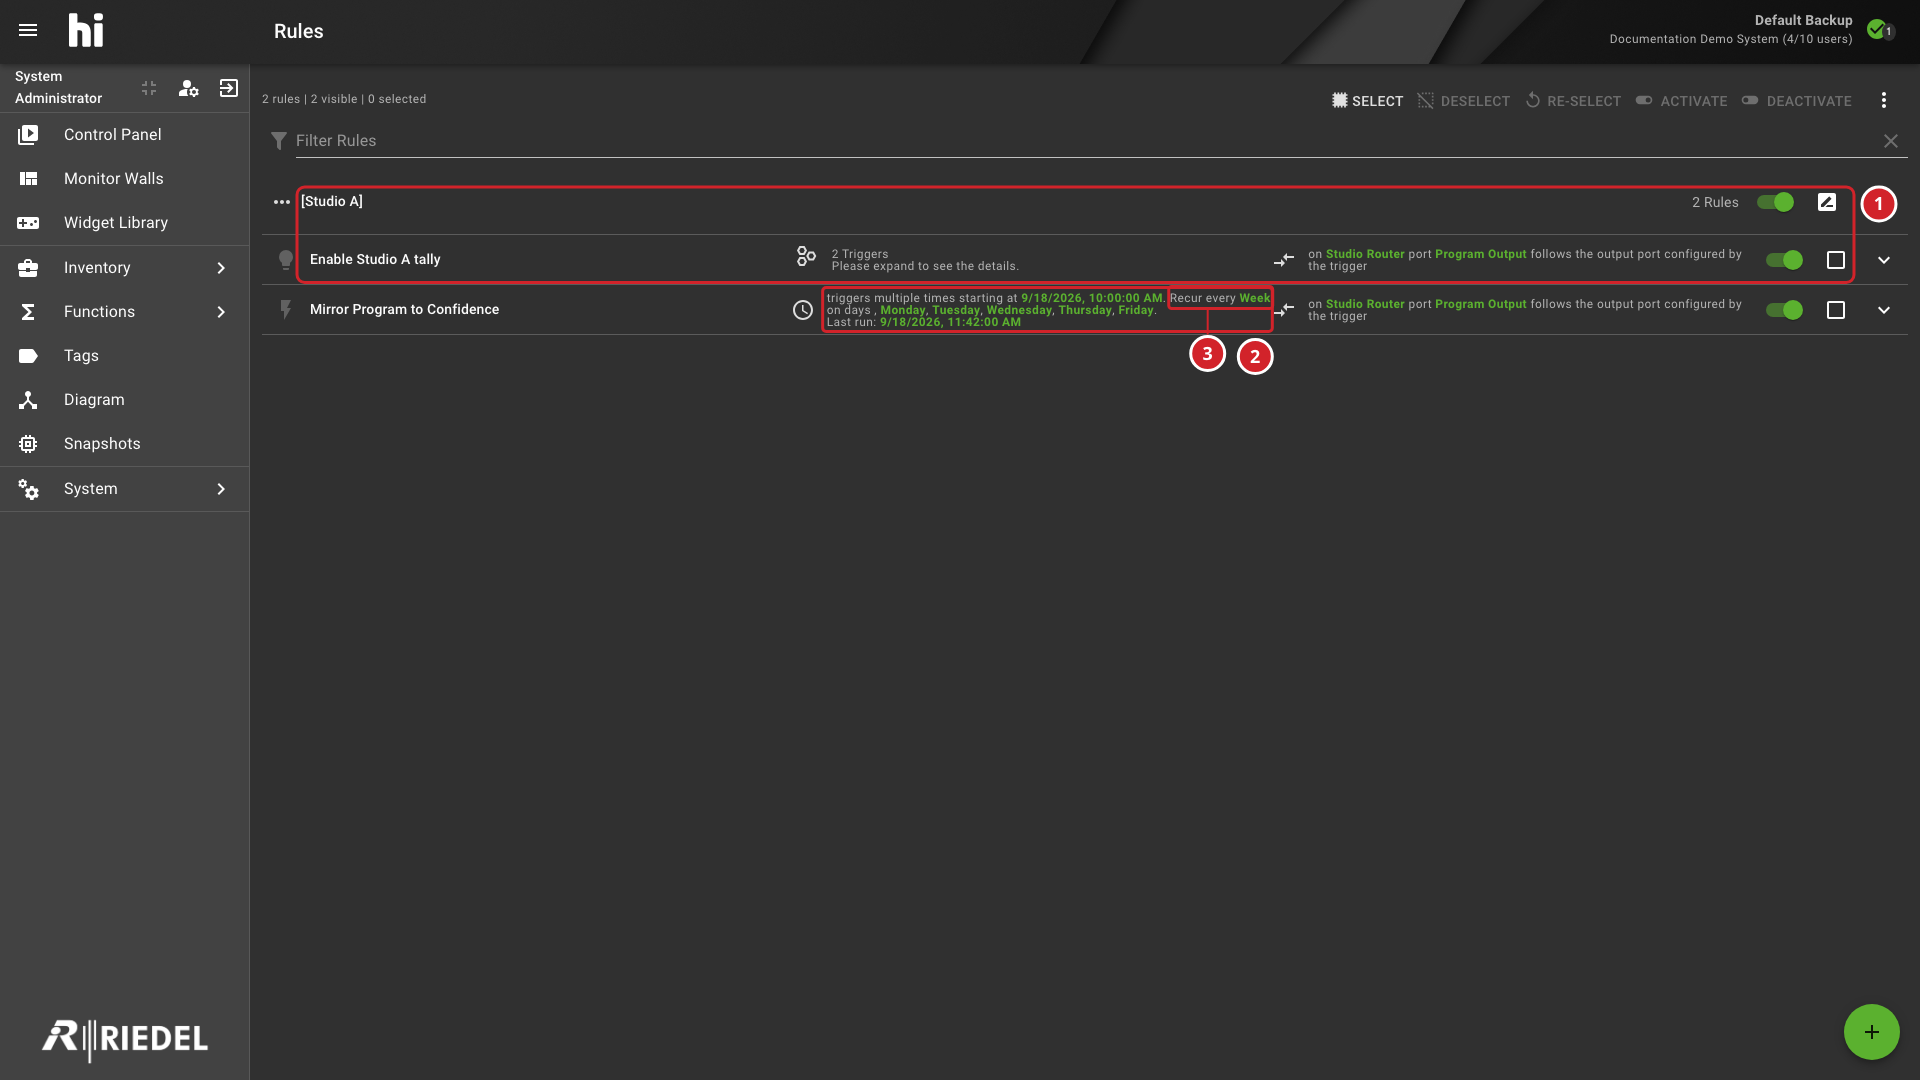
-
Rule enabled control and Studio A Rule Group.
-
Last run timestamp.
-
Recurrence setting shown as Recur every.
Creating Rules
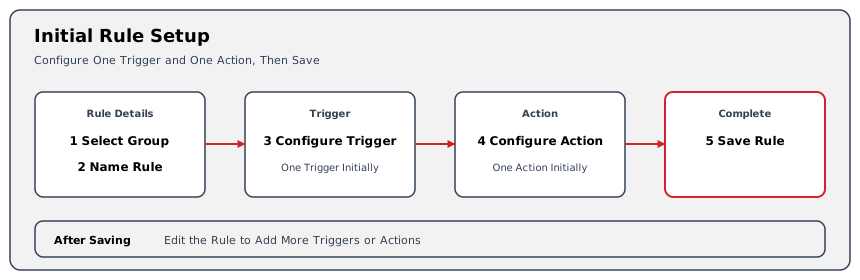
Select the plus button and follow the guided creation process:
-
Select a Rule Group or create one.
-
Enter a Rule name in Rule Name.
-
In Setup Rule Trigger, select a trigger in Select a Trigger and configure it.
-
In Setup Rule Action, select an action in Select an Action and configure it.
-
Select Save.
The trigger and action dialogs offer Back and Cancel in addition to Save. Back appears only while the guided creation process is active.
The Select a Trigger list offers these entries, in this order.
|
Entry |
Described In |
|---|---|
|
on a Connection / Crosspoint |
On a Connection / Crosspoint Trigger |
|
on a GPI Input |
On a GPI Input Trigger |
|
on a Tally change |
On a Tally Change Trigger |
|
on Metadata change |
On Metadata Change Trigger |
|
on Parameter change |
On Parameter Change Trigger |
|
on Button press |
On Button Press Trigger |
|
on Schedule |
On Schedule Trigger |
|
on Preset Change |
On Preset Change Trigger |
The Select an Action list offers these entries, in this order.
|
Entry |
Described In |
|---|---|
|
create a Connection / Crosspoint |
Other Crosspoint Actions |
|
switch a GPO Output |
GPO Action: Impulse |
|
change a Tally |
Tally Action |
|
activate / deactivate Tally |
Activate / Deactivate Tally Action |
|
change Metadata |
Metadata Action |
|
change a Parameter |
Parameter Action |
|
send HTTP Request |
HTTP Request Action |
|
recall a Snapshot |
Snapshot Action |
|
enable / disable a Rule or a Rule Group |
Enable / Disable Rule Action |
|
control a Video Server |
Video Server Action |
|
send commands via telnet |
Telnet Action |
|
assign / unassign Tags To Ports |
Tag Action |
|
lock / unlock destination ports |
Lock Action |
The control a Video Server entry is unavailable unless the license option for video-server integration is installed.
To create Rules with multiple triggers or actions, first create a Rule with a single trigger or action, then add the other triggers or actions in a second step.
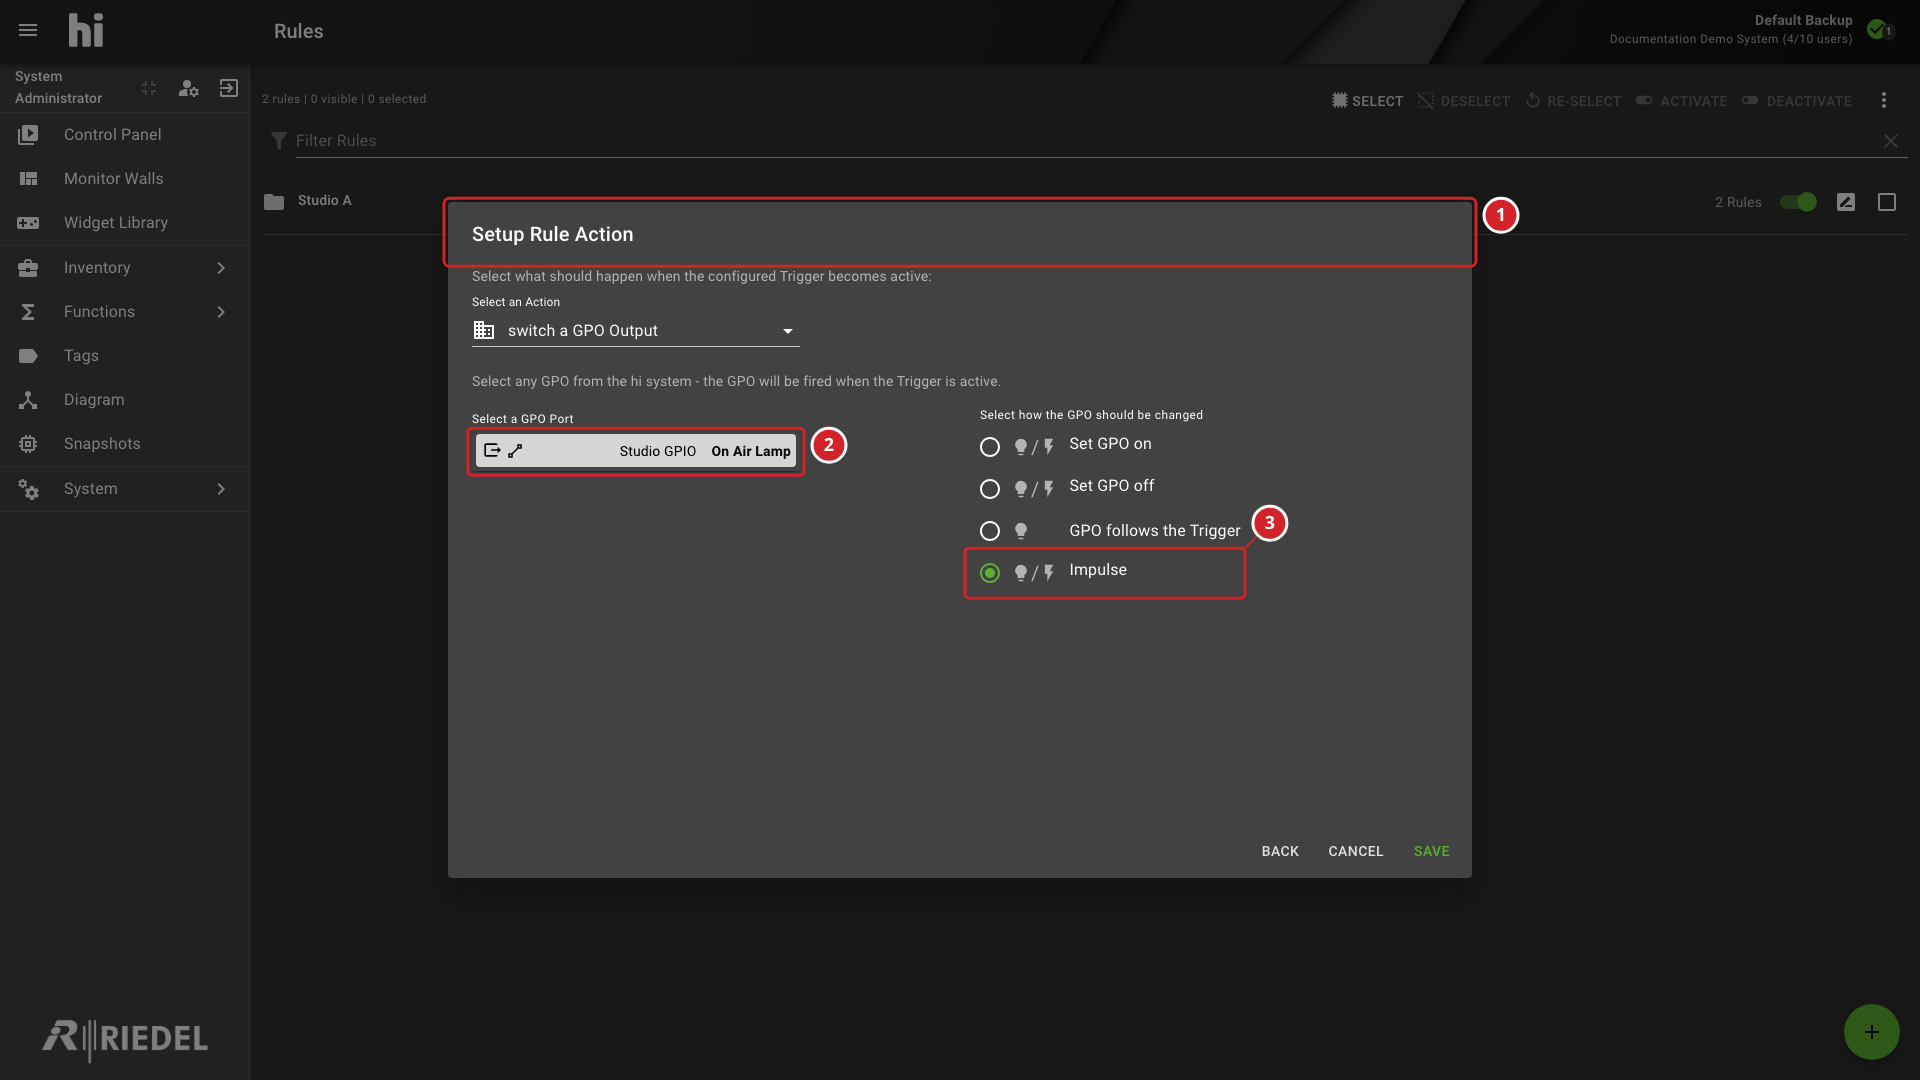
-
Setup Rule Action step.
-
Selected GPO Port: On Air Lamp.
-
Impulse GPO action type.
For the full list of available triggers and actions, refer to Concepts: Rule Engine.
On Schedule Trigger
Select on Schedule. The trigger fires at a specified date and time, either once or on a recurring basis.
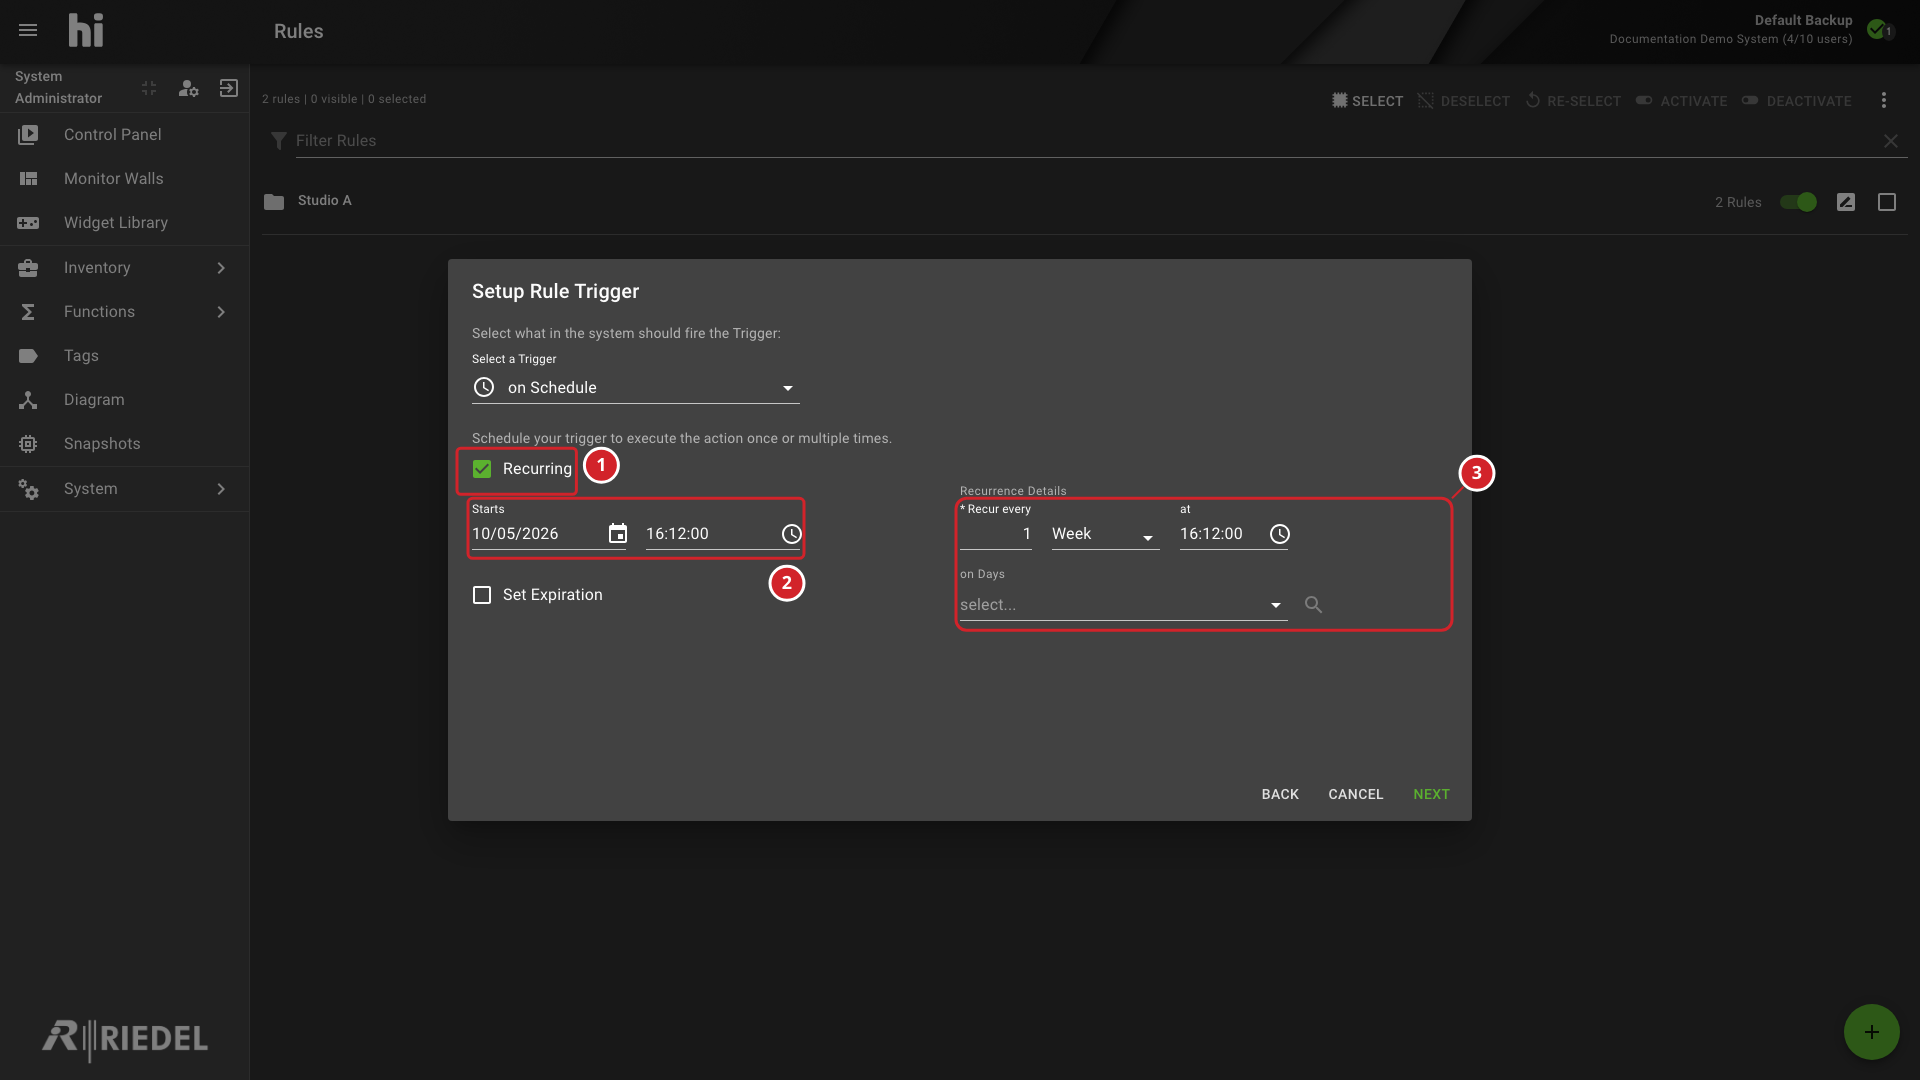
-
Recurring enables repeated execution.
-
Starts sets the first execution date. The adjacent field sets its time.
-
Recurrence Details identifies the controls for the interval, time, and days.
|
Parameter |
Description |
|---|---|
|
Recurring |
Enable to configure repeated execution. When disabled, the trigger fires once at the specified date and time. |
|
Executed on and at |
Date and time for a single execution. |
|
Starts |
Start date and time for a recurring schedule. |
|
Set Expiration |
(Recurring only) Enable to set an expiration date (Expires) and time after which the trigger stops firing. |
|
Recur every |
(Recurring only) Interval value combined with the period unit. The maximum is 2880 for Minute, 48 for Hour, 31 for Day, 52 for Week, 12 for Month, and 100 for Year. |
|
Period |
(Recurring only) Unit of recurrence: Minute, Hour, Day, Week, Month, or Year. |
|
at |
(Recurring only) Time component for the recurrence. The label and precision depend on the period: at (sec) for Minute, at (min:sec) for Hour, and at with the full time for the other periods. |
|
on Days |
(Recurring, Week period only) Select which days of the week the trigger fires. |
|
on Days |
(Recurring, Month period only) Select which days of the month (1 to 31) the trigger fires. |
Minimum recurrence interval for the Minute period is 15 minutes. Select Recurring to see the Recurrence Details.
The trigger view displays the Last run and Next run timestamps when available.
On Preset Change Trigger
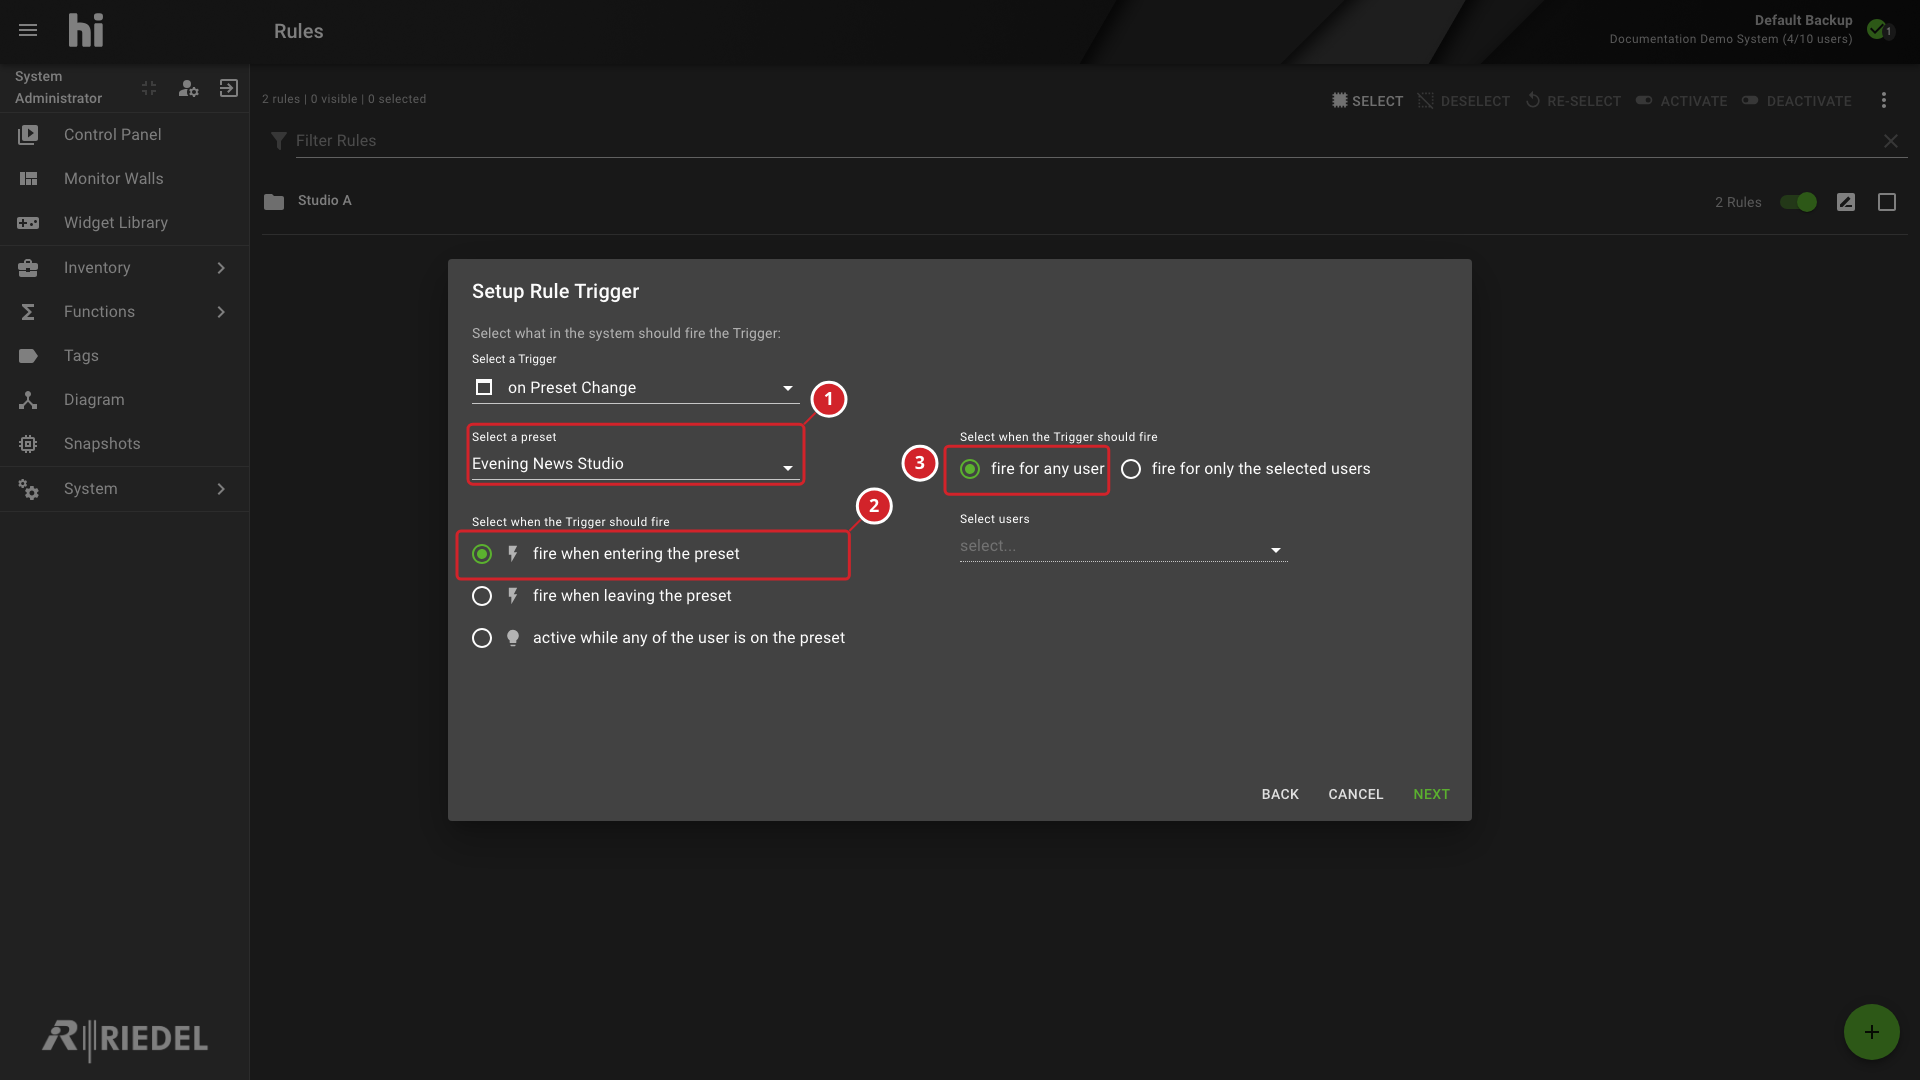
Select on Preset Change. The trigger fires when a user enters, leaves, or stays on a selected Preset.
-
Select a preset selects the Preset to monitor. The example uses Evening News Studio.
-
fire when entering the preset fires when a monitored user enters the selected Preset.
-
fire for any user monitors every user.
|
Parameter |
Description |
|---|---|
|
Select a preset |
The Preset to monitor. |
|
Activation type |
Determines when the trigger fires. fire when entering the preset is event-based and fires once when any monitored user switches to the Preset. fire when leaving the preset is event-based and fires once when any monitored user switches away from the Preset. active while any of the user is on the preset is stateful and remains active as long as at least one monitored user is on the Preset. |
|
User filter |
Select fire for any user to monitor all users, or fire for only the selected users and select specific users in Select users. |
On a Connection / Crosspoint Trigger
Select on a Connection / Crosspoint. The trigger monitors a Crosspoint: select the Select Destination Port, then select when the trigger fires. Select Source Port is available only for fire when a specific Source is connected.
|
Option |
Result |
|---|---|
|
fire every time when the Source changes |
Event-based. Fires each time the selected output connects to a different Source. |
|
fire when a specific Source is connected |
Stateful. Fires when a selected input Port is connected to the output Port, for example when PGM A connects to transmission line TX A. |
On a GPI Input Trigger
Select on a GPI Input, then select a GPI Port in Select a GPI Port. The trigger monitors the GPI input Port of a GPIO device, for example a hiContact. The dialog asks when the trigger should fire.
|
Option |
Result |
|---|---|
|
on any change |
Event-based. Fires each time the GPI turns on or off. |
|
GPI is active |
Stateful. Active while the GPI is active. |
|
GPI is inactive |
Stateful. Active while the GPI is inactive. |
On a Tally Change Trigger
Select on a Tally change, then select a Tally in Select a Tally. The trigger monitors a Tally channel. See Tally and Labels for the Tally model. Select a Port or Port Container is available only for fire when a specific Essence or Port Container receives Tally.
|
Option |
Result |
|---|---|
|
fire on all Tally changes |
Event-based. Fires each time the status of the selected Tally changes, for example at every vision mixer cut. |
|
fire when a specific Essence or Port Container receives Tally |
Stateful. Fires when the selected Essence Port or Port Container receives the selected Tally, for example RED Tally on CCU 1 Camera In. |
On Metadata Change Trigger
Select on Metadata change, then select an Essence Port in Select a Port and enter a Metadata Key. Metadata Value is required and appears only for when a specific Value is set to this Key.
|
Option |
Result |
|---|---|
|
on any change of Metadata at this Key |
Event-based. Fires each time the key appears, disappears, or changes its value. |
|
when a specific Value is set to this Key |
Stateful. Fires when the key is present and holds the configured value. |
On Parameter Change Trigger
Select on Parameter change, then select a Node in Select Node and a parameter in Select Pinned Parameter. The trigger monitors the pinned parameter.
|
Option |
Result |
|---|---|
|
on any change of Parameter value |
Event-based. Fires each time the value changes. |
|
when Parameter has a specific value |
Stateful. Fires when the value matches the configured comparison. |
For a Boolean parameter, select is true or is false under Trigger will fire if the value is.... For an enumeration parameter, select the Value from a list. For other parameters, select an Operator and enter a Value. Numeric operators apply only to numeric parameters.
|
Symbol |
Meaning |
Applies To |
|---|---|---|
|
|
Equals |
All parameter types |
|
|
Not equal |
All parameter types |
|
|
Less than |
Numeric parameters |
|
|
Less than or equal to |
Numeric parameters |
|
|
Greater than |
Numeric parameters |
|
|
Greater than or equal to |
Numeric parameters |
On Button Press Trigger
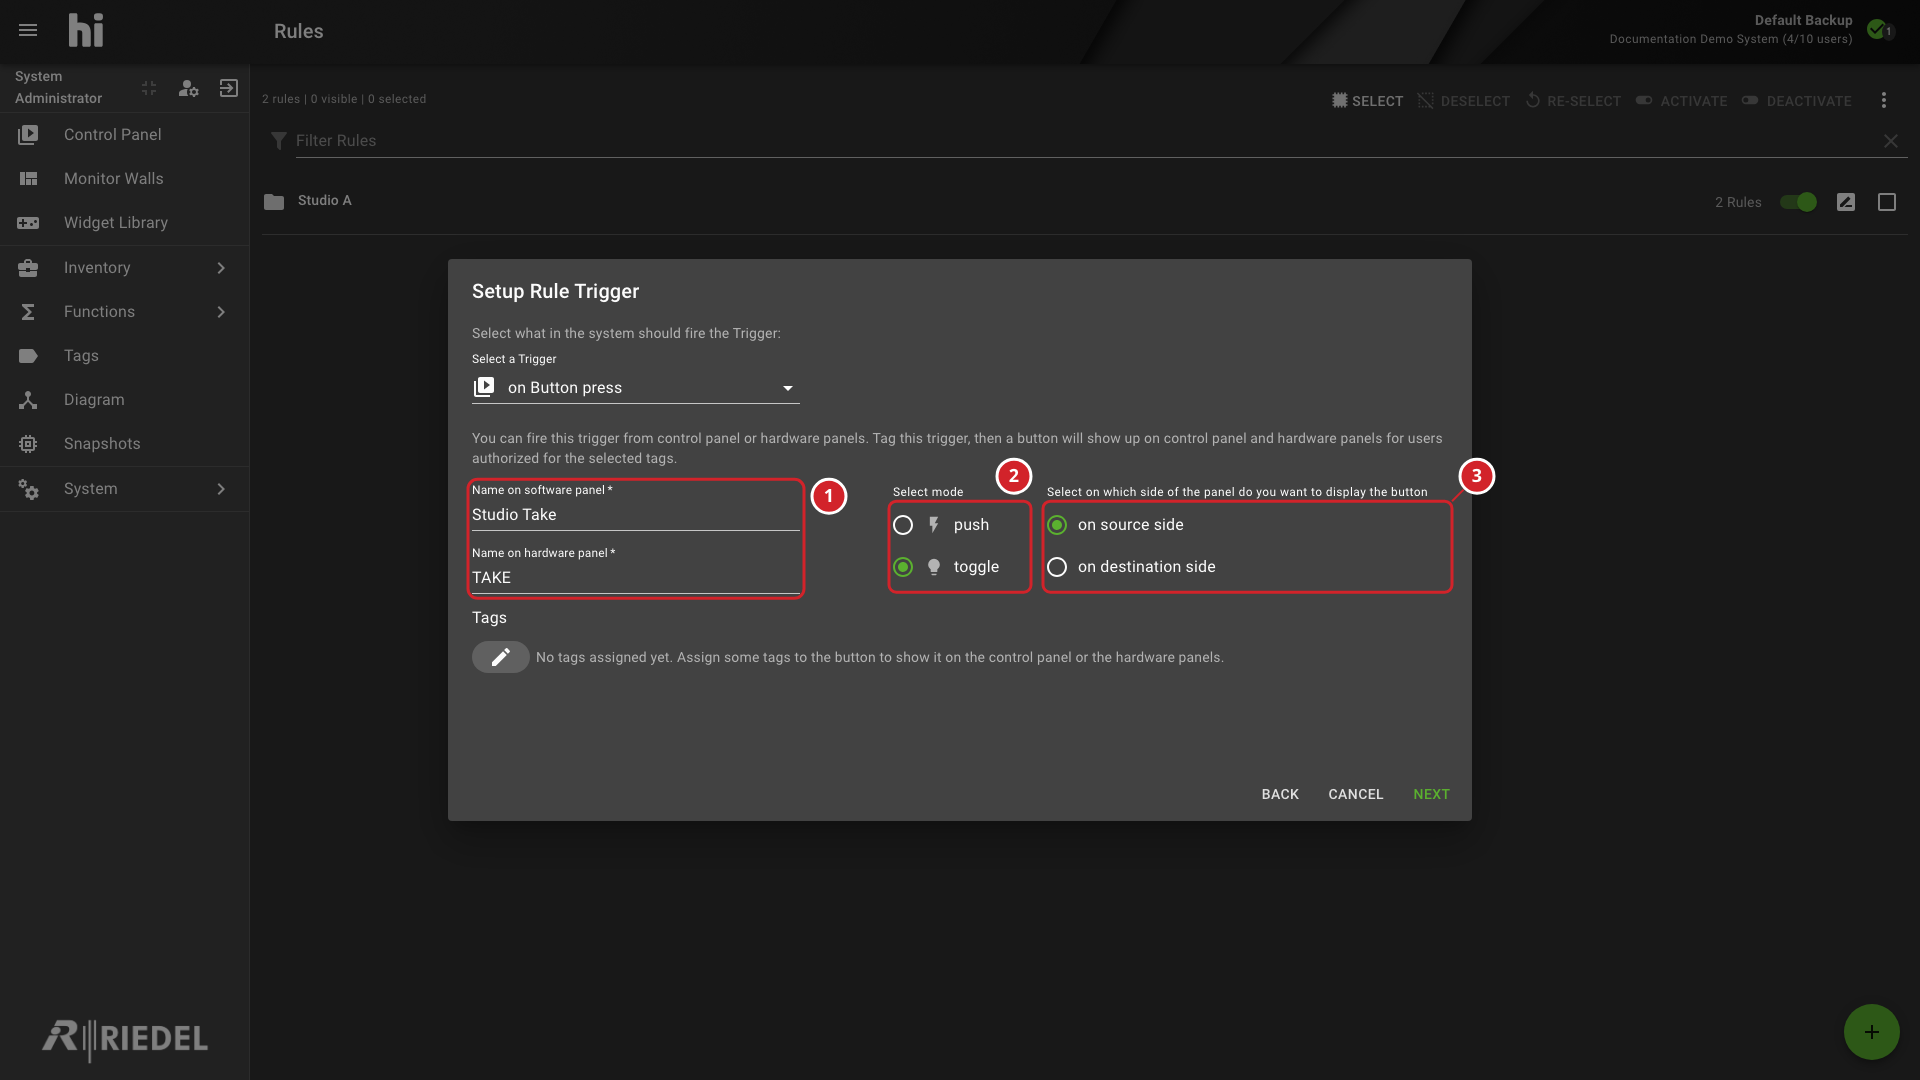
Select on Button press. The trigger creates a button on the Control Panel. A Preset can delegate the button to Hardware Panels. The button behaves like any other Port: filter it using Tags or pin it statically in a Preset.
|
Mode |
Result |
|---|---|
|
push |
Event-based. Fires each time the button is pressed. Use it for one-shot actions, such as loading a Snapshot. |
|
toggle |
Stateful. The button turns on and off and passes its state to the actions. Use it to turn something on and off, such as a Tally. |
-
Name on software panel and Name on hardware panel set the button names.
-
Select mode selects push or toggle. The example uses toggle.
-
The side selection places the button on the on source side or the on destination side.
|
Field |
Description |
|---|---|
|
Name on software panel |
The name that the button shows on the Control Panel. Required. |
|
Name on hardware panel |
The name that the button shows on a Hardware Panel. Required. |
|
Select mode |
push or toggle, as described above. |
|
Select on which side of the panel do you want to display the button |
on source side or on destination side. |
|
Tags |
The Tags that make the button visible. The dialog shows "No tags assigned yet. Assign some tags to the button to show it on the control panel or the hardware panels." until you assign a Tag. |
Assign at least one Tag to the button. Without a Tag, the button does not appear on the Control Panel or the Hardware Panels. Only users who are authorized for the selected Tags see the button.
Crosspoint Action: Follow Source of Trigger
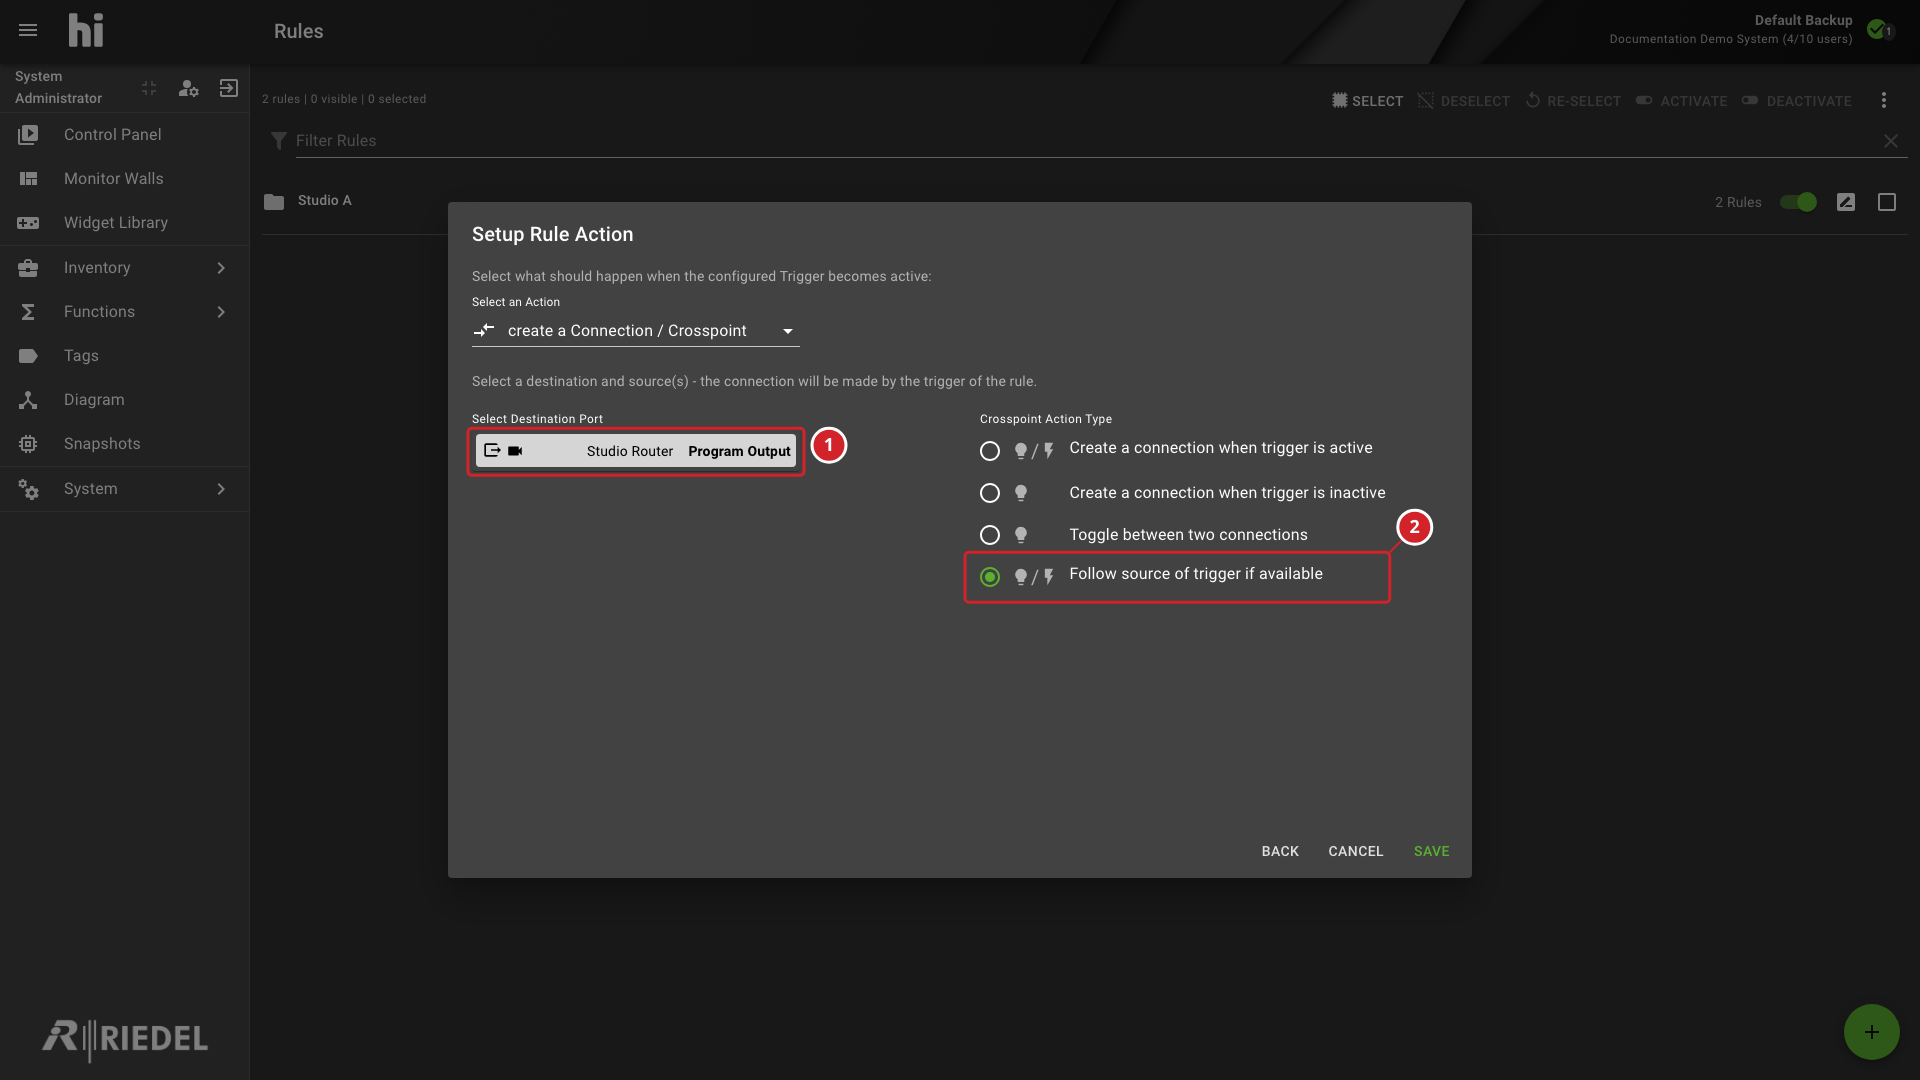
When configuring a create a Connection / Crosspoint action, select the Follow source of trigger if available radio option under Crosspoint Action Type. This variant does not require selecting Source Ports manually. Instead, the action automatically routes the Source Port that the trigger provides to the configured Destination Port. This option requires an on a Connection / Crosspoint trigger. The trigger and action Destinations must be different Ports on the same Node, unless both are IP Ports or one belongs to a Port Container. If these conditions are not met, the Rule fails validation and is disabled.
-
Program Output is the Destination selected for this Crosspoint action.
-
Follow source of trigger if available uses the Source Port supplied by the trigger.
This option is useful when building Rules that mirror routing changes: a Crosspoint trigger detects a route change and the Follow action replicates that Source to a different Destination.
GPO Action: Impulse
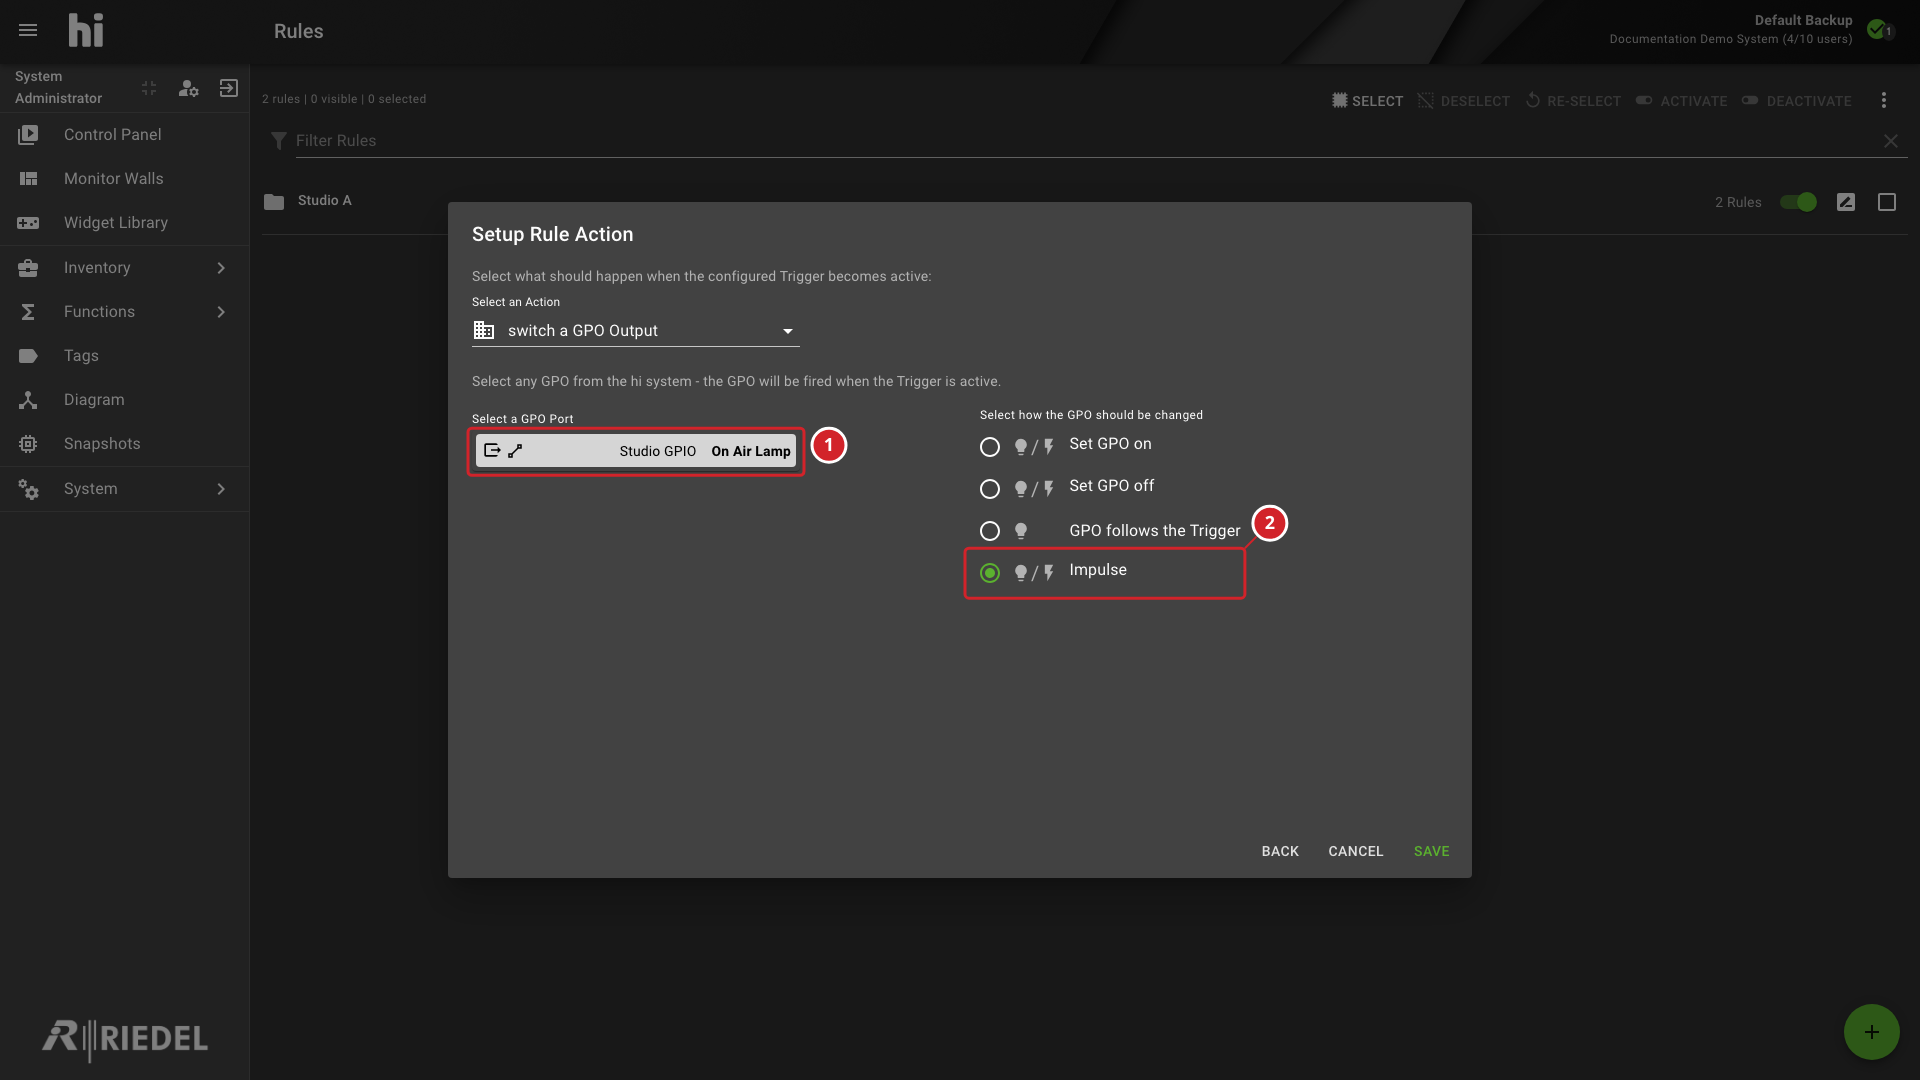
When configuring a switch a GPO Output action, select a GPO Port in Select a GPO Port, then select the Impulse radio option under Select how the GPO should be changed. This action briefly sets the selected GPO to ON, then sets it to OFF.
-
On Air Lamp is the GPO Port selected for this action.
-
Impulse briefly activates the selected GPO.
The four GPO action types are:
|
Type |
Behavior |
|---|---|
|
Set GPO on |
Sets the GPO output to ON when the trigger fires. |
|
Set GPO off |
Sets the GPO output to OFF when the trigger fires. |
|
GPO follows the Trigger |
The GPO state mirrors the trigger state (ON when active, OFF when inactive). Requires a stateful trigger. |
|
Impulse |
Briefly sets the GPO to ON, then sets it to OFF. |
Other Crosspoint Actions
The create a Connection / Crosspoint action connects an input of a Node to an output of a Node that supports routing. Select the Destination in Select Destination Port, then select the Source Port or Ports. Two Source selectors are labeled connect when Trigger is Active and connect when Trigger is Inactive.
|
Type |
Result |
|---|---|
|
Create a connection when trigger is active |
Connects the configured Source to the configured Destination when the trigger fires and is active. |
|
Create a connection when trigger is inactive |
Connects the configured Source to the configured Destination when the trigger fires and is inactive. |
|
Toggle between two connections |
Connects the first Source when the trigger is active and the second Source when it is inactive. |
|
Follow source of trigger if available |
See Crosspoint Action: Follow Source of Trigger |
Tally Action
The change a Tally action changes a Tally on a Port. Select a Tally in Select a Tally and a Port in Select a Port. The options appear under Tally Action.
|
Type |
Result |
|---|---|
|
Tally follows Trigger |
Sets the Tally to active when the trigger is active and to inactive when it is inactive. |
|
Set Tally on |
Sets the Tally to active when the trigger fires, regardless of the trigger state. |
|
Remove Tally |
Removes the Tally from the Port when the trigger fires, regardless of the trigger state. |
Activate / Deactivate Tally Action
The activate / deactivate Tally action changes the status of a Tally Source, for example to enable or disable Tally from a vision mixer. Select a Tally and a Tally Source. The options appear under Tally Source Action.
|
Type |
Result |
|---|---|
|
toggle Tally Source with trigger |
Activates the Tally Source when the trigger is active and deactivates it when the trigger is inactive. |
|
toggle Tally Source with trigger inverted (tally will be off when trigger is active) |
Activates the Tally Source when the trigger is inactive and deactivates it when the trigger is active. |
|
enable Tally from this Source |
Activates the Tally Source when the trigger fires. The Source then influences the Tally of the system. |
|
disable Tally from this Source |
Deactivates the Tally Source when the trigger fires. The Source then does not influence the Tally of the system. |
Metadata Action
The change Metadata action inserts or removes a key and value pair on an Essence Port. Select the Port, then enter the key and value.
|
Type |
Result |
|---|---|
|
Metadata follows Trigger |
Inserts the pair when the trigger is active and removes it when the trigger is inactive. |
|
Set Metadata |
Inserts the pair when the trigger fires. |
|
Remove Metadata |
Removes the pair when the trigger fires. |
Parameter Action
The change a Parameter action changes the value of a pinned parameter. Select a Node in Select Node and a parameter in Select Pinned Writeable Parameter. The options appear under Parameter Action Type.
|
Type |
Result |
|---|---|
|
Set a parameter value when trigger is active |
Sets the parameter to the defined value when the trigger fires and is active. |
|
Set a parameter value when trigger is inactive |
Sets the parameter to the defined value when the trigger fires and is inactive. |
|
Toggle between two values |
Sets the first value when the trigger is active and the second value when it is inactive. |
The value fields are labeled value to set when Trigger is Active and value to set when Trigger is Inactive.
HTTP Request Action
The send HTTP Request action sends an HTTP request to an endpoint. Use it to trigger events in third-party software or to call HTTP-based APIs.
|
Field |
Description |
|---|---|
|
Method |
GET, POST, PUT, or DELETE. |
|
Request URI |
The endpoint URL. Required. |
|
Format |
JSON or TEXT. |
|
Content or JSON Preview |
The body of the request. The field is named JSON Preview when the format is JSON. Insert buttons add Source Primary Name, Source Monitoring Name, Source Panel Name, or Source Mixer Name placeholders, or you can enter free text. |
|
Use Retry Policy |
Enable to set Attempts (1 to 100), Retry Interval (1 to 180 seconds), and Timeout (1 to 180 seconds). |
Snapshot Action
The recall a Snapshot action recalls a Snapshot. Select the Snapshot in Select Active Snapshot or Select Inactive Snapshot, then select Save. The options appear under Snapshot Action Type.
|
Type |
Result |
|---|---|
|
Recall the active snapshot when trigger is active |
Recalls the active Snapshot when the trigger is active. |
|
Recall the inactive snapshot when trigger is inactive |
Recalls the inactive Snapshot when the trigger is inactive. |
|
Toggle between two snapshots |
Recalls the active Snapshot when the trigger is active and the inactive Snapshot when it is inactive. |
Enable / Disable Rule Action
The enable / disable a Rule or a Rule Group action enables or disables a Rule or a Rule Group. Under Select what would you like to control, select Rule or Rule Group, then select the target in Select Rule Group and Select Rule. Under Select how the rule(s) should be changed, select one of these options.
|
Type |
Result |
|---|---|
|
Enable |
Enables the selected Rule or Rule Group when the trigger fires. |
|
Disable |
Disables the selected Rule or Rule Group when the trigger fires. |
|
Follow the Trigger |
The selected Rule or Rule Group follows the state of the trigger. |
Video Server Action
The control a Video Server action controls playback on a video server player channel. Select a Node in Select Video Server Node and a player in Select Player. Under Select the operation on the Player, select one of these options. The entry requires the video-server integration license option.
|
Type |
Result |
|---|---|
|
Cue a Clip |
Cues the clip selected in Select Clip. |
|
Play a Clip |
Plays the clip selected in Select Clip. |
|
Pause |
Pauses playback. |
|
Stop |
Stops playback. |
See Widgets for the player.
Telnet Action
The send commands via telnet action sends a text command to a device using Telnet. Enter the Host, the Port, and the Command. Select AUTO CRLF to have hi insert a carriage return and line feed (CR+LF, hexadecimal 0D 0A) after the line. Set embedded hexadecimal bytes in the command within double curly braces.
Caution
The dialog states that only one execution is allowed within 10 seconds.
Tag Action
The assign / unassign Tags To Ports action assigns Tags to Ports or removes them. Under Select Ports, Port Containers and Portals, select the targets. Select the Tags in the Tags to add and Tags to remove lists. Other Tags on the targets remain unchanged. A stateful Rule can set the Tag when the trigger is active or inactive. An event-based Rule can set the Tag when the trigger is active.
Lock Action
The lock / unlock destination ports action locks or unlocks Destination Ports, Port Containers, or Portals. Select the targets under Select Ports, Port Containers and Portals. Under Lock Destination Action, select one of these options.
|
Type |
Result |
|---|---|
|
Lock follows Trigger |
Stateful. The lock follows the trigger state. |
|
Lock |
Locks the targets when the trigger fires. |
|
Unlock |
Unlocks the targets when the trigger fires. |
See Destination Lock States Reference for lock authority.
Edit Rules
Expand a Rule to see options:
-
Edit logic - open the trigger logic editor (see Editing Trigger Logic)
-
Rename rule - provide a new name
-
Change group - move to another group
-
Clone rule - duplicate all triggers and actions into a new, inactive Rule. Review the copied configuration before enabling it.
-
Delete Rule - remove the Rule
Editing Triggers
To edit a trigger, select Edit Trigger at the end of the trigger. To remove it, select Delete Trigger. To add a trigger to an existing Rule, select Add a new Trigger below the triggers, then configure the new trigger. See Creating Rules for the trigger types.
Editing Trigger Logic
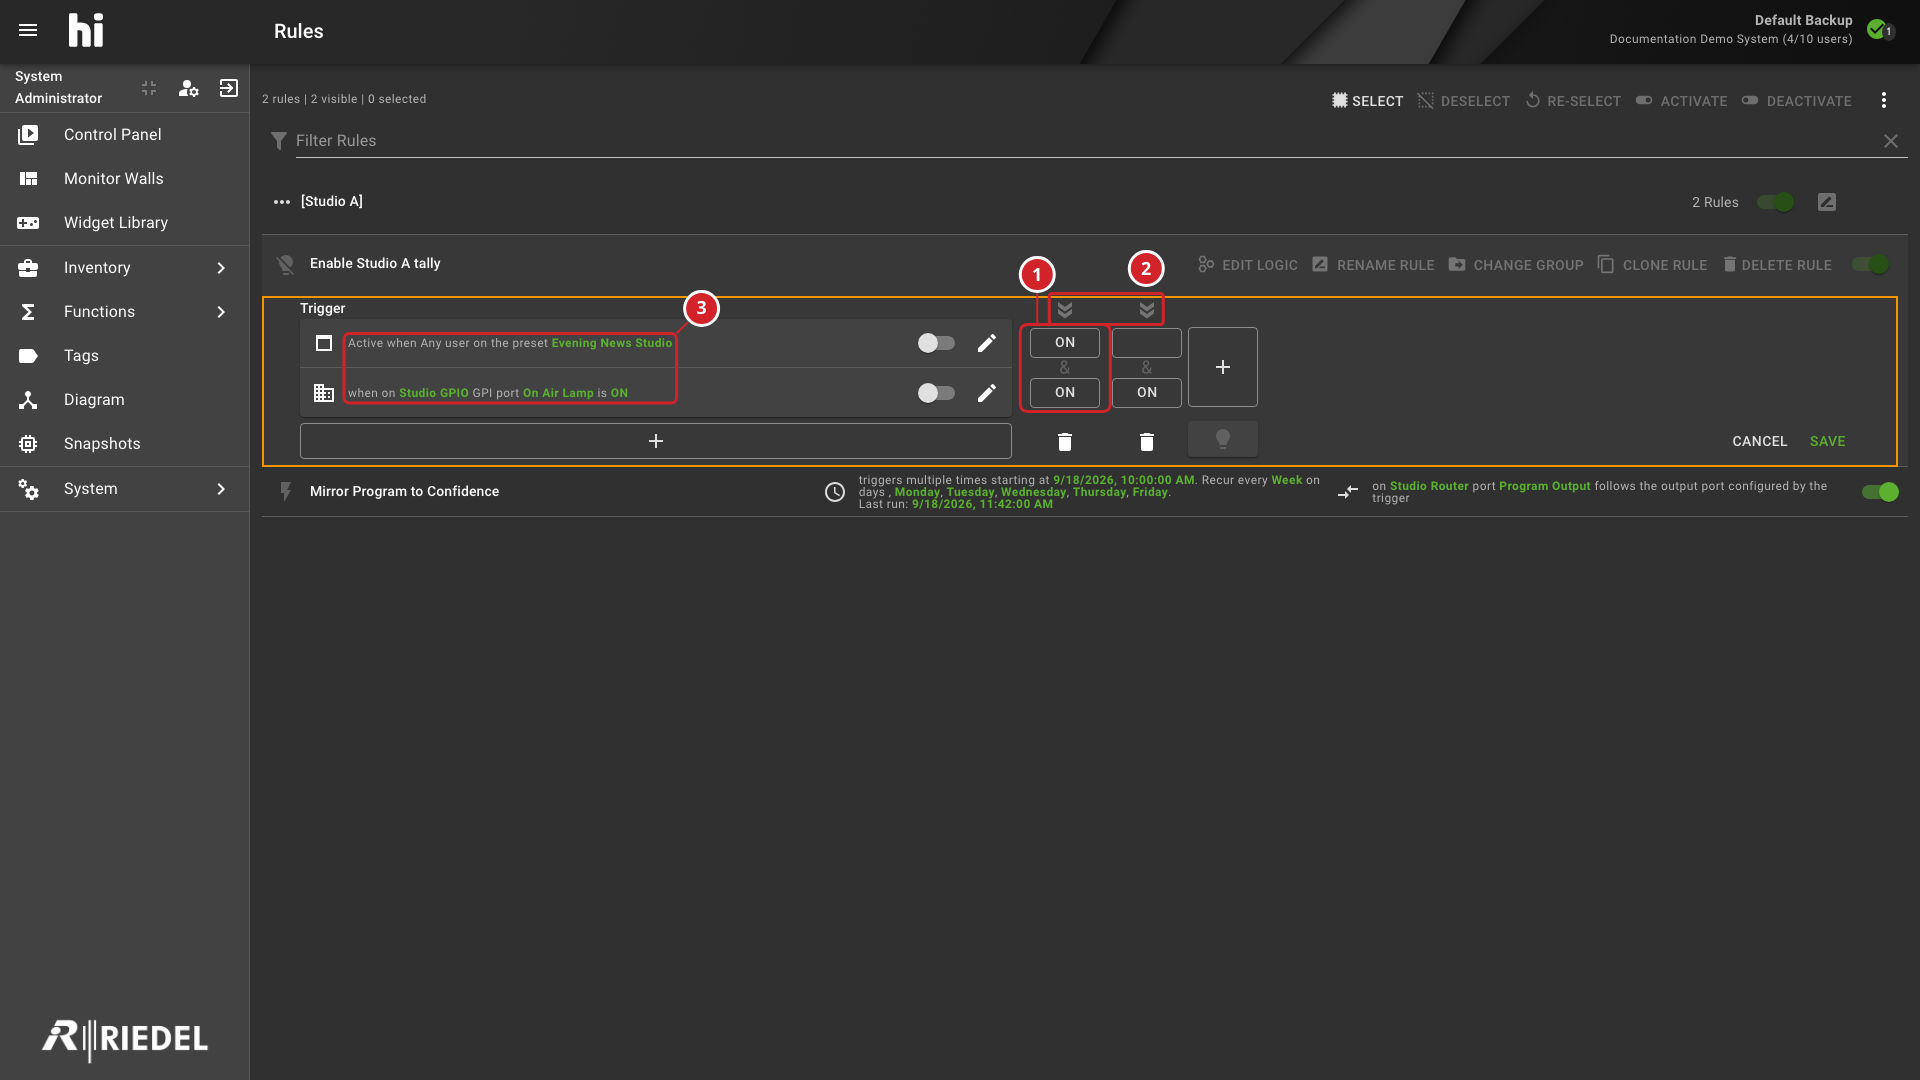
When a Rule has multiple triggers, select Edit logic above the expanded Rule to configure logical combinations using AND/OR columns. See Multi-Trigger Logic in Rule Engine for how columns combine.
-
AND-combine two triggers - set both triggers to ON in the first column and use no other column.
-
OR-combine two triggers - set the first trigger to ON in the first column. Add a second column and set the second trigger to ON there.
-
Require a trigger to be inactive - set the trigger to OFF. For example, a Rule fires only when the button EMERGENCY is not pressed and the Port Container PGM A is connected to Destination TX 1.
-
Triggers combined with AND in one column.
-
Separate columns combined with OR.
-
Configured conditions used by the example Rule.
Testing Trigger Logic
The logic editor shows an orange border. In this mode you can test the logic without changing the state of the triggers in the system. Each stateful trigger shows a switch with the tooltip Simulate State. Event-based triggers show Simulate Event. Change the switch to simulate the state of the trigger. The icon at the lower right of the trigger columns shows the result.
See Stateful and Event-based Rules for how trigger combinations limit the available actions.
Select Save to apply the logic or Cancel to discard it.
Editing Actions
Add, edit, or remove actions. To edit an action, select Edit Action at the end of the action. To remove it, select Delete Action. To add an action, select Add a new Action below the actions. hi attempts to run all actions of a Rule at the same time, so the order of actions is not significant. Complex actions can take different amounts of time to finish.
The lock / unlock destination ports action is available for destination Ports, Port Containers, and Portals. See Rule Engine for its variants.
Verify the Result
Confirm that the Rule appears in the intended Rule Group with the intended active or inactive state. Under operationally safe conditions, verify that its triggers and actions behave as configured, including any recurrence or stateful behavior.
Next Steps
-
Use Control Panel to verify routing actions.
-
Use Manage Tally to verify Tally-dependent triggers.