
Configure hiDot Menu Items
Overview
Use the hiDot editor on a hiDot Node to select what an operator can reach from the device. In the menu structure, you create Presets and Folders, add items to them, and select each entry's icon and color. For hiDot product information, see hiDot (Mark 1). For protocol and workflow details, see Riedel hiDot Series.
Prerequisites
-
Use Node admin and open Inventory > Nodes.
-
The hiDot is added as a Node and its Node tab is available.
-
The Snapshots, Triggers, Pinned Parameters, and Ports you intend to assign already exist.
-
Customize Mode is off on the Node. See Customize Mode.
Open the Menu Item Editor
-
In Inventory > Nodes, open the hiDot Node and select the Node tab.
-
Under Menu Items, select Menu Item Editor.
-
In the hiDot Menu Items dialog, review the existing structure. The dialog states "View, edit or create menu items for the hiDot device."
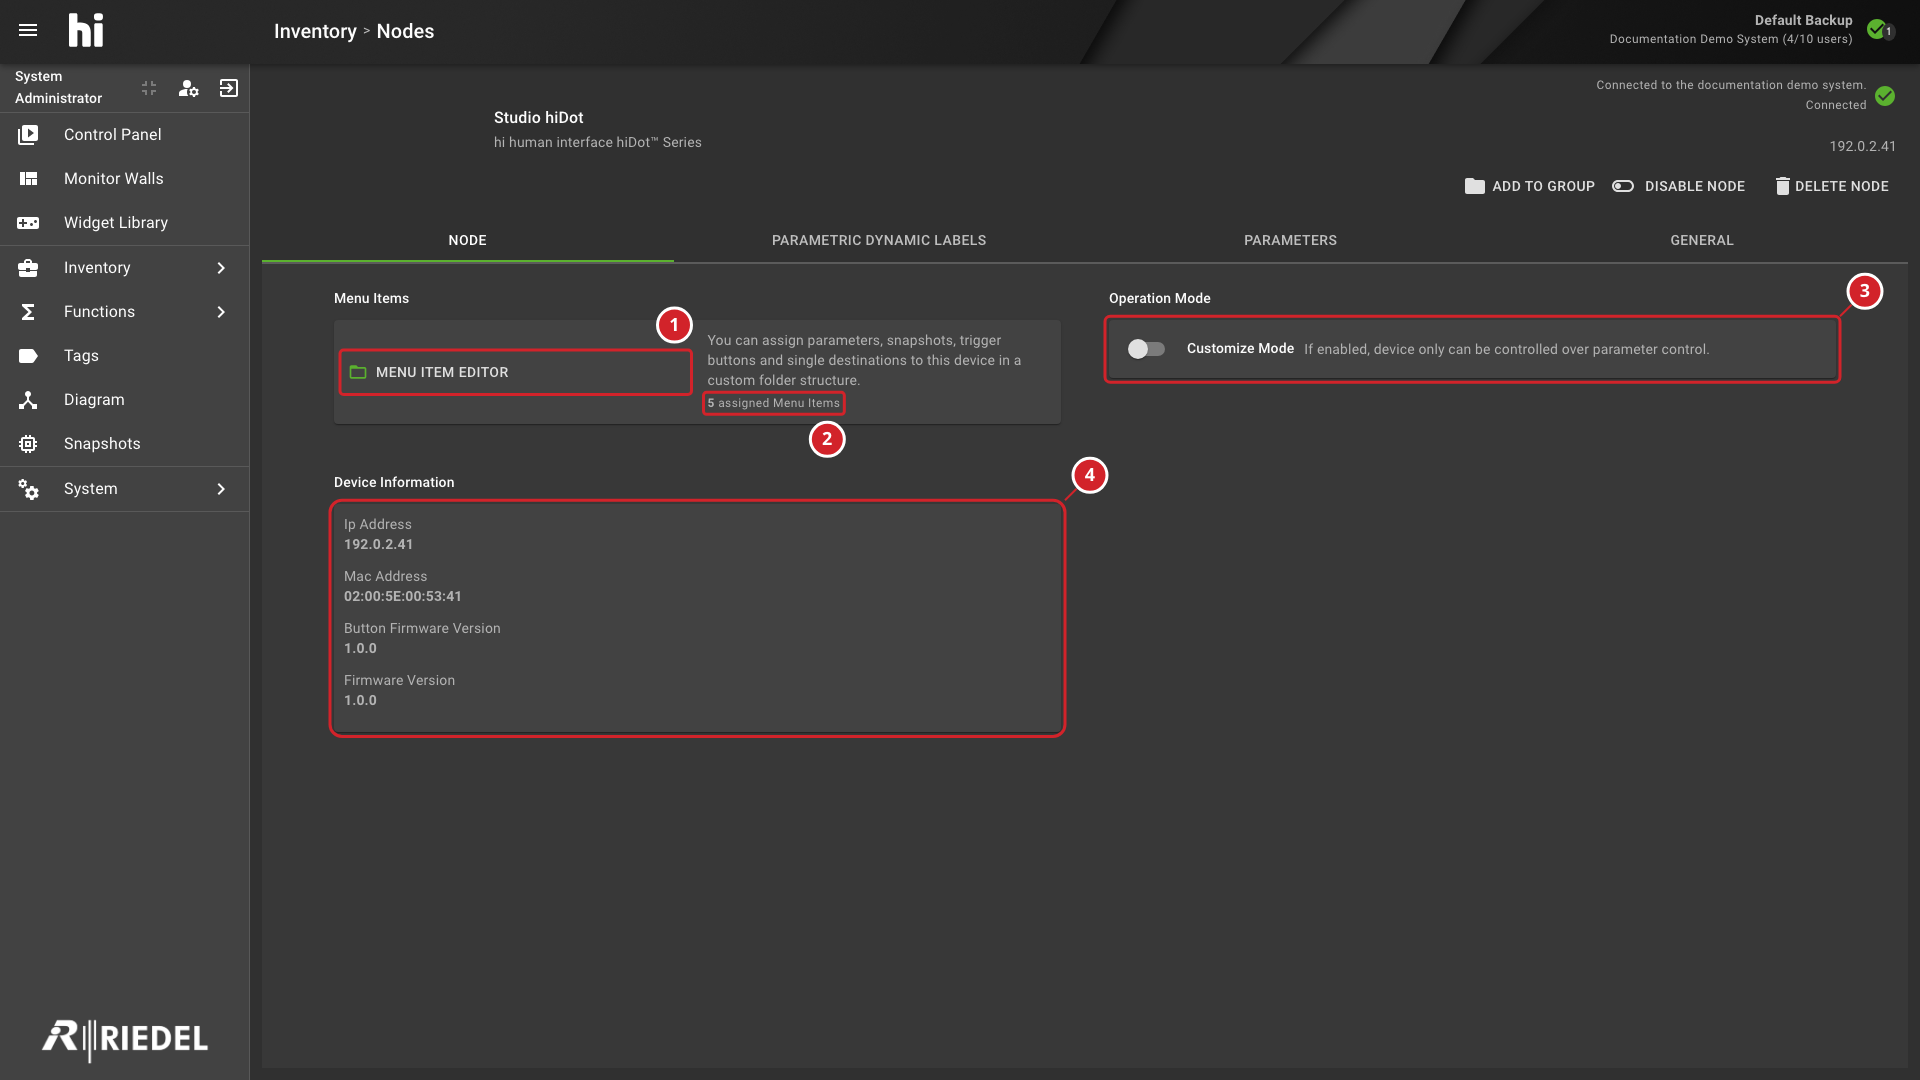
The Menu Item Editor row shows the number of assigned Menu Items. It states that you can assign Parameters, Snapshots, Trigger Buttons, and Single Destinations in a custom folder structure.
-
The Menu Item Editor button, which opens the menu structure editor.
-
The number of assigned Menu Items.
-
The Customize Mode switch, which is off.
-
The Device Information panel, with the IP address, MAC address, and firmware versions of the device.
If the Node does not offer the Menu Item Editor, Menu Items shows separate Trigger, Snapshot, Parameter, and Quick Access rows instead. See Assign Items Without the Menu Item Editor.
Build the Menu Structure
-
Select Add Preset, enter a Preset Name, and select Add. Add Preset is unavailable when five Presets exist.
-
On the Preset, select the Add Items button, then select Add Folder to create a nested Folder Name.
-
Names accept a maximum of 15 characters.
-
Use Expand All and Collapse All to review the structure.
-
Use Rename Preset or Rename Folder (Rename in the dialog) to change a name.
-
Drag entries to change their order within their level.
A new Preset or Folder uses the Folder icon until you change it.
Add Items to a Preset or Folder
On a Preset or Folder, select Add Items, then select one of the following.
|
Action |
Result |
|---|---|
|
Add Folder |
Creates a nested Folder. |
|
Add Parameter |
Opens Select Parameters to assign. Select one or more Pinned Parameters. |
|
Add Snapshot |
Opens Select Snapshots to assign. Select one or more Snapshots. |
|
Add Trigger |
Opens Select Trigger Buttons to assign. Select one or more Button Triggers. |
|
Add Single Destination |
Opens Create Single Destination.
Add a Single Destination |
If there are no Pinned Parameters, the Parameter selector shows No Pinned Parameters. Pin a Parameter first. See Manage Parameter Containers and Assign Parameter Control.
Add a Single Destination
-
Select Add Items, then Add Single Destination.
-
In Create Single Destination, enter a Name.
-
Select Destination Port and select one Destination in the Port Picker.
-
Select Source Ports and select one or more Sources.
-
Select OK. OK is unavailable until both a Name and a Destination Port are set.
The dialog assigns a Destination and its available Sources. Check the result on the hiDot after you save.
Change an Icon or Color
-
On the Preset or Folder, select Change Icon.
-
In Select an Icon, use Filter images to narrow the icon set for this device, select an icon, and select Select.
-
To change color, select Change Color and select one of the predefined colors. Arbitrary colors are not offered.
Move or Delete an Entry
-
Select Move to... on an entry to open Move Item to other folder, then select the destination Folder or root.
-
Select the delete action (Delete Preset, Delete Folder, Delete Destination, Delete Trigger, Delete Snapshot, or Delete Parameter). Delete Menu Item asks you to confirm. Deleting a Preset or Folder also deletes all of its children.
Save the Menu
-
Review the structure.
-
Select Save and apply. The button is unavailable until the structure changes.
-
Select Close to leave the dialog.
Assign Items Without the Menu Item Editor
When the Node does not use the Menu Item Editor, assign items from the Menu Items rows:
-
Trigger opens a selector for Trigger Buttons. Selected Triggers are accessible from the device.
-
Snapshot opens a selector for Snapshots to recall from the device.
-
Parameter opens a selector for Pinned Parameters to control from the device.
-
Quick Access selects one Trigger, Snapshot, or Parameter, or None, for quick access.
Each row shows the number of assigned items. Quick Access shows the selected item type and name.
Customize Mode
Customize Mode is under Operation Mode. When it is on, the hiDot can be controlled only over Parameter Control, and the assignment rows are shown as inactive.
Verify the Result
Reopen Menu Item Editor and confirm the saved structure, names, icons, and colors. Compare the Menu Items count. Then check the hiDot itself; the saved configuration does not confirm what the device displays. Device Information shows the IP Address, MAC Address, Button Firmware Version, and Firmware Version when the Node reports them.
Next Steps
-
Add Snapshots, Triggers, or Parameters you still need, then repeat this procedure.
-
Review Manage Nodes for Node List operations.