
Use a Line Transmit Widget
Overview
A Line Transmit Widget routes configured Source Port Containers or Portals to a selected Destination. It combines selection of a routing Source with controls for individual destination audio Ports.
Typical workflows include:
-
Select a configured feed for an intended Destination through Use the Widget, then inspect the resulting Source and verify the destination signal.
-
Apply Mute or Test to an individual audio Port using the corresponding position in its configured Source. Follow Audio Control Behavior and confirm the affected Port first.
-
Disconnect an individual audio Port, or select an already affected Port again to restore its recorded desired Source when that record is available. Verify the resulting Port state.
An administrator configures the available Sources, Destinations, and audio-control Sources. Mute and Test use those configured Sources; the control names do not guarantee that a Source carries silence or a test signal.
Prerequisites
-
Your account has Control Panel access.
-
The active Control Panel Preset includes the Widget's Widget Group and enables the Widget Area.
-
The Widget has configured Source and Destination Port Containers or Portals.
-
For Mute or Test, an administrator has configured the appropriate Source and matching audio Port positions.
See Configure a Line Transmit Widget for configuration. Leave customization mode before opening the Widget.
Use the Widget
Caution
Selecting a Source sends a routing change to the selected Destination immediately. Selecting an enabled audio Port applies its selected mode immediately. Confirm the affected Destination or Port before proceeding.
-
Open the Control Panel and select the Widget's Widget Group.
-
Select the Line Transmit Widget to open its dialog.
-
In Destinations, select the required Destination Port Container or Portal. Selecting it again clears the selection.
-
In Sources, select the required Source to send the routing request.
-
To operate an individual audio Port, select Mute, Disconnect, or Test. Selecting the same mode again clears it.
-
Before selecting the audio Port, confirm the intended mode and the affected Port. Then select the enabled audio Port.
This sends a routing change for that Port. Mode selection alone does not change its routing.
-
Inspect the displayed Port state and Source. Select Close when finished.
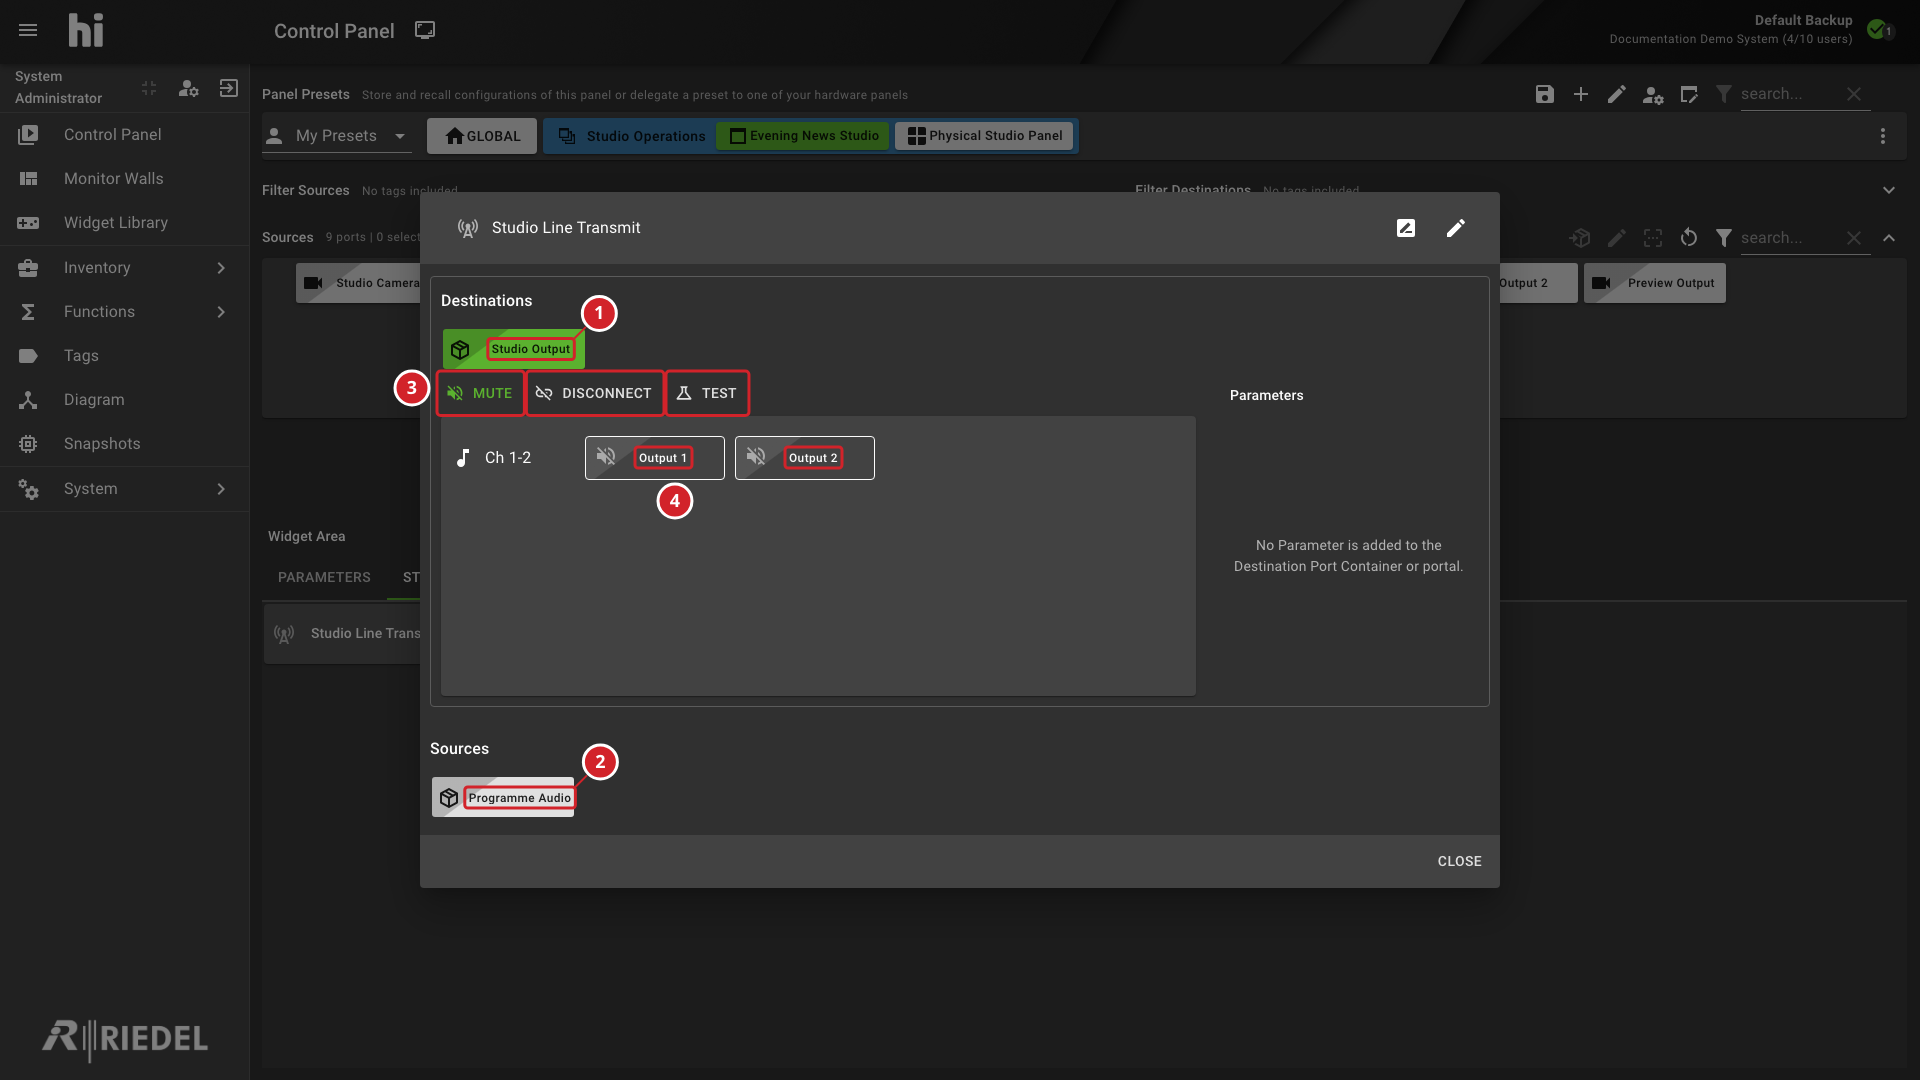
-
Destinations identifies the selected Destination Port Container or Portal.
-
Selecting a configured Source sends the routing change to that Destination immediately.
-
Mute, Disconnect, and Test select the mode for individual audio Ports.
-
Selecting an enabled audio Port applies the selected mode to that Port.
Audio Control Behavior
|
Control |
Effect When Selecting an Audio Port |
|---|---|
|
Mute |
Routes the Port from the corresponding position in the configured Mute Source. |
|
Disconnect |
Sends a disconnect request for the Port. |
|
Test |
Routes the Port from the corresponding position in the configured Test Source. |
The controls require audio Ports. Mute and Test also require their configured Sources. Individual Ports are disabled when the selected mode cannot use their positions.
Selecting an already muted, disconnected, or tested Port again can restore its recorded desired Source. This requires a recorded desired Source; verify the resulting state.
Verify the Result
Confirm that the dialog shows the intended Source for the affected Destination or audio Port. A displayed request or selected mode alone does not confirm the signal at the destination device.
If a request fails, use the displayed error to identify the failed operation:
|
Displayed Message |
Operation to Check |
|---|---|
|
Error best effort connecting ports. |
Routing a Source to the selected Destination. |
|
Error sending crosspoint change |
Applying an audio mode to an individual Port. |
Confirm the selected Destination, configured Sources, and current device state. If the problem remains unresolved, follow Customer Support.
Next Steps
-
See Use the Control Panel for other routing workflows.
-
See Configure a Line Transmit Widget to change the Widget's configured controls.