
Create a Snapshot from Selected Ports
Overview
Use this common Snapshot workflow to save the current state of selected Ports directly from the Control Panel. Select which component types to capture and save them in a new Snapshot. The same workflow can add components to an existing Snapshot.
To prepare a named, empty Snapshot first, use Create a Snapshot from the Workspace.
Prerequisites
-
Use an account with the Snapshot admin role.
-
Open Control Panel with a Preset in Take or Direct Take mode. The Snapshot icon is not shown for a Preset in Single Destination mode.
-
Use Control Panel access and Tag access to the Ports being captured. Only Ports visible to the current user can be saved.
Capture the Selected Ports
-
Open the Control Panel in a mode that supports Snapshot creation.
-
Select the Snapshot icon with the tooltip Select ports to create a new snapshot to enter Snapshot Creation mode.
-
Select the required Sources or Destinations. Select as many Ports as the Snapshot must cover.
-
Select Create Snapshot. The button stays unavailable until at least one Port is selected. To leave the mode without saving, select Exit Snapshot Creation Mode.
-
In Select Snapshot, enter a new name in the first row (placeholder new) to create a Snapshot, or select an existing Snapshot to add to it. Use Filter by text to find an existing Snapshot. Select Next.
-
In Add to snapshot, select the required component types, then select Add.
Next stays unavailable until a Snapshot is selected, or until a name is entered for a new Snapshot. You can enter a new name and select existing Snapshots in the same pass. hi then creates the new Snapshot and adds the components to each selected existing Snapshot.
The component list offers these choices:
|
Component choice |
Saves |
|---|---|
|
current connection of selected destinations |
The current Source of each selected Destination. Unavailable when no Destination is selected. |
|
parameters pinned to selected ports |
Parameters pinned to the selected Ports. |
|
labels of selected ports |
Labels of the selected Ports. |
|
configuration of selected port containers |
Configuration of the selected Port Containers. |
|
tag assignments of selected entities |
Tag assignments of the selected Ports. |
hi stores only information of online Nodes. See the component reference.
hi shows Adding items to snapshot... while it saves. For a new Snapshot, it then confirms with Snapshot successfully created followed by the Snapshot name.
Enter Snapshot Creation Mode
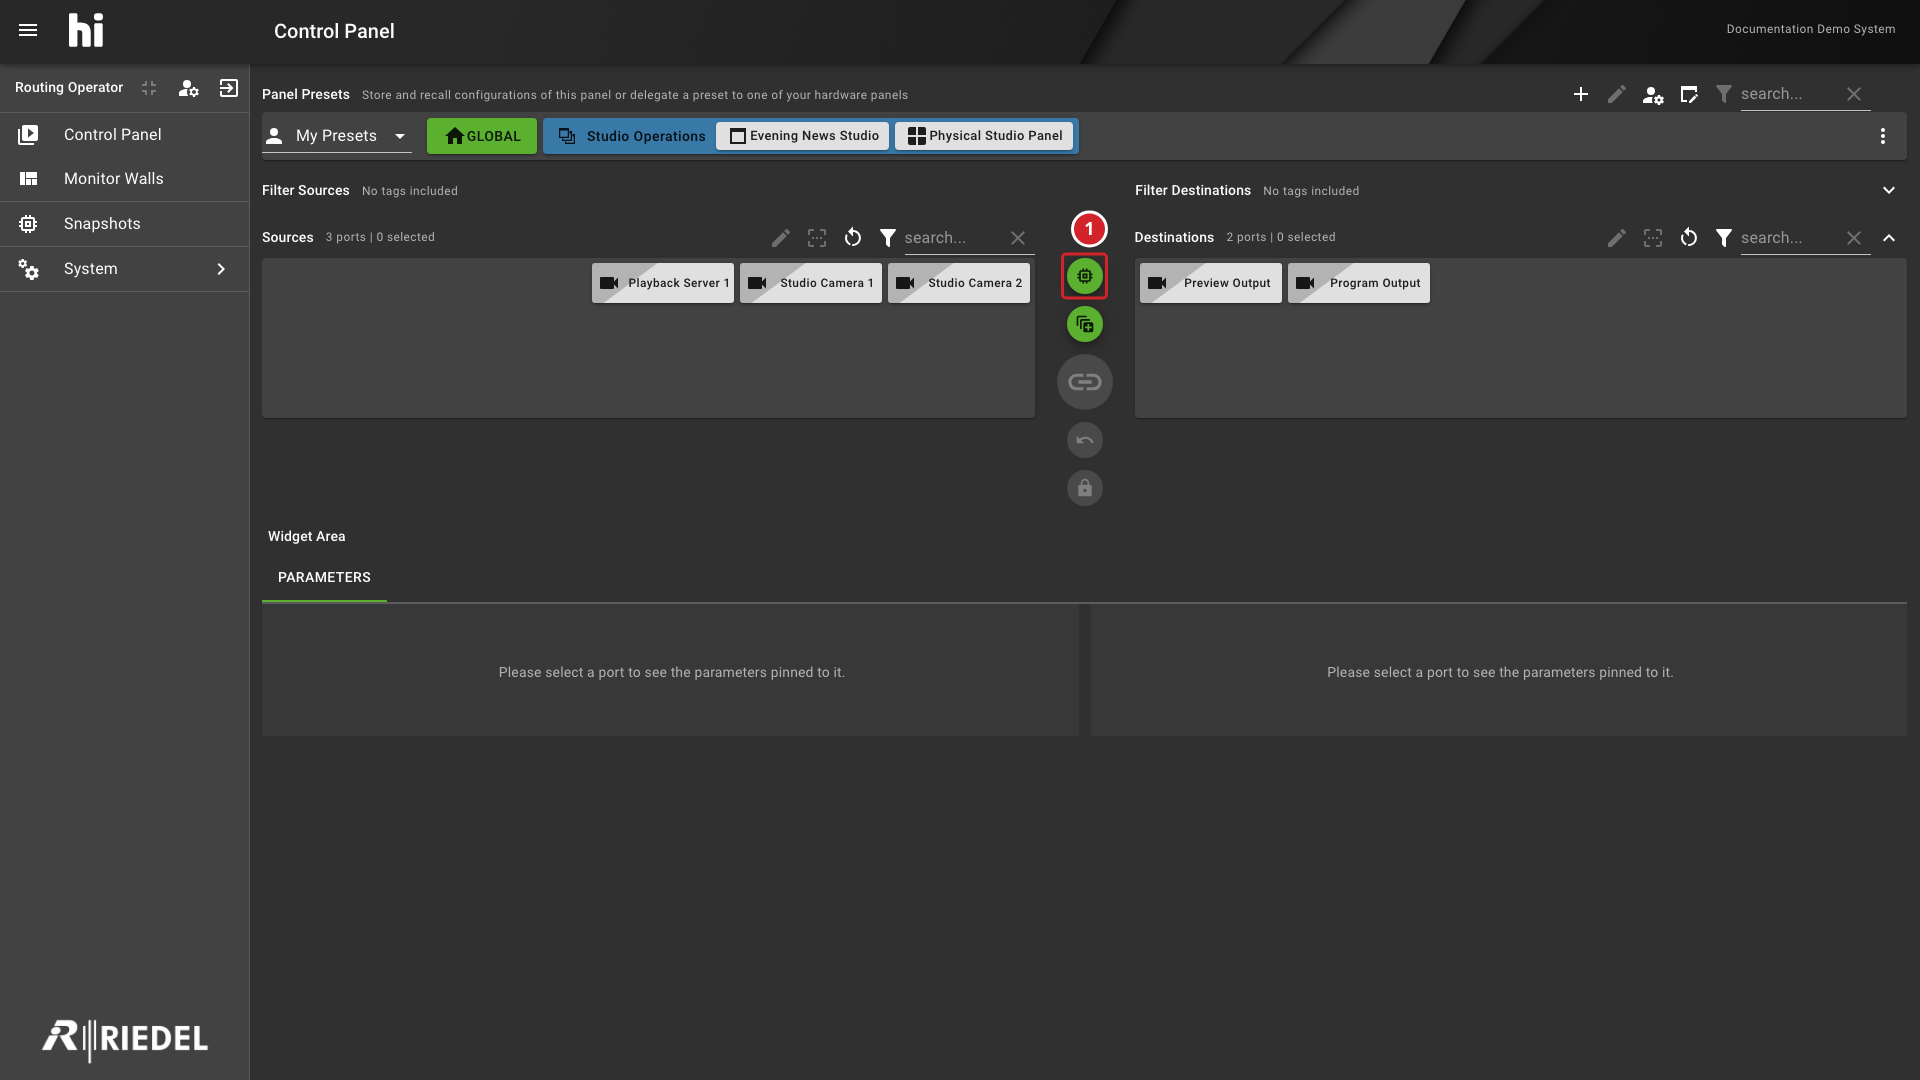
-
Select ports to create a new snapshot starts Snapshot Creation mode.
Select Sources and Destinations
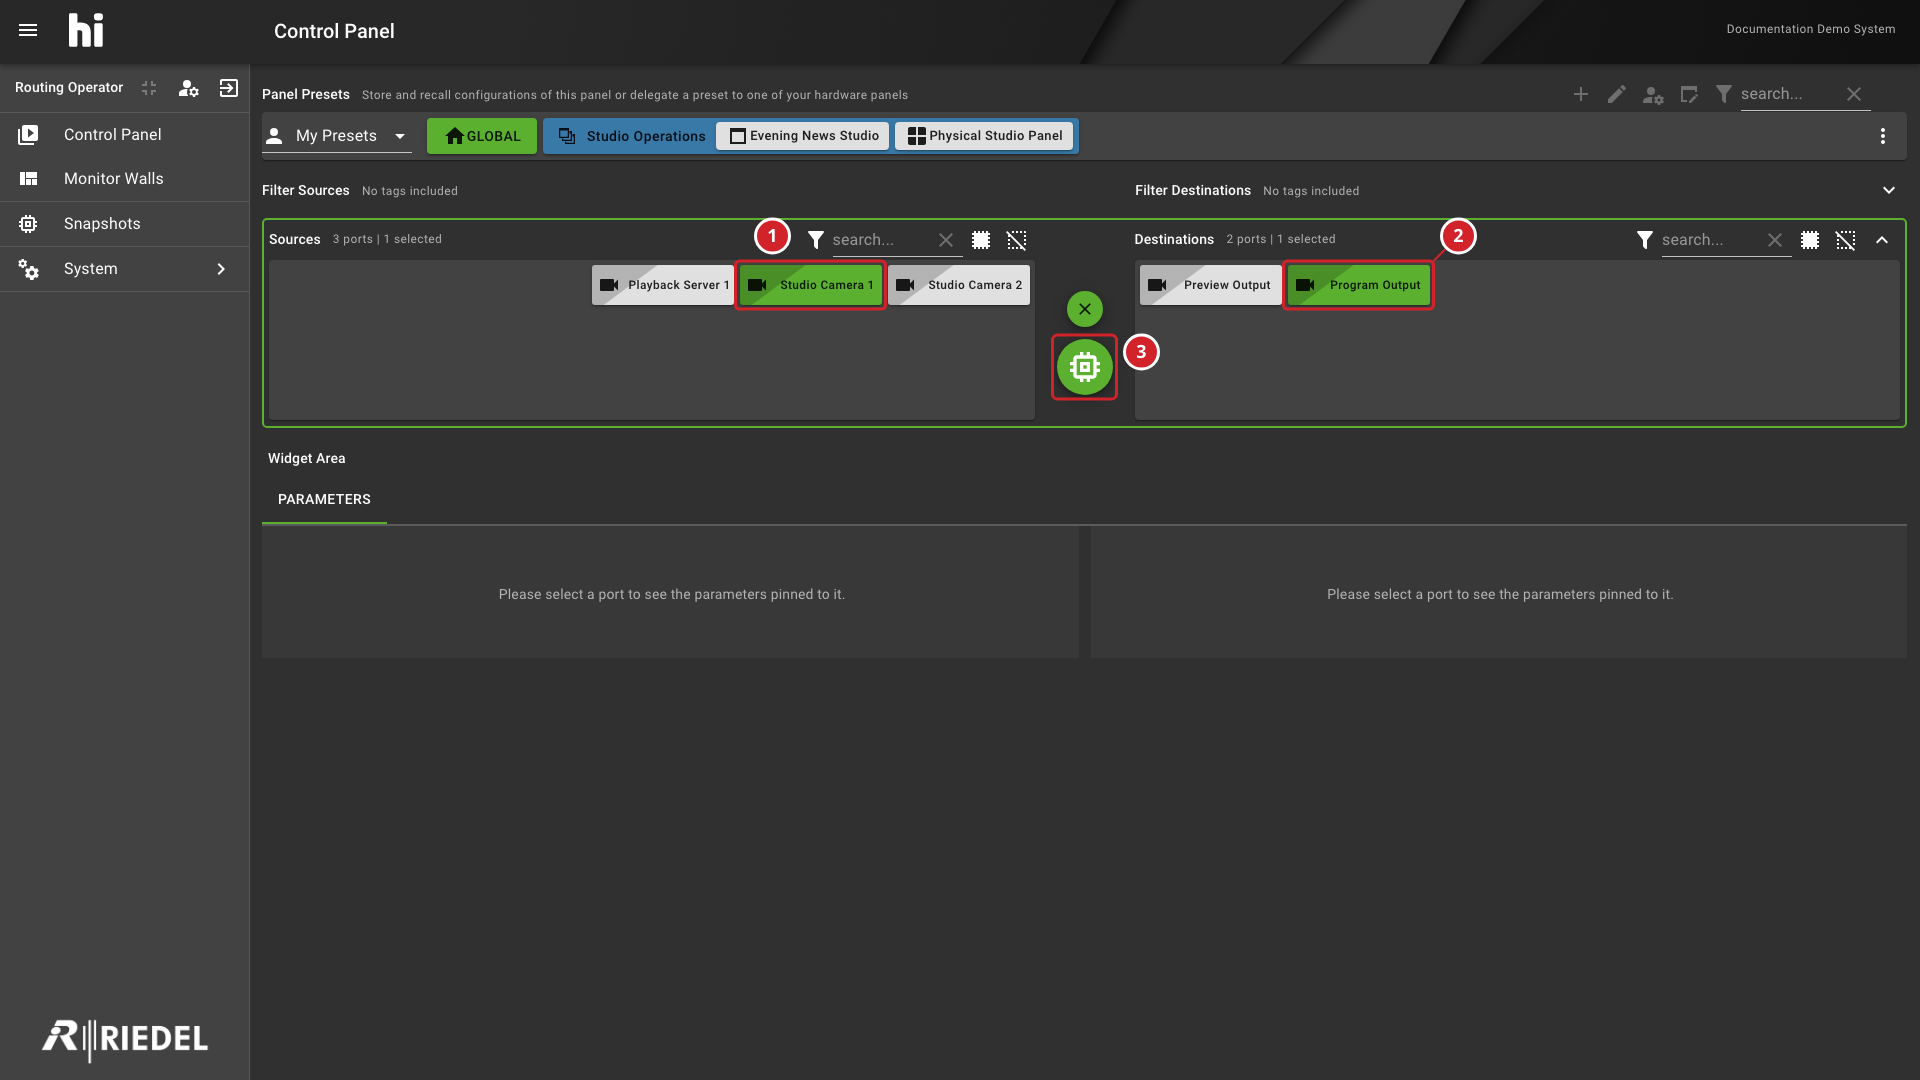
-
Studio Camera 1 is the selected Source.
-
Program Output is the selected Destination.
-
Create Snapshot opens the Select Snapshot dialog.
Create a New Snapshot
Enter a new name in Select Snapshot, then select Next. The example creates Morning News Studio from the selected Ports.
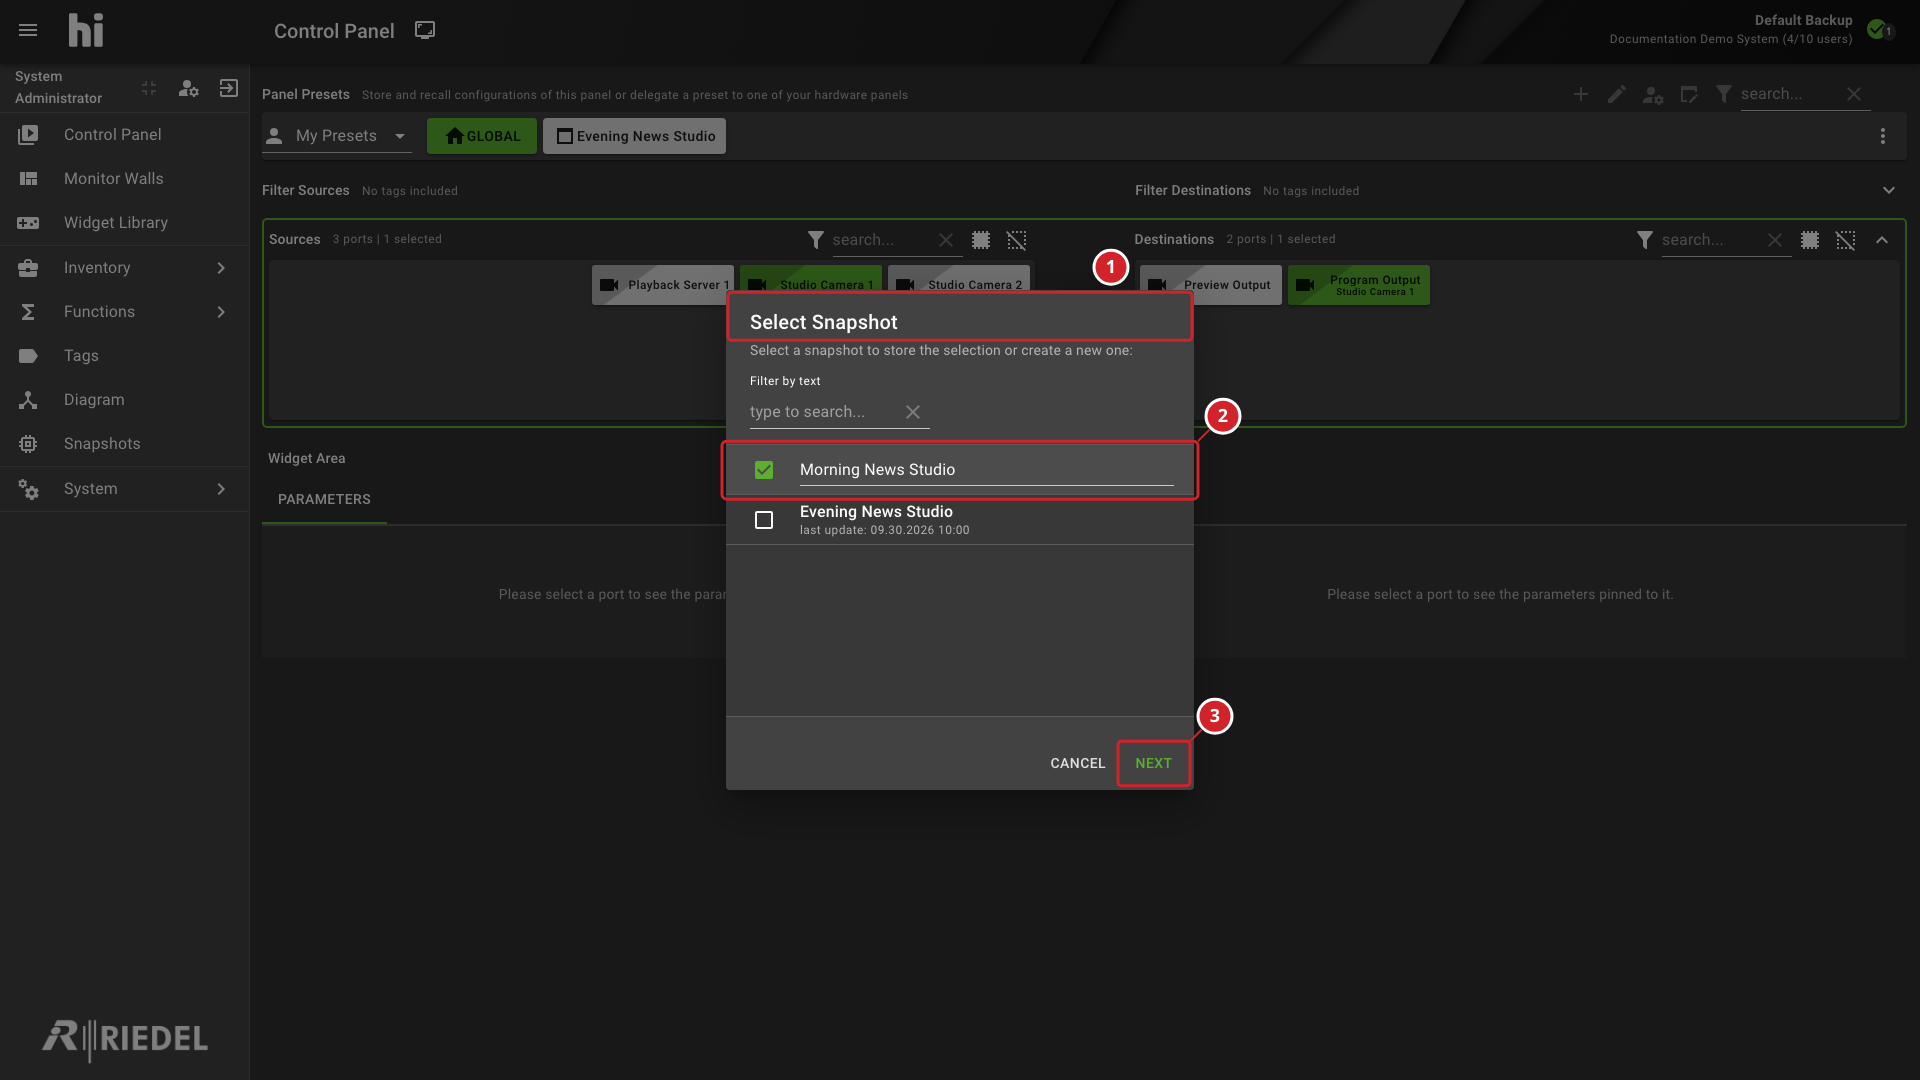
-
Select Snapshot chooses where to store the selected Ports.
-
Morning News Studio is entered as the new Snapshot name.
-
Select Next to select the components to save.
Select the component types to capture. This example saves the current connection of the selected Destination.
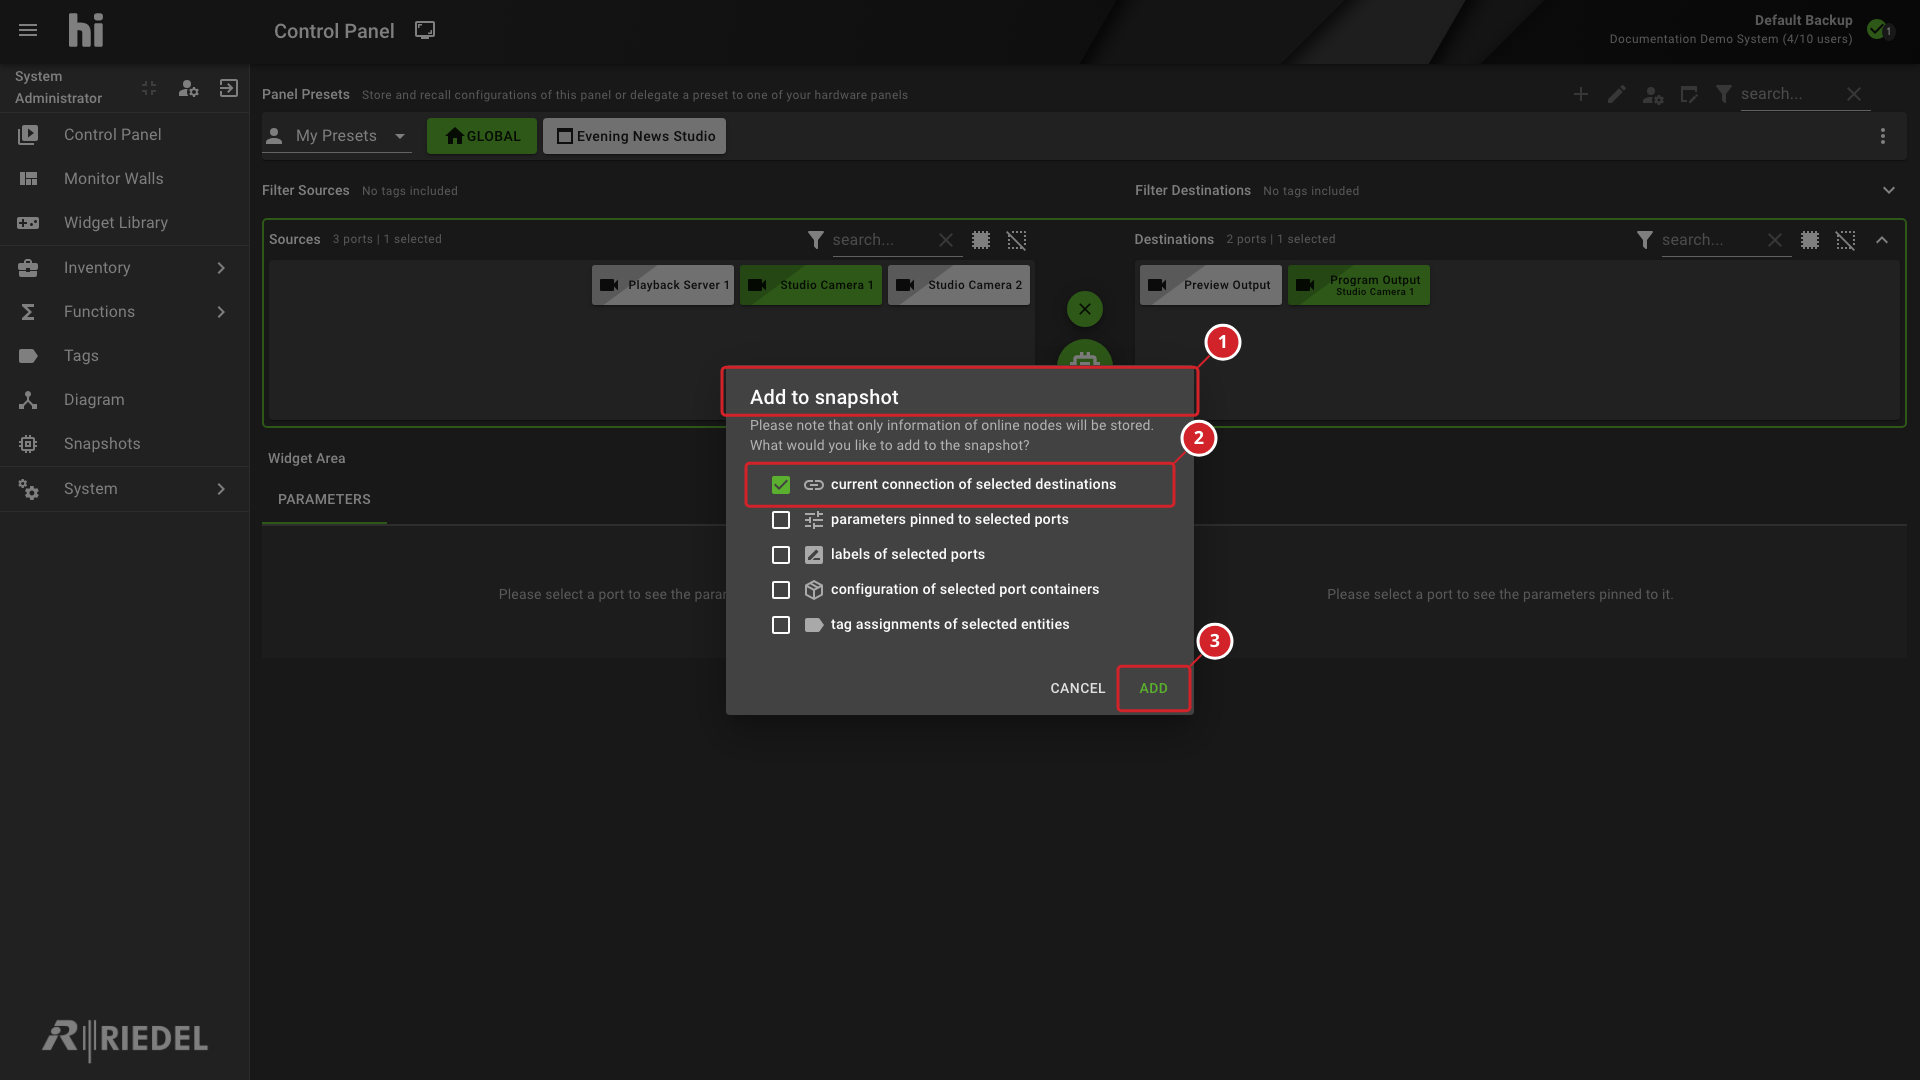
-
Add to snapshot shows the component types available for the selected Ports.
-
current connection of selected destinations is selected in this example.
-
Select Add to create the Snapshot with the selected components.
Add to an Existing Snapshot
The example below selects an existing Snapshot. Enter a new name instead when creating a new Snapshot.
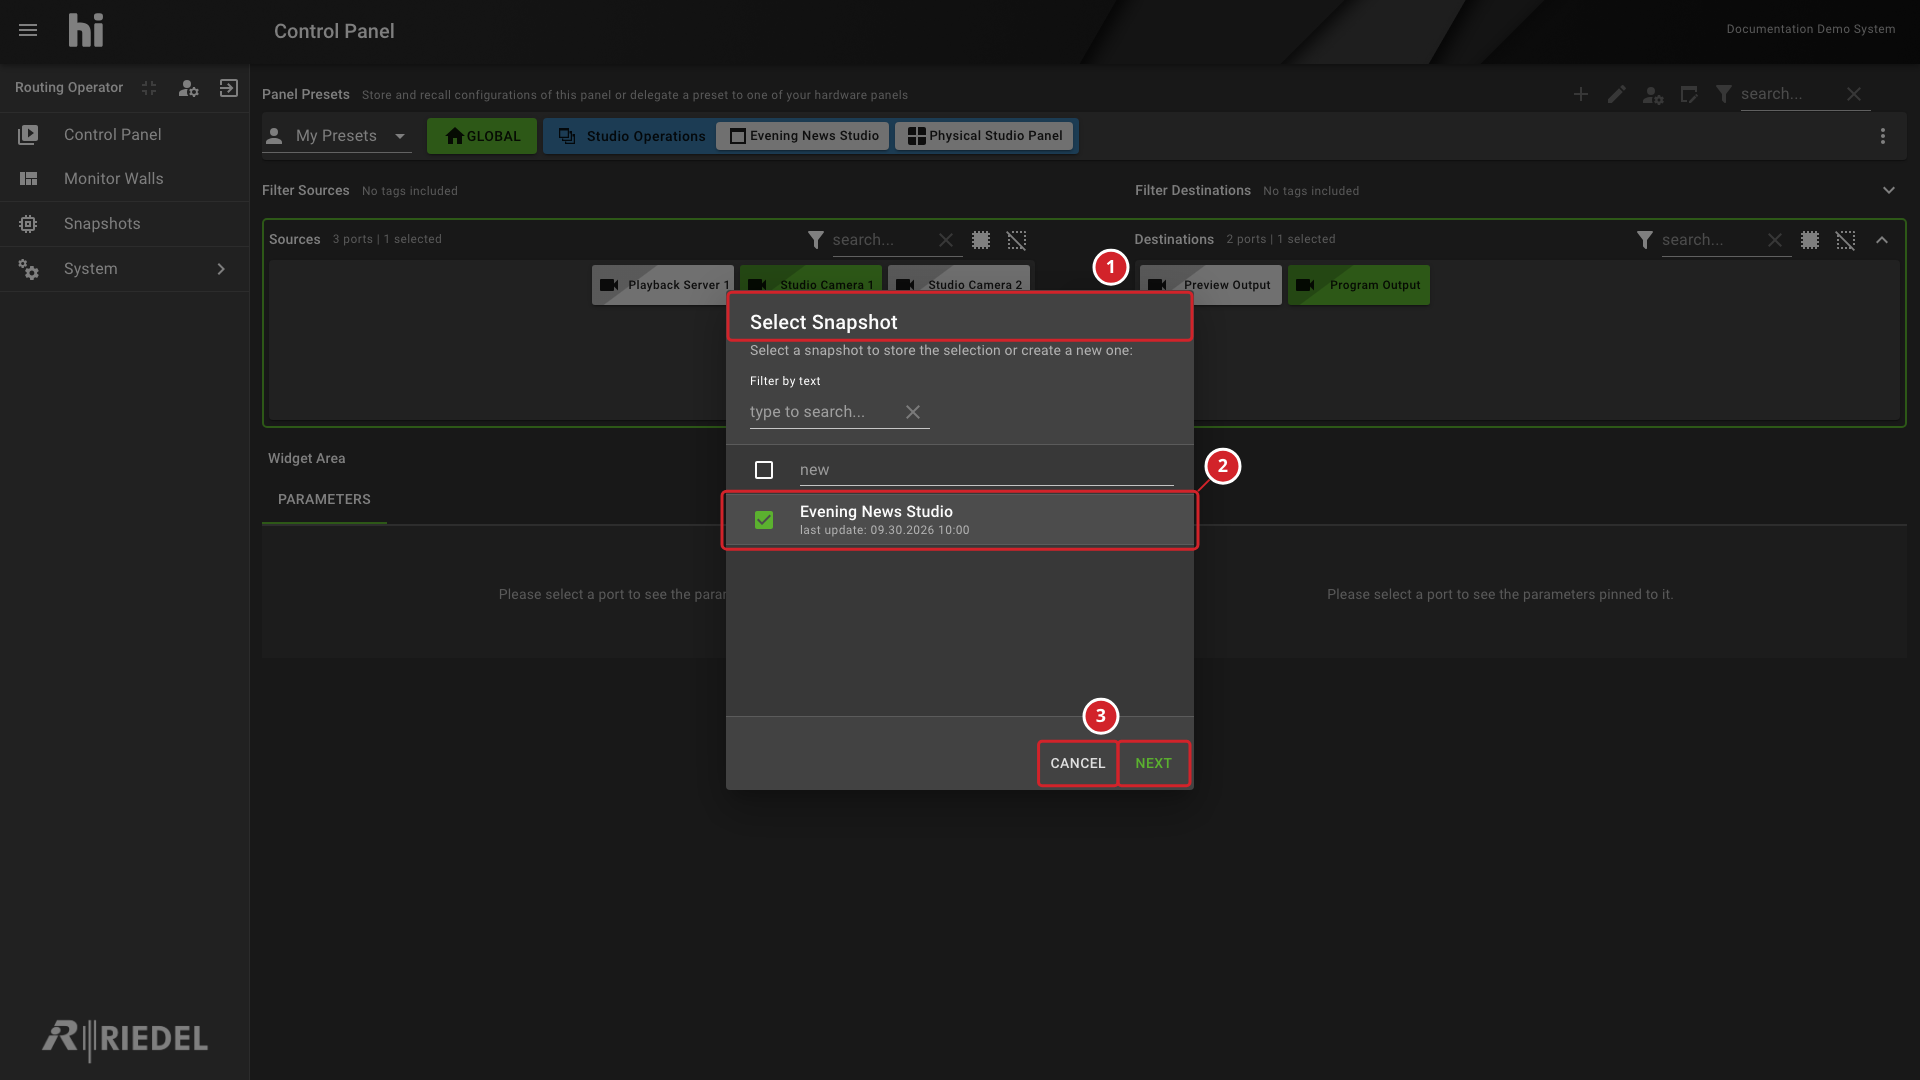
-
Select Snapshot chooses where to store the selected Ports.
-
The existing Evening News Studio Snapshot is selected.
-
Select Next to select components, or Cancel to close the dialog.
Select Components and Add
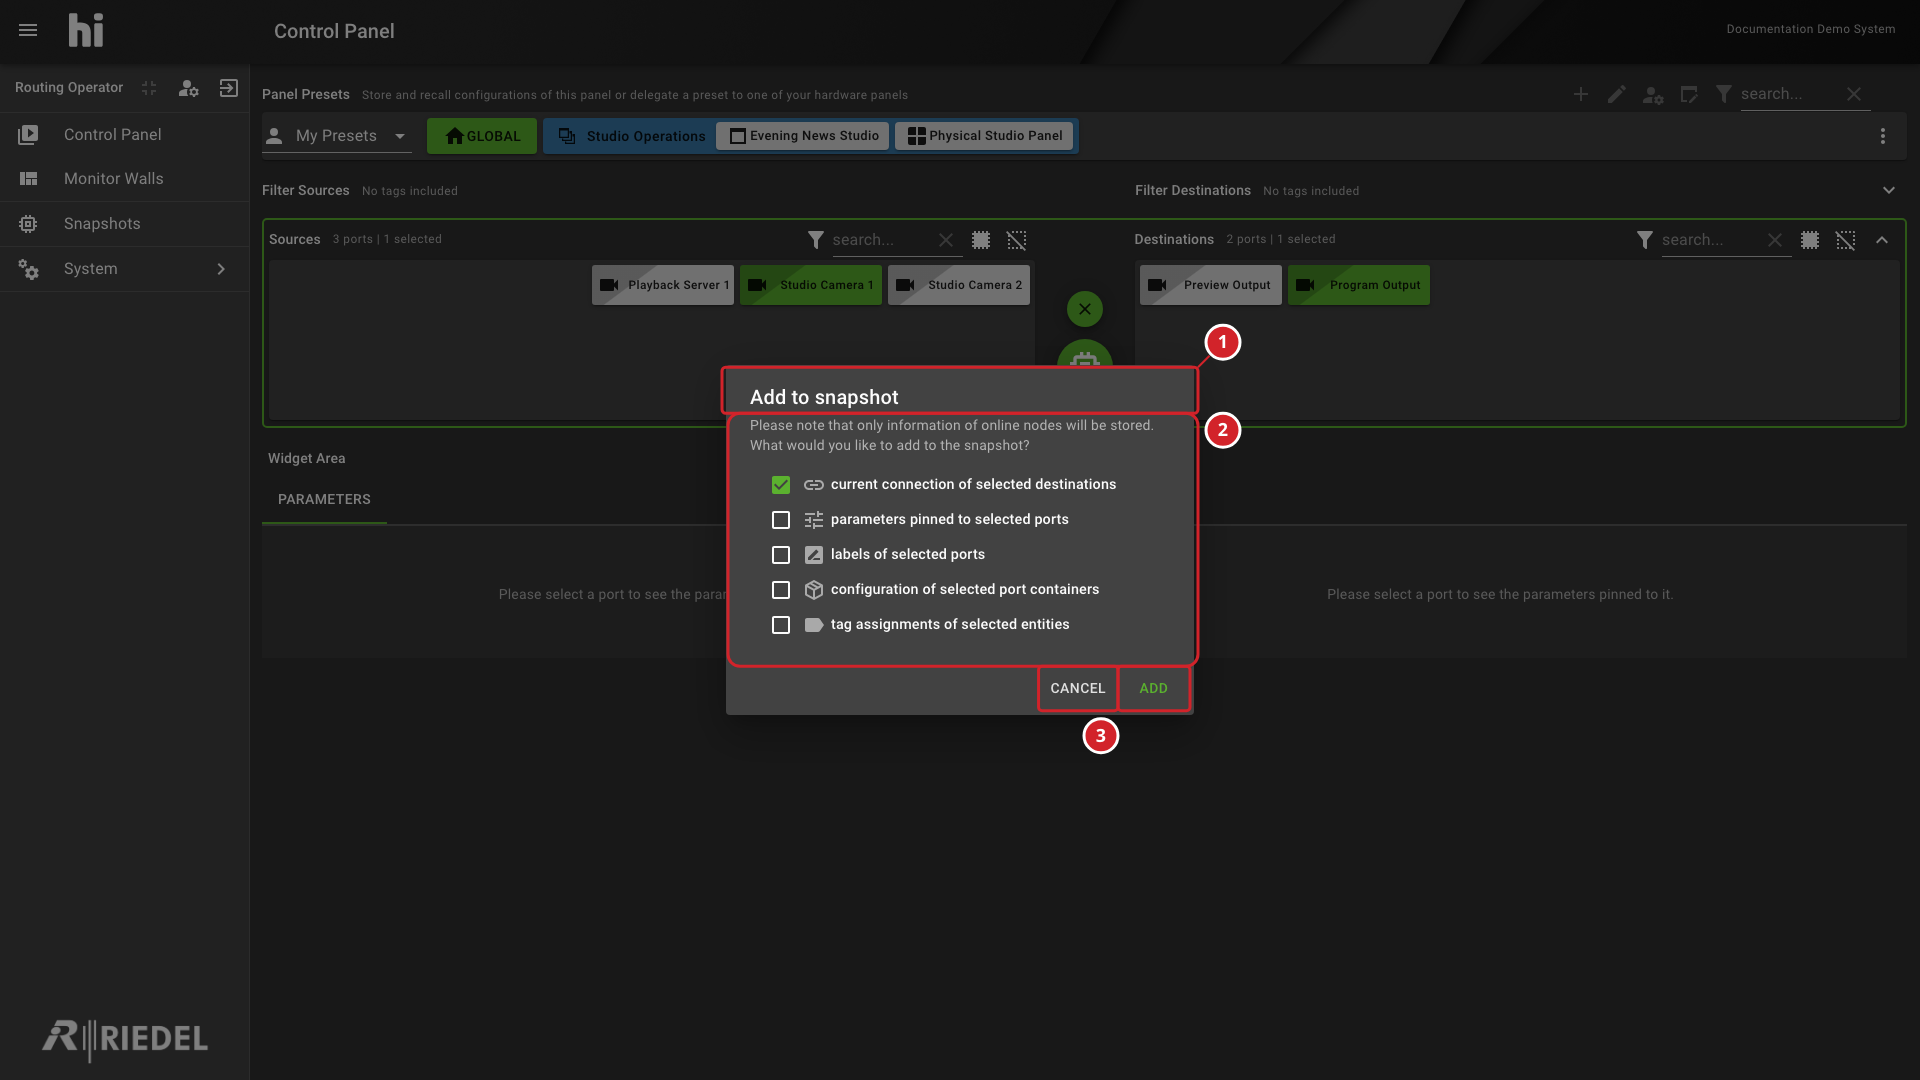
-
Add to snapshot chooses the components to add.
-
Select the components to add; current connection of selected destinations is selected in this example.
-
Select Add to confirm the component selection, or Cancel to close the dialog.
Capture Labels and Tag Assignments from a Node
Select Ports on a Node's Labels tab, then select Create Snapshot in the three-dot menu to open the same Select Snapshot dialog. This path offers only labels of selected ports and tag assignments of selected entities. It requires the Snapshot admin role.
Verify the Result
Open the saved Snapshot in the Snapshots workspace. Confirm that the selected components are present and that their saved values match the state you intended to capture.
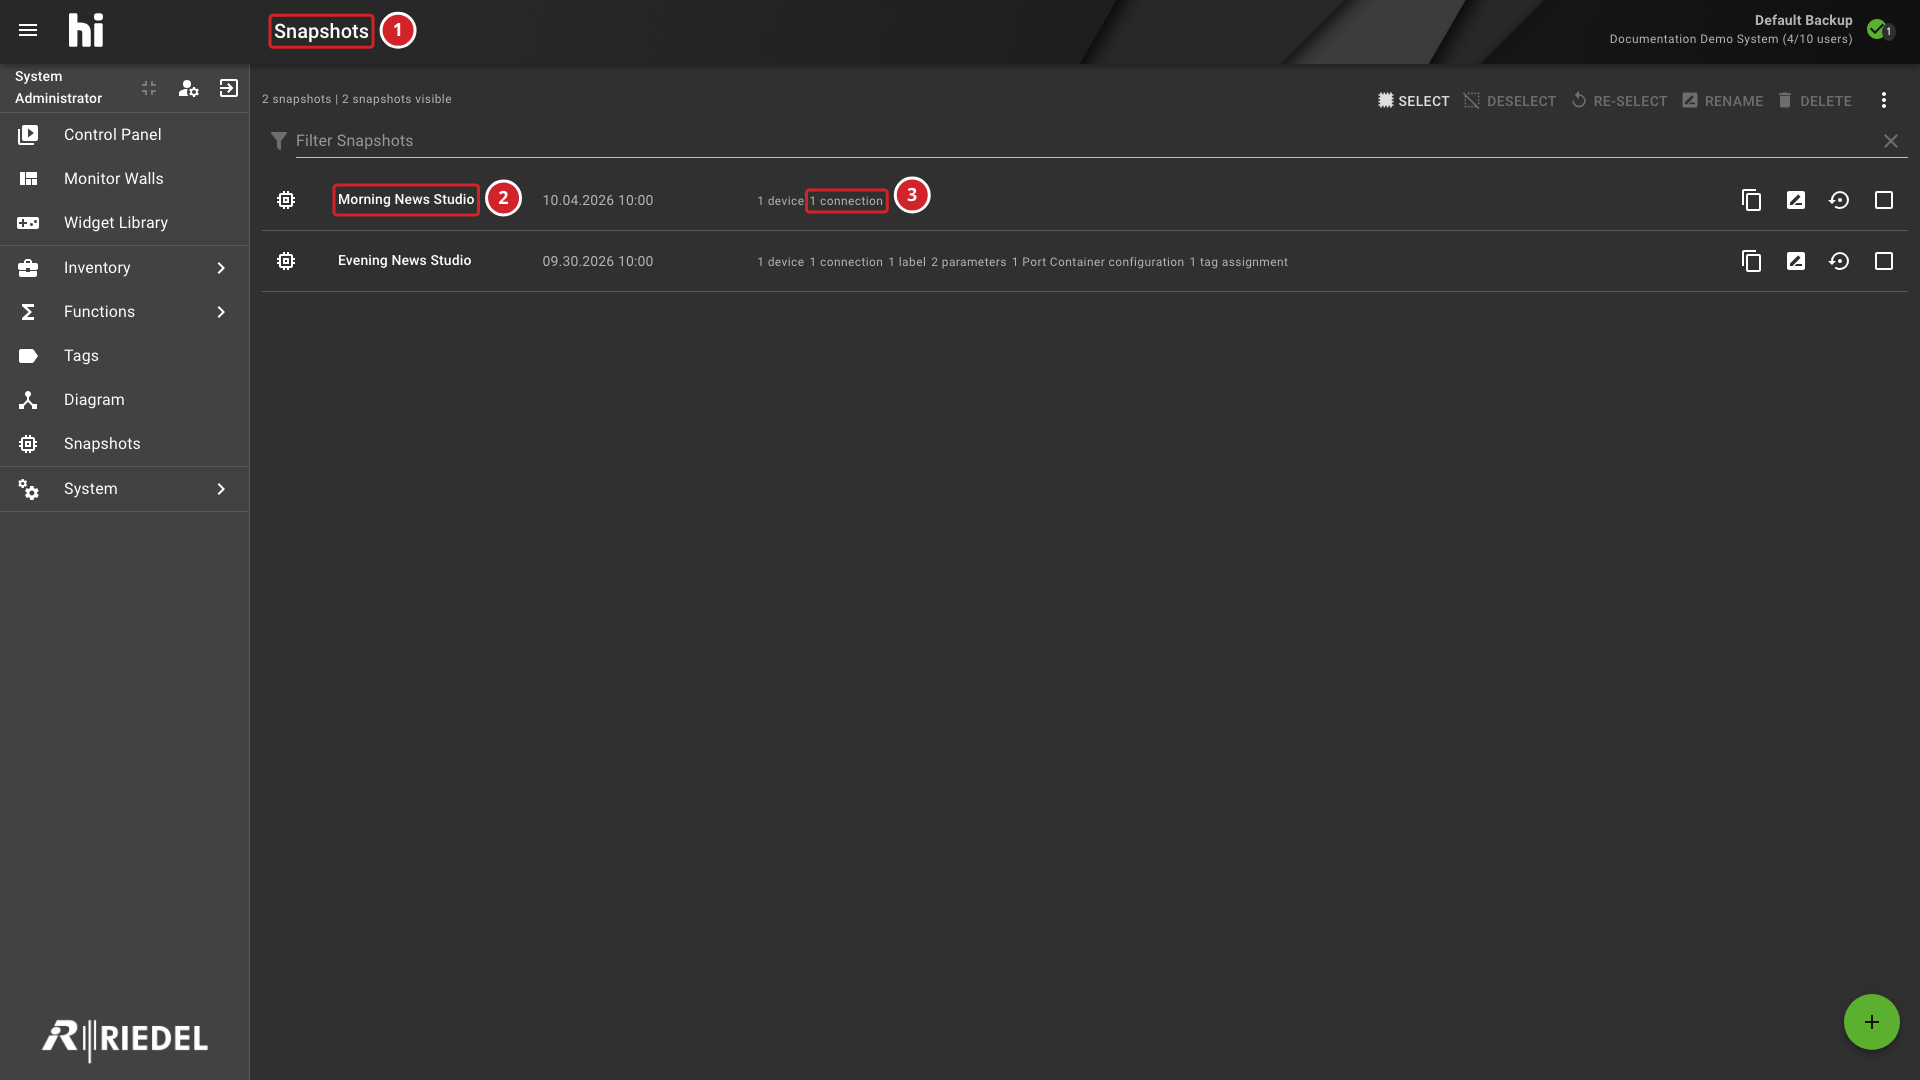
-
The Snapshots workspace lists the saved Snapshots.
-
Morning News Studio appears in the Snapshots list.
-
1 connection identifies the saved connection count for this Snapshot.
Next Steps
Inspect the saved component tabs before recalling the Snapshot.